A deployment share
is a shared folder that target machines connect to during the
deployment process. From the deployment share, files that are needed
for the deployment process such as scripts are copied to the target
machine. We created a deployment share on a
Windows 2008 R2 Server named DeploySrv, the deployment share name was
MDT Lab, and it had a local path of F:\MDTLab. The shared folder name was MDTLab$, which is a hidden share name. The network path (UNC) was \\DeploySrv\MDTLab$.
We'll start by opening the properties of the
deployment share. You can do that by right-clicking the deployment
share and choosing Properties. You don't need
to customize the installation; you could just go ahead and deploy, but
every company is slightly different. Every user would have to spend
30-40 minutes the first time they fired up their new computer, but you
could instead configure most settings according to your company
standard, and save a lot of money.
The properties dialog box of a deployment share
contains six tabs: General, Rules, Windows PE x86 Settings, Windows PE
x86 Components, Windows PE x64 Settings, and Windows PE x64 Components.
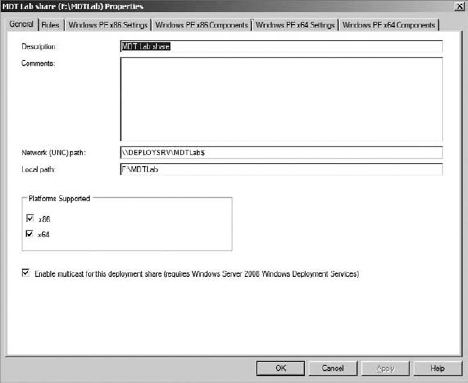
The General tab, shown in Figure 1,
displays fields for the description, comments, network (UNC) path, and
local path of the deployment share. The platforms supported by default
are x86 (32-bit) and x64 (64-bit). This explains why when you updated
the deployment share for the first time, a 32-bit and 64-bit custom
WinPE containing the MDT scripts LiteTouchPE_x86.wim and LiteTouchPE_x64.wim were created in the F:\MDTLab\Boot folder. Along with the WIM files, ISO files were created named LiteTouchPE_x86.iso and LiteTouchPE_x64.iso (which you could easily burn to a CD that you could use to boot the target machine).
If you select x86 only as your supported platform by
de-selecting the x64 check box on the properties page of the deployment
share, then only the LiteTouchPE_x86.wim and LiteTouchPE_x86.iso will be created. And if you choose only x64 as a supported platform, the LiteTouchPE_x64.wim and LiteTouchPE_x64.iso alone are created.
Using the properties dialog box, you can customize
WinPE by configuring the corresponding tabs. If you chose x86 as a
supported platform, you use the tabs Windows PE x86 Settings and
Windows PE x86 Components. The configuration parameters for the x64
WinPE are on the Windows PE x64 Settings and the Windows PE x64
Components tabs.
We'll get back to these tabs in just a second, but
first let's look at the last setting on the General tab: "Enable
multicast for this deployment share (requires Windows Server 2008
Windows Deployment Services)." By default this setting is deselected,
and there is good reason for that. MDT doesn't know if you have a
Windows Deployment Services (WDS) server. As you can see from the name
of this setting, MDT requires a WDS server. Normally (with this setting
deselected), MDT distributes images using unicast (using the SMB 2.0
protocol if using Windows Server 2008 or higher as the deployment
server, otherwise SMB 1.0) packets on the network. For an image to be
deployed to a target machine, the image files (usually between 2 GB and
5 GB in size) need to be sent to each computer. Now, if you deploy a
small number of machines at the same time, things will most likely work
nicely, but when the number of machines deployed at the same time
increases, you will load up the network and your switches and routers
will look like a Christmas tree.
There is one other big difference between unicast
and multicast: When using multicast, the image is first copied down to
the computer before being installed. The great thing about that is that
if you have networking issues, this method will be more resilient. A
multicast transfer will try to reconnect for a much longer period of
time than a unicast session will. For example, with multicast you can
unplug the cable during the multicast phase (do not try this in real
deployment scenarios) and then plug it in again and the image will
still be deployed; with unicast, you will most likely be forced to
redeploy the machine. With multicast you will have a lower number of
packets passing through switches and routers since it will be basically
one stream of packets, and that will also lessen the burden on the
deployment server. The problem is that MDT 2010 alone cannot provide
multicasting—only WDS can. When you select "Enable multicast for this
deployment share," you'll need to set up a WDS on the server that will
host the deployment share. We recommend you use
multicast, if possible. For now, you can leave it unchecked but when
everything is working the way you want it to, please go back and check
Enable Multicast and re-generate new boot images to start using
multicast.
From that point forward, when you deploy an image
from the MDT server the image will be handled by WDS, which can
distribute it via the multicast protocol.
Before we move onto the Rules tab, let's go back to
the supported platforms and look at your configuration options. The
Windows PE x86 Settings and Components tabs have settings identical to
those on the Windows PE x86 Settings and Components tabs. It's just
that the x86 settings and components determine the settings for the x86
WinPE (LiteTouchPE_x86.wim) and the x64 settings and components determine the settings for the x64 WinPE (LiteTouchPE_x64.wim). For this reason we'll cover only the options from one set of these tabs, the Windows PE x86 Settings and Components tabs.
On the Windows PE x86 Settings tab, shown in Figure 2,
in the Lite Touch Boot Image Settings pane, the Generate A Lite Touch
Windows PE WIM File is selected and you can't deselect this option. It
wouldn't make a lot of sense to choose to support x86 clients and then not create a LiteTouchPE_x86.wim, right? What you can change is the image description and whether or not the LiteTouchPE_x86.iso is created. If you are adding your LiteTouchPE_x86.wim file to a WDS server, there may be no need to create the LiteTouchPE_x86.iso,
which would result in the update of the deployment share finishing more
quickly. You can also edit the ISO filename if you have selected
Generate A Lite Touch Bootable ISO Image.
In the Generic Boot Image Settings pane, you can
choose to create a generic Windows PE WIM file and ISO image. Choosing
the generic boot image creates a WinPE file named Generic_x86.wim or Generic_x64.wim along with the accompanying ISO files (you would find these in the F:\MDTLab\Boot
folder) that do not contain the MDT scripts. The WIM and ISO files
created from the Lite Touch Boot Image Settings create the WinPE image
that contain the scripts needed for the MDT client wizard.
The Windows PE Customizations pane allows you to
change the background bitmap that is displayed when you boot a WinPE
image, add an extra directory to the WinPE image, and set your scratch
space size. First let's change the default custom background bitmap
file. The default background is displayed in Figure 3.

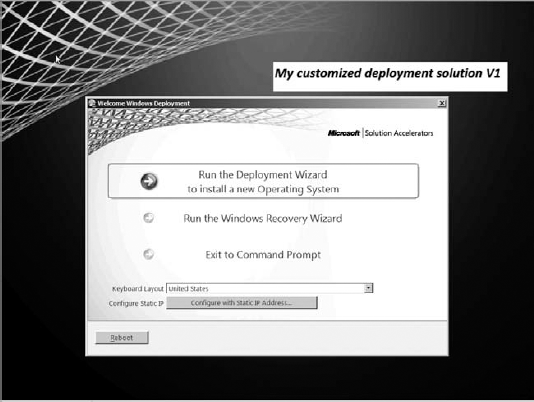
In the Custom Background Bitmap File box, browse to
the bitmap file you would like for your new background. The new file
will be copied into the new LiteTouch_x86.wim file in the Windows\System32 folder when you select Update Deployment share (that is the process that will create the WinPE.wim files) and rename to Winpe.bmp. A new background is shown in Figure 4.
|
It might seem inefficient to spend time modifying
the background image, but there are some real-world reasons. We have
seen deployment issues regarding different boot images where the IT
department updates new versions of the boot images when they put in new
drivers for new models and/or change rules in boot strap.ini. Other
technicians might not be aware of the fact that the boot images have
been updated to reflect the new environment changes and they might
still try to use the old boot images. That will almost certainly result
in error messages and a blocking issue; for example, the installation
will not continue. One way to avoid this issue is to update the image
every time you create new boot images; that way it will be very easy to
see what version they are using as boot images and if there is a
problem during a deployment, you can eliminate a number of problems by
just asking what version they are using to boot from and they would
easily see that directly on the screen.
|
The Extra Directory To Add field allows you to add folders and files to LiteTouchPE_xXX .wim. At first glance you might think, "I'll just browse to a folder that contains tools I like to have handy in my WIM file and the folder will appear at the root of my WIM
file (X:)." But that's not what happens. The folder itself does not get
added; only the files within the folder are added to the root of the WIM
file. Well, that's fine if you just have one tool to add but a bit
messy if you have a few tools you'd like to keep handy in the WIM file. If you add a folder with a subfolder that contains the tools, then the second folder does get added to the WIM file. That is, if you browse to C:\Tools to add it as an extra folder, only the contents of the folder are added. But when you browse to C:\Extra\Tools (where the Tools folder contains the additional tools), the Tools folder is added to the root of the WIM file.
The Scratch Space Size box provides an area in RAM
that acts as a temporary storage location for files. During the
deployment process, tasks are performed that require hard disk space.
There isn't any hard disk space until DiskPart.exe creates
and formats a volume. Until there is hard disk space, the scratch space
is used. MDT uses the scratch space for logging and configuration
files. It also uses the scratch space to inject drivers when deploying
Windows Vista and above. As you probably know, drivers tend to be a bit
larger than 32 MB which is the default scratch space size. So on a
production deployment share, you must change the scratch space to 128
MB to be able to inject some of the drivers.
The Windows PE x86 Components tab is shown in Figure 5. Here you'll find options related to driver injection, feature packs, and optional fonts to be included in LiteTouch_x86.wim.
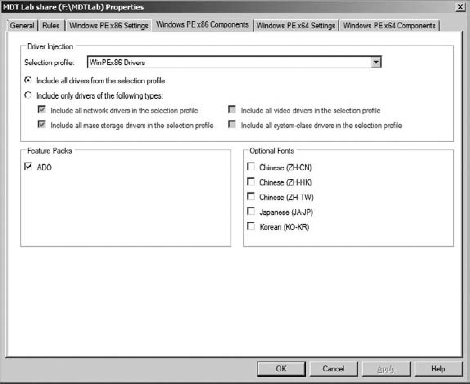
In the Driver Injection pane, you can choose a
selection profile from the drop-down list. Selection profiles must be
created before you can use them here. In WinPE you only need drivers to be
able to access the deployment share, so follow these steps:
Create two folders under Out-Of-Box Drivers using the Deployment Workbench by browsing to the Out-Of-Box Drivers folder, right-click, and select New Folder. Call one of the new folders WinPEx86 and the other WinPEx64.
Browse
to Advanced Configuration\Selection Profiles and create two selection
profiles, one called WinPEx86 Drivers (which only includes Out-Of-Box Drivers\WinPEx86) and the other called WinPEx64 Drivers (which only includes Out-Of-Box Drivers\WinPEx64).
Return
to the Windows PEx86 Components tab and select the "WinPEx86 Drivers
Selection" profile and then do the same for Windows PE x64 Components
tab. This way, you will only include the drivers that are needed for
booting WinPE. Doing so will make the WinPE image smaller, more stable,
and faster to load. Otherwise, the image would include all network
drivers and storage drivers you have in the Out-Of-Box Driver folder. It would also mean that regenerating the boot image would take a long time every time you added or removed a driver.
In the Feature Packs pane notice that ADO is
selected by default. ADO stands for ActiveX Data Objects, which is a
COM object that provides communications to data sources such as the MDT
database.
The Optional Fonts options are pretty self-explanatory; the listed fonts can be added to LiteTouchPE_xXX.wim by simply putting a check mark in the accompanying box and regenerating LiteTouchPE_xXX.wim.
There is one more reason to select only the platform
that you will be deploying to. If you are only going to be deploying,
say, 32-bit images, you can speed things up by deselecting x64 as a
supported platform. That way, when you update your deployment share
only one set of WinPE WIM and ISO files is generated. Let's get back to
the Rules tab now in the deployment share's properties dialog box.
The Rules tab, shown in Figure 6,
displays a list of settings that determine the behavior of the MDT
client wizard. The Rules tab displays the settings that are stored in
the CustomSettings.ini file in MDTLab/Control. These settings are a combination of the CustomSettings.ini template found in CustomSettings.ini in C:\Program Files\Microsoft Deployment Toolkit\Templates and the answers you provided when running the New Deployment Share Wizard.
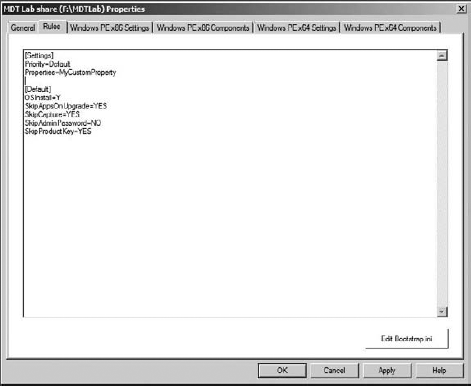
When you compare the CustomSettings.ini template with your deployment share's CustomSettings.ini displayed in the Rules tab, you can see that the template settings have been modified: SkipCapture=YES is now set to NO and the SkipAdminPassword=NO is set to YES.
What do these settings mean and what can they be set to? The following
list describes each setting and explains where the setting originated
from and how it can change the behavior of the MDT client wizard:
[Settings]
, Priority=Default, and [Default]
The first section, [Settings], points to which section the MDT client wizard should begin reading during the deployment process. Under the [Settings] section, the Priority=Default setting points to the [Default] section heading, so this is where the MDT client wizard will begin reading the settings during the deployment process.
OSInstall=Y
This setting allows the target machine to
receive an operating system. If this setting is not listed, then
deployment of an OS is allowed to any target machines. If this setting
is set to N, then no OS will be deployed. There are built-in
task sequence (TS) templates that do not deploy OSs but that perform
other functions like the Sysprep And Capture TS and the Post OS
Installation TS.
SkipAppsOnUpgrade=YES
This setting is from the CustomSettings.ini
template. During the deployment of an OS, the MDT client wizard
presents the Select One Or More Applications To Install page, which
lists applications you've added to the MDT Deployment Workbench. When
technicians are performing the installation, they can select
applications to be installed after the OS is installed successfully.
Setting this to YES will prevent the page from being displayed. Setting it to NO presents this page during deployment. Please note that the SkipAppsOnUpgrade
property applies to upgrades only and therefore is not commonly used.
For normal deployments (bare-metal, refresh, or replace scenarios), the
property for the Select One Or More Applications To Install page is SkipApplications=YES/NO.
SkipCapture=NO
If set to YES, this setting will
tell the MDT client wizard to not ask if you would like to create a
reference image (Sysprep & Capture). The reason you'd select
Prepare is that for some reason you don't want the wizard to do the
Sysprep step for you; instead you would like to perform that step
manually.
SkipAdminPassword=YES
During the creation of the deployment share you
saw the option Ask User To Set The local Administrator Password. You
accepted the default setting to not ask the user to set the local
administrator password, which resulted in SkipAdminPassword=YES.
This setting causes the MDT client wizard to skip this page during the
deployment process. If you would like this page to be displayed during
deployment, set SkipAdminPassword to NO.
SkipProductKey=YES
Enterprise clients do not need to worry about
entering a product key but all non-Enterprise clients will need to do
so. Upon creation of the deployment share, you saw the option Ask User
For A Product Key. You accepted the default to not ask the user to
enter a product key, which resulted in SkipProductKey=YES. If you prefer this page to be displayed during deployment (so someone can type in a product key), SkipProductKey=NO will do just that.
At this point you may be thinking, "Okay, I
understand where these settings came from and how they were modified
when the deployment share was created, but what happens when you leave
the settings as SkipAdminPassword=YES and SkipProductKey=YES?
How does the local Administrator account get a password? And where does
the product key come from?" Well, you could supply them in the Rules
tab; the entries would look like this:
[Settings]
Priority=Default

[Default]
OSInstall=Y
SkipAppsOnUpgrade=YES
SkipCapture=NO
SkipAdminPassword=YES
AdminPassword=P@ssw0rd
SkipProductKey=YES
OverrideProductKey=11111-22222-33333-44444-55555
Before we move on, we'll talk a bit about the password for the local Administrator account. If you leave SkipAdminPassword=YES
and you do not supply a local administrator password in the properties
of the deployment share Rules tab, then whatever password you supplied
in the task sequence you created will be used. You'll learn more when
we get to the properties of the task sequences.
Before we leave the Rules tab, let's look at the
Edit Bootstrap.ini button in the bottom-right corner. Clicking this
button displays the following:
[Settings]
Priority=Default

[Default]
DeployRoot=\\DeploySrv\MDTLab$
The settings from the Bootstrap.ini file were generated just like the CustomSettings.ini file. The template Bootstrap.ini found in the C:\Program Files\Microsoft Deployment Toolkit\Templates
folder was copied to the deployment share and then modified when you
created your deployment share to include the network path (UNC) of your
deployment share. This file is read by the MDT client wizard to locate
the root of the deployment share. When you click the Edit Bootstrap.ini
button, you are actually looking at the contents of your Bootstrap.ini file in F:\MDTLab\Control.
