Applications you add to the Deployment Workbench appear under the Deployment Workbench/Deployment Shares/Name of your deployment share/Applications
node. There are two ways to view the properties of an application. You
can right-click the application name and choose Properties, or you can
double-click the application name. The properties dialog box of an
application has three tabs: General, Details, and Dependencies. (If the
application is a Microsoft Office 2007 or Office 2010 application, it
will have a fourth tab called Office Products.) The General tab is
shown in Figure 1.
The General tab displays the Name, Comments, Display
Name, Short Name, Version, Publisher, Language, and Source Directory
attributes. When you added the application by running the New
Application Wizard, you were asked a series of questions. If you
answered the questions or filled in the boxes, the information you
supplied then is displayed on the General tab.
The Source Directory field specifies where the target machine should look for application files (like Setup.exe or Install.exe) to install after the OS deployment has completed successfully. Applications\Microsoft Office Pro Plus 2010\ points the target machine to the root of the deployment share (\\DeploySrv\MDTLab$\). From the root it will then look in the \Applications\Microsoft Office Pro Plus 2010 folder, so the complete path is \\DeploySrv\MDTLab$\Applications\Microsoft Office Pro Plus 2010.
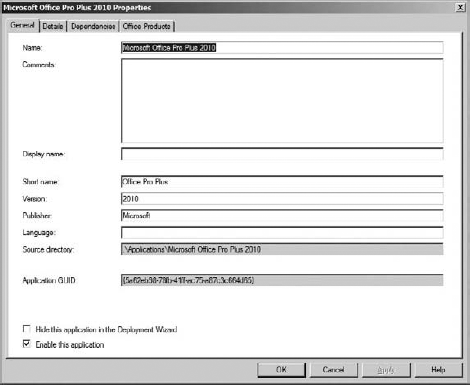
At the bottom of the General tab are two selections:
Hide This Application In The Deployment Wizard and Enable This
Application. The first option prevents the application from being
listed on the Select One Or More Applications To Install page of the
MDT Deployment Wizard. If you have applications that you do not want
listed during the deployment process but you do want to install, add
the application on the Rules tab of the deployment share properties (CustomSettings.ini).
The Enable This Application
option is selected by default, but if you have an application that
you're not ready to deploy, you can deselect this option. Applications
that have been disabled or set to hide will not appear on the list of
available applications to install during the deployment process.
Changing these settings (enabling an application or choosing to no
longer hide an application) does not require you to update your
deployment share, so feel free to test these settings out. Just change
the option of your choice and then launch LiteTouchPE_xXX again and your new setting will take effect.
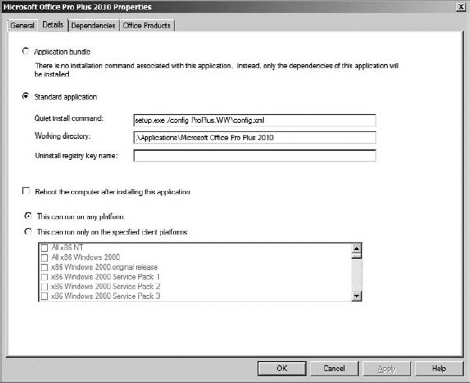
The Details tab, shown in Figure 2,
allows you to choose either an application bundle or a standard
application. (We'll discuss the Application Bundle option last.) A
standard application is one you would like to install, and you must
complete the Quiet Install Command and Working Directory fields. The
Quiet Install Command is the command that performs the installation in
quiet or silent mode. A quiet or silent mode is also called unattended
mode sometimes; it means that the installation of the application does
not require any kind of user input. Working Directory is where the MDT
Deployment Wizard will look for the application's source files.
The last setting for a standard application is
Uninstall Registry Key Name. The key name identifies applications that
are already installed on the target machine so that no attempt is made
to install the application if it already exists on the machine. To find
the value you need to enter in this field, check the Registry of a
machine that currently has the application installed.
For example, let's say you want to find the
uninstall key for Microsoft Office. On a machine that has Microsoft
Office installed, open the Registry (click the Start button and type Regedit in the Search Programs And Files box and press Enter) and drill down to HKEY_LOCAL_MACHINE\Software\Microsoft\Windows\CurrentVersion\Uninsta11. Under the Uninstall key, you'll need to find the subkey that pertains specifically to Microsoft Office.
The first thing you'll probably notice is you're
looking at a bunch of GUIDs. So to find the GUID that belongs to
Microsoft Office, highlight each GUID until you find the one that has a
display name of "Microsoft OfficeOffice 64-bit Components 2010" (the
machine we tried this on is running Windows 7 64-bit). When you find
the correct display name, copy the information by right-clicking the
GUID and choosing Copy Key Name. This will put the key name, HKEY_LOCAL_MACHINE\SOFTWARE\Microsoft\Windows\CurrentVersion\Uninsta11\{90120000-002A-0000-1000-0000000FF1CE}, into your Clipboard. Now open Notepad and press Ctrl+V; then just copy and paste the GUID {90120000-002A-0000-1000-0000000FF1CE}, including the curly brackets, into the Uninstall Registry Key Name field.
This setting is not important in all installation
scenarios. A bare-metal machine would not have any applications
installed, so it would be a waste of time to configure this setting if
you are only performing bare-metal installations. But if you are
creating a task sequence using the Post OS Installation task sequence
to install applications on machines that already have an OS, this
setting may come in handy. You might have seven applications that
always need to be installed on your users' desktop machines, and a
quick fix for a missing application would be to run the MDT Deployment
Wizard and choose the Post OS Installation task sequence. This task
sequence should be configured with the appropriate uninstall keys for
all seven applications. When the task sequence runs, only the
applications that do not currently have an uninstall key in the
Registry would be installed.
|
If an application needs to reboot the machine before
it can continue or complete successfully, you'll want to put a check
mark in the Reboot The Computer After Installing The Application box. Never
allow an application to reboot during the MDT deployment process. You
must allow the MDT to control when reboots occur or you will lose
control of your installation and the MDT Deployment Wizard will have
problems knowing where and how to continue. It will more or less be
lost. When it gets lost, your deployment will fail.
|
The last two settings on the Details tab pertain to
which operating systems this application should be installed on. You
can choose This Can Run On Any Platform (the default). Or you can
select This Can Run Only On The Specified Client Platforms. You must
then select the platforms (down to the service pack level) that you
would this application to be installed on.
Finally, the Application Bundle radio button at the
top of the Details tab lets you set up dependencies for applications to
be installed in a specific order. You configure that order on the
Dependencies tab.
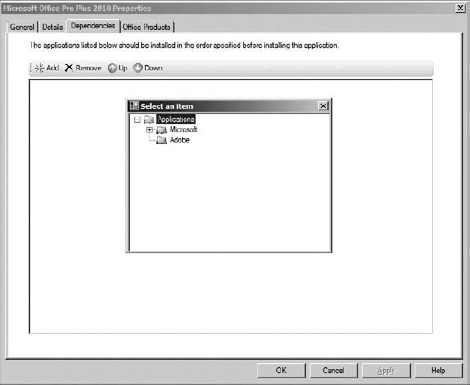
The Dependencies tab, shown in Figure 3,
lists the other applications that need to be installed successfully
before this application can be installed. Click Add and the Select An
Item box appears, as shown in Figure 3.
In the Select An Item box, expand the folders to browse to the
application you want and click OK. The application will then be listed
on the Dependencies tab.