You'll need to expand the Deployment Share/Operating Systems/W7 node in
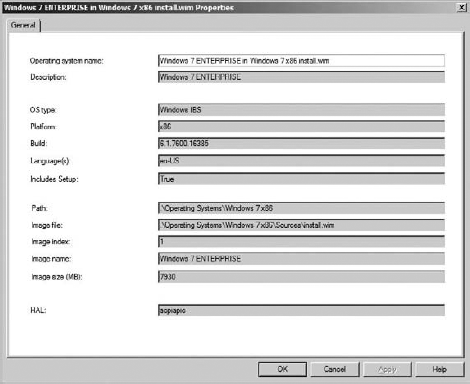
the Deployment Workbench . Right-click Windows 7 Enterprise in Windows 7 x86 install.wim and choose Properties; the result is displayed in Figure 1.
The properties of the operating system cannot be
edited from here, so let's walk through the properties first and then
you'll learn how you can edit them if needed:
Operating System Name
The name you gave the OS when you added it to the Deployment Workbench.
Description
The OS description you supplied.
OS Type
Shows Windows IBS (Image-Based Setup).
Platform
Displays either x86 or x64 (or ia64).
Build
Shows the complete build number.
Language(s)
Displays the language.
Includes Setup
Set to true or false, determines whether Setup.exe is included in this image.
Path
Displays the folder that was created within the deployment share to store the OS.
You imported your OS into the F:\MDTLab\Operating Systems\Windows 7 x86 folder). The . (dot) represents the root of the deployment share, or in this case, F:\MDTLab. So .\Operating Systems\Windows 7 x86 really represents the F:\MDTLab\Operating Systems\Windows 7 x86 folder.
Image File
Shows the image file or WIM you added (Install .wim, in this case).
Image Index
Displays the index number. A single WIM file
could have multiple WIM files within it. Here you can see 1 as the
index number and, since the Enterprise version of Windows 7 by default
only contains one install image, it makes sense.
Image Name
Shows the name of the image inside the WIM file.
Image Size (MB)
Contains the size of the image file in megabytes.
HAL
Shows the hardware abstraction layer (HAL) or
ACPI APIC (with this evolution of the OS, the HAL has become more
generic and less of an issue with deployment).
As you know, the process of importing an OS takes
some time to complete. So if you have added an OS and now want to make
a change to one of these settings, you have to open the OperatingSystems.xml file in F:\MDTLab\Control.
Or if you don't mind waiting, you could delete the OS and add it again,
this time making your changes. Editing the XML file is not a lot of
fun; Listing 1 shows its contents.
Example 1. OperatingSystems.xml
<?xm1 version="1.0" encoding="utf-8"?>
<oss>
  <os guid="{e97ff94c-1b21-4a66-86ec-0d708c73683e}" enable="True">
    <Name>Windows 7 Enterprise in Windows 7 x86 install.wim</Name>
    <CreatedTime>9/27/2009 11:03:58 PM</CreatedTime>
    <CreatedBy>DEPLOY\Administrator</CreatedBy>
    <LastModifiedTime>9/27/2009 11:03:58 PM</LastModifiedTime>
    <LastModifiedBy>DEPLOY\Administrator</LastModifiedBy>
    <Description>Windows 7 ENTERPRISE</Description>
    <Platform>x86</Platform>
    <Build>6.1.7600.16385</Build>
    <OSType>Windows IBS</OSType>
    <Source>.\Operating Systems\Windows 7 x86</Source>
    <IncludesSetup>True</IncludesSetup>
    <SMSImage>False</SMSImage>
    <ImageFile>.\Operating Systems\Windows 7 x86\Sources\install.wim</ImageFile>
    <ImageIndex>1</ImageIndex>
    <ImageName>Windows 7 ENTERPRISE</ImageName>
    <Flags>Enterprise</Flags>
    <HAL>acpiapic</HAL>
    <Size>7930</Size>
    <Language>en-US</Language>
</os>
|
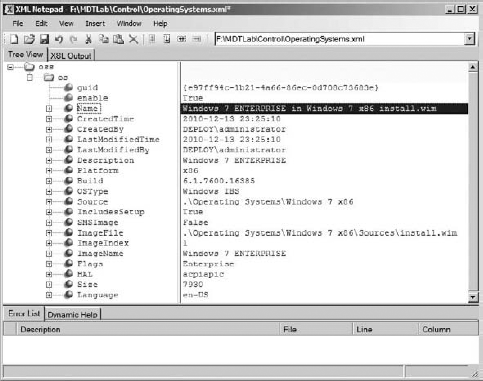
Microsoft has a wonderful free
XML editor called XML Notepad, and it is slightly easier to use than
Notepad, the built-in editor. Once you download and install XML
Notepad, you can open any XML file by right-clicking the file and
choosing Edit With XML Notepad. The same OperatingSystems.xml opened by XML Notepad is shown in Figure 2.
To change an attribute (such as the OS name,
description, or image name), double-click the attribute and change it
to whatever you like. For example, if you want to change Windows 7
Enterprise to read W7E, you highlight Name in the Tree View tab at the
top left, then double-click on Windows 7 ENTERPRISE in windows 7 x86 install.wim, type W7E,
and save your changes. The next time you open the Deployment Workbench
you'll see W7E as the name; if you already have the Deployment
Workbench open, refreshing the screen (by pressing F5) displays any
changes you made in OperatingSystems.xml.
A note of caution here: We do not recommend changing
the following attributes in this manner: OS Type, Platform, Build,
Language(s), Includes Setup, Image Index, Image Size, or HAL. These are
all attributes that were built into the Install.wim
file and should not be changed. The Path and Image File attributes
should be changed from within the Deployment Workbench or by moving
(using copy and paste) Operating Systems from one folder to another.
