Transitions determine how you
get from slide A to slide B. Back in the old slide projector days,
there was only one transition: the old slide was pushed out, and the new
slide dropped into place. However, with a computerized presentation,
you can choose from all kinds of fun transitions, including wipes,
blinds, fly-ins, and much more. These transitions are almost exactly
like the animations, except that they apply to the whole slide (or at
least the background — the base part of the slide — if the slide's
objects are separately animated).
NOTE
The transition effect for a slide refers to how the slide enters,
and not how it exits. As a result, if you want to assign a particular
transition while moving from slide 1 to slide 2, you would assign the
transition effect to slide 2.
The individual transitions are
hard to describe in words; it is best if you just view them onscreen to
understand what each one does. You should try out several transitions
before making your final selection.
1. Setting Transition Effects and Timings
The default transition effect
is None. One slide replaces another with no special effect. If you want
something flashier than that, you must choose it from the Transitions
tab.
As you are setting up the
transition effect, you have a choice of allowing it to occur manually
(that is, On Click) or automatically. Generally speaking, if there is a
live person controlling and presenting the show, transitions should be
manual. With manual transitions, the presenter must click the mouse to
move to the next slide, just like clicking the advance button on a 35mm
slide projector. This might sound distracting, but it helps the speaker
to maintain control of the show. If someone in the audience asks a
question or wants to make a comment, the show does not continue on
blindly, but pauses to accommodate the delay.
However, if you are preparing a
self-running presentation, such as for a kiosk, automatic transitions
are a virtual necessity. In the following section you will learn how to
set the timing between slides. Timings also are in effect when you
record narration.
To assign a transition effect and control its timing, follow these steps:
View
or select the slide in Normal or Slide Sorter view. If you use Slide
Sorter view, you can more easily select multiple slides to which you can
apply the transition.
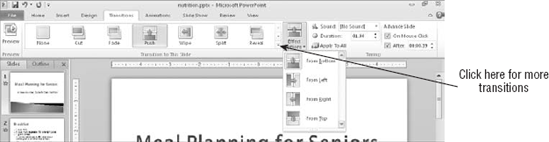
(Optional)
On the Transitions tab, in the Transition to This Slide group, click
the transition you want to use. Open the gallery to see additional
transitions if needed. See Figure 1. The effect is previewed on the slide.
If you do not want a transition effect, do not choose a transition; instead leave the default transition (None) selected.
Click
Effect Options and select any options for the chosen effect transition
as desired. The effects listed will be different depending on the
transition you chose.
In the Timing group, mark or clear the check boxes for:
On Mouse Click: Transitions when you click the mouse.
Automatically: Transitions after a specified amount of time has passed. (Enter the time, in seconds, in the associated text box.)
NOTE
It is perfectly okay to
leave the On Mouse Click check box selected, even if you choose
automatic transitions — in fact, this is a good idea. There may be times
when you want to manually advance to the next slide before the
automatic transition time has elapsed, and leaving this option selected
allows you to do so.
NOTE
You will probably want to
assign automatic transitions to either all or none of the slides in the
presentation, but not a mixture of the two. This is because mixed
transition times can cause confusion, when some of the slides
automatically advance and others do not. However, there may be
situations where you need to assign different timings and effects to the
various slides' transitions.
(Optional) Adjust the Duration setting to specify how quickly the transition effect will occur.
This
is not the timing between slides, but rather the timing from the
beginning to the end of the transition effect itself. For example, for a
Fade transition, it determines how fast the fade occurs.
(Optional)
If you want a sound associated with the transition, select it from the
Sound drop-down list. See the next section for details.
(Optional) If you want these same transition settings to apply to all slides in the presentation, click Apply to All.
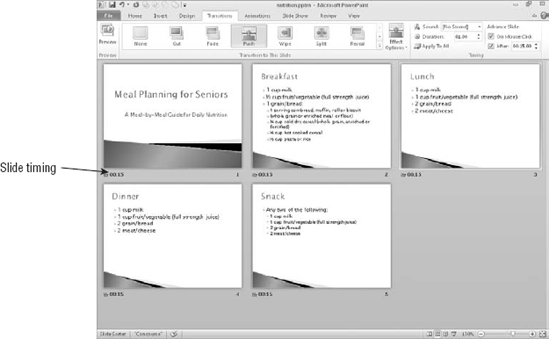
Any automatically
advancing transitions that you have set appear with the timings beneath
each slide in Slide Sorter view, as shown in Figure 2.
2. More about Transition Sounds
In the Transition Sound menu, shown in Figure 3, you can choose from among PowerPoint's default sound collection, or you can choose any of the following:
No Sound: Does not assign a sound to the transition.
Stop Previous Sound:
Stops any sound that is already playing. This usually applies where the
previous sound was very long and was not finished when you moved on to
the next slide, or in cases where you used the Loop Until Next Sound
transition (see below).
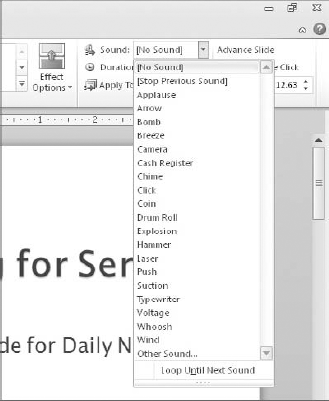
Other Sound: Opens a dialog box from which you can select another WAV sound file stored on your system.
Loop Until Next Sound:
An on/off toggle that sets whatever sound you select to loop
continuously either until another sound is triggered or until a slide
appears that has Stop Previous Sound set for its transition.
NOTE
Sounds associated with transitions can get annoying to your audience very quickly. Don't use them gratuitously.
3. Rehearsing and Recording Transition Timings
The trouble with setting
the same automatic timings for all slides is that not all slides deserve
or need equal time onscreen. For example, some slides may have more
text than others, or more complex concepts to grasp. To allow for the
differences, you can manually set the timings for each slide, as
described in the preceding section. However, another way is to use the
Rehearse Timings feature to run through your presentation in real time,
and then to allow PowerPoint to set the timings for you, based on that
rehearsal.
NOTE
When you set timings
with the Rehearse Timings feature, PowerPoint ignores any hidden slides.
If you later unhide these slides, they are set to advance
automatically. You need to individually assign them an Automatically
After transition time.
To set transition timings with the Rehearse Timings feature, follow these steps:
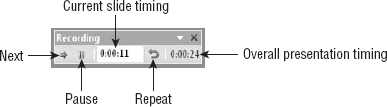
On
the Slide Show tab, click Rehearse Timings. The slide show starts with
the Recording toolbar in the upper-left corner, as shown in Figure 4.
NOTE
If you want to record
voiceover narration as you rehearse and record the timings, click Record
Slide Show in step 1 instead of Rehearse Timings.
Click
through the presentation, displaying each slide for as long as you want
it to appear in the actual show. To move to the next slide, you can
click the slide, click the Next button in the Recording toolbar
(right-pointing arrow), or press Page Down.
When
setting timings, it may help to read the text on the slide, slowly and
out loud, to simulate how an audience member who reads slowly would
proceed. When you have read all of the text on the slide, pause for one
or two more seconds and then advance. If you need to pause the rehearsal
at any time, click the Pause button. When you are ready to resume,
click the Pause button again.
If you make a mistake on the timing for a slide, click the Repeat button to begin timing this slide again from 00:00.
|
If you want a slide to display
for a fairly long time, such as 30 seconds or more, you might find it
faster to enter the desired time in the Current Slide Timing text box on
the Recording toolbar, rather than waiting the full amount of time
before advancing. To do this, click in the text box, type the desired
time, and press Tab. You must press the Tab key after entering the time —
do not click the Next button — or PowerPoint will not apply your
change.
|
|
When you reach the final slide, a dialog box appears, asking whether you want to keep the new slide timings. Click Yes.
|
If
you want to temporarily discard the rehearsed timings, deselect the Use
Timings check box on the Slide Show tab. This turns off all automatic
timings and allows the show to advance through mouse-clicks only. To
clear timings altogether, choose Slide Show => Record Slide Show => Clear => Clear Timings on All Slides. |
