Logo
programming4us
programming4us
programming4us
programming4us
Home
programming4us
XP
programming4us
Windows Vista
programming4us
Windows 7
programming4us
Windows Azure
programming4us
Windows Server
programming4us
Windows Phone
 
programming4us
Windows 7

Microsoft Project 2010 : Creating a Budget for Your Project (part 1) - Creating and Assigning Budget Resources

- Free product key for windows 10
- Free Product Key for Microsoft office 365
- Malwarebytes Premium 3.7.1 Serial Keys (LifeTime) 2019
8/12/2014 4:16:10 AM

Creating a Budget for Your Project

Creating a project budget is a three-step process. First, you create budget resources and assign them to the project summary task, then you identify the budget values for the project (costs or number of hours), and finally, you match up each of your project’s resources with a budget type, so you can compare budgeted values with actual values as your project progresses.

Creating and Assigning Budget Resources

The first step to creating a budget for your project is to create resources that represent each budget category in your organization. For example, your organization may have one budget for training costs and another budget for travel costs. To track these budgets in Project 2010, create two separate resources that represent each of these budgets in your project.

To create a budget resource, follow these steps:

1.
On the View tab, in the Resource Views group, click Resource Sheet.

2.
Type the name of the budget resource in the Resource Name column.


A best practice is to use a naming scheme that identifies the resource as a budget resource. For example, if I am adding a resource for my organization’s training budget, I might choose to type Budget-Training in the Resource Name column.


3.
Double-click the name of the budget resource to display the Resource Information dialog box.

4.
Choose the resource type for the budget resource from the Type list.

5.
Select the Budget check box, as shown in Figure 1.
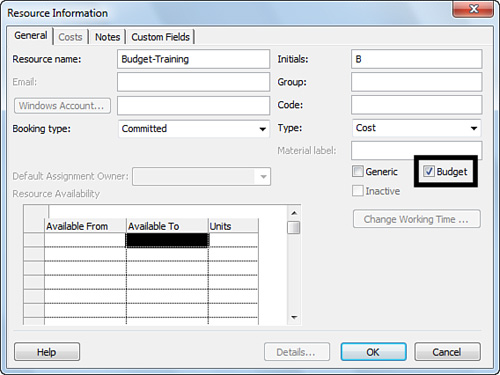
Figure 1. The Budget check box appears below the Material Label field.

6.
Click OK to add the budget resource to your project.

After you create the resources, the next step is to assign them to the project summary task.

To assign a budget resource to the project summary task, follow these steps:
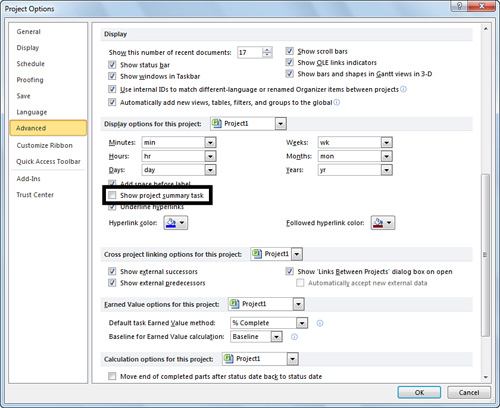
1.
Click the File tab and then click Options.

2.
Click Advanced on the left portion of the window.

3.
Under Display options for this project, select the Show project summary task check box (shown in Figure 2), and then click OK.

Figure 2. The Show project summary task check box is highlighted.

4.
On the View tab, in the Task Views group, click Gantt Chart.

5.
Double-click the first row in the Gantt Chart view to display the Summary Task Information dialog box for the project summary task.

6.
Click the Resources tab and then select the budget resource from the drop-down list in the Resource Name column, as shown in Figure 3.
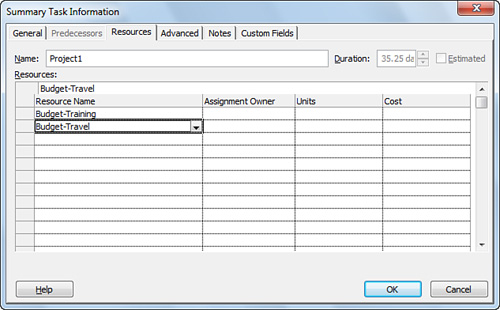
Figure 3. Assigning the budget resources to the project summary task.

7.
Click OK to assign the budget resource to the project summary task.

Other -----------------
- Microsoft Access 2010 : Enhancing the Queries That You Build - Ordering Query Results, Refining a Query by Using Criteria
- Microsoft Access 2010 : Enhancing the Queries That You Build - Everything You Need to Know About Query Basics
- Using the Windows 7 Libraries : USING THE EXPLORER BROWSER CONTROL (part 2)
- Using the Windows 7 Libraries : USING THE EXPLORER BROWSER CONTROL (part 1) - Adding the Explorer Browser to Your Toolbox , Configuring the Explorer Browser Example
- Using the Windows 7 Libraries : CONSIDERING USER-DEFINED COLLECTIONS
- Using the Windows 7 Libraries : USING NON-FILESYSTEM CONTAINERS
- Using the Windows 7 Libraries : WORKING WITH KNOWN FOLDERS
- Conducting Research in OneNote 2010 : Translating Text
- Conducting Research in OneNote 2010 : Researching a Topic, Customizing the Research Task Pane
- Conducting Research in OneNote 2010 : Handling the Research Task Pane
 
 
Top 10
- Microsoft Visio 2013 : Adding Structure to Your Diagrams - Finding containers and lists in Visio (part 2) - Wireframes,Legends
- Microsoft Visio 2013 : Adding Structure to Your Diagrams - Finding containers and lists in Visio (part 1) - Swimlanes
- Microsoft Visio 2013 : Adding Structure to Your Diagrams - Formatting and sizing lists
- Microsoft Visio 2013 : Adding Structure to Your Diagrams - Adding shapes to lists
- Microsoft Visio 2013 : Adding Structure to Your Diagrams - Sizing containers
- Microsoft Access 2010 : Control Properties and Why to Use Them (part 3) - The Other Properties of a Control
- Microsoft Access 2010 : Control Properties and Why to Use Them (part 2) - The Data Properties of a Control
- Microsoft Access 2010 : Control Properties and Why to Use Them (part 1) - The Format Properties of a Control
- Microsoft Access 2010 : Form Properties and Why Should You Use Them - Working with the Properties Window
- Microsoft Visio 2013 : Using the Organization Chart Wizard with new data
 
programming4us
Windows Vista
programming4us
Windows 7
programming4us
Windows Azure
programming4us
Windows Server