Sometimes it takes more than a
handful of chocolate-covered peanuts to keep the accountants happy.
Project data that maps to the organization's accounting
codes may be just the ticket. Fortunately, it's easy to include
accounting codes in Project, whether it's just a simple account number
or a hierarchical structure of multilevel codes. Either way, you can
enter accounting codes that map to resources, tasks, or project phases.
In this section, you'll learn how to create accounting codes in either a
flat listed structure or a multilevel outline structure. 1. Entering Accounting Codes in a Custom FieldTo
associate accounting codes with resources or tasks, you must set up a
custom field. To create a custom field for accounting codes, choose
Project→Properties→Custom Fields. Here are some of the settings accounting codes rely on: Task or Resource field. Select the Task option if your accounting codes map to tasks or phases. Select the Resource option if your accounting codes map to employees, equipment, materials, or cost resources. Number or Text field type. If your accounting codes consist strictly of numbers, like "100103" or "4400," select Number as the custom
field type. If your accounting codes include numbers with any letters
or special characters, like "25-4400" or "BT_052466," then select the
Text field, which is more flexible.
Note: If your accounting codes have multiple levels in a hierarchical structure, select the Outline Code field, and refer to Section 11.8.2 on page 322.
Field name. Click Rename, and then give the custom field a descriptive name, like "Accounting Code" or "Acct #." Lookup table.
A lookup table makes it easy to pick valid values, which accountants
worship. To set up a lookup table that acts as a drop-down list, click
Lookup. Type the first accounting code in row 1 under Value, and then,
in the Description column, type an explanation of the code, as shown in Figure 1. 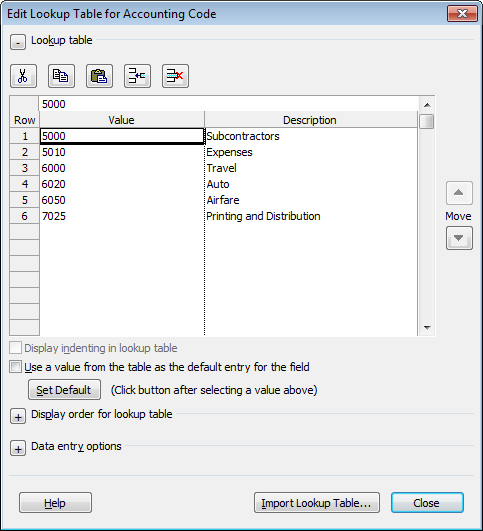
2. Creating Multilevel Accounting CodesIf
your organization's accounting codes are a hierarchical structure of
levels within levels, create a custom outline code rather than a number
or text field. Then, the drop-down list that appears in the custom field
cell in a table shows this hierarchy. In a long list of accounting
codes, this multilevel outline code can help you find the code you need
more quickly. This section describes how to create a new outline code,
set up the format for the code, and create the outline code's lookup table. 2.1. Selecting and naming your new outline codeFollow these steps to begin to create an outline code to hold your multilevel accounting codes: Choose Project→Properties→Custom Fields. The Custom Fields dialog box appears. At the top of the dialog box, select either the Task or Resource option as appropriate. If
some accounting codes apply to tasks and others apply to resources,
you'll have to create two sets of outline codes—one for tasks and the
other for resources. You can't combine them. In the Type box, choose Outline Code. Although
almost all the custom fields let you create a lookup table for them,
the outline code is the only custom field for which you can create a
multilevel lookup table. In the list of fields, select the next available outline code, for example, Outline Code1 or Outline Code10. You typically know a custom field is available if it doesn't include a second name in parentheses. Click Rename, type the name you want for this field, for example, Code Number or Accounting, and then click OK. The renamed field appears in the list of outline codes. Keep the Custom Fields dialog box open, and go on to the next section to set the format for your accounting code.
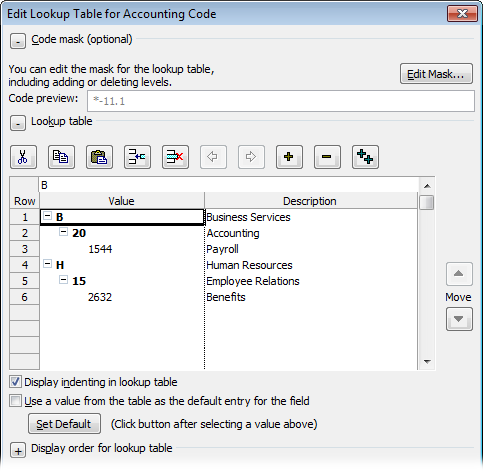
2.2. Setting the format for the multilevel accounting codeCreate the format and multilevel structure for your accounting code as follows: In the "Custom attributes" section, click Lookup. The Edit Lookup Table dialog box appears. It has additional options from the Edit Lookup Table dialog box for other types of custom fields. At the top of the Edit Lookup Table dialog box, click the + next to "Code mask". Project expands the "Code mask" section. Click Edit Mask. The Code Mask Definition dialog box appears, as shown in Figure 2. The code mask
is the template that specifies the type of characters, the sequence,
and the length of the code in each level of the outline code, as well as
the character that separates each of the multiple levels. For example,
suppose one of your typical accounting codes looks like "B-20.1544." You can specify this format as the code mask. 
In
the first row of the Sequence column, choose whether the first part of
your accounting code is a number, uppercase letters, lowercase letters,
or alphanumeric characters. In the B-20.1544 example, the first level is an uppercase letter. In the Length column for the first row, specify how many characters the first level of the code can have. If it's always one digit, for example, select 1. If it could be one to three digits, select Any. In the Separator column for the first row, select the character that separates the first and second levels of the code. In the B-20.1544 example, the first-level separator is a hyphen. In the second row, repeat steps 4–6 to define the second level of the code. As
you specify the format for each outline code level, the "Code preview"
box shows an example of your code. Repeat this step for each level in
the code. When you're done, click OK to close the Code Mask Definition dialog box. Keep the Edit Lookup Table dialog box open and go on to the next section to create the multilevel lookup table for your accounting code.
2.3. Creating a multilevel lookup table for an accounting codeNow enter the actual accounting codes in the multiple levels you need by following these steps: In the Edit Lookup Table dialog box, be sure the "Display indenting in lookup table" checkbox is turned on. This checkbox shows the hierarchical outline structure in the lookup table while you're setting it up. Select the first Value cell, and then type a value for the top level of your first accounting code. For the B-20.1544 example, you would type B in the Value field. Type a description in the Description field. Select
the second Value cell, and then type a value for the second level of
your first accounting code. Then click Indent to show that this level is
subordinate to the first level. For the B-20.1544 example, you would type 20 in the Value cell. If you enter a value that doesn't match the code mask, Project displays the value in red. Select
the third Value cell, and then type a value for the third level of your
first accounting code. Then click the Indent button to show that this
third level is subordinate to the second level. For the B-20.1544 example, you would type 1544 in the Value cell, as shown in Figure 3. Continue entering accounting codes until all the levels in all the codes are done. Click Close. Then click OK to close the Custom Fields dialog box. Your multilevel accounting codes are saved with the project.
3. Applying Accounting Codes to Your ProjectWith
a custom accounting code field in hand, add it to the table of your
choice (right-click the table heading and then choose Insert Column).
Remember, you can add only a task field to a task-oriented view and
table. Likewise, you can add only a resource field to a
resource-oriented view and table. With the new column in place, work
through your tasks or resources, and then enter the appropriate
accounting codes.
|
