The Bing Maps control provides full mapping
capabilities on Windows Phone 7. The control is optimized for mobile
performance, including map tiles optimized for mobile bandwidth speeds.
The Bing Maps control fully supports Silverlight data
binding for pushpin data with templates for plotting information. Users
can pinch zoom the map, so it is not recommended to implement buttons
for zooming in and out.
A Bing Maps control is dropped into the ContentPanelGrid
control, and two application bar buttons are enabled. The next three
sections cover licensing, how to add a pin programmatically, and how to
data bind to a collection of locations and plot on the Bing Maps
control.
1. Licensing
As of this writing, the Bing Maps control is
free to use for consumer-facing applications. This means if you are
building a store locator, points of interest application, and so on that
consumers would use, there is no licensing cost. To get started go to
this URL to obtain an application key:
www.bingmapsportal.com
Set the Application Type to mobile for your mobile application. Next, set the key value in XAML, either directly or via data binding, for the CredentialProvider attribute:
<bing:Map Name=" TestBingMapsControl"
   CredentialsProvider="AppKeyGoesHere" />
It is really that simple to gain access to what is a
very powerful Silverlight-based mapping control. The next two sections
cover plotting data on the Bing Maps control.
2. Programmatically Add a Pin
There are many mobile scenarios where your
application just needs to plot a single point, or a small number of
points, and center the map on a point. In the BingMapsControl project's MainPage.xaml
code file, the application bar is enabled. The left button plots a
single point on the map by setting the location on a Pushpin object
configured in the XAML. The following is the XAML for the Bing Maps
Control:
<bing:Map Name="TestBingMapsControl"
  CredentialsProvider="..." >
  <bing:Pushpin x:Name="SinglePushpin" Visibility="Collapsed">
    <bing:Pushpin.Content>
      <Ellipse Width="25" Height="25" Fill="#FF00FF4A"/>
    </bing:Pushpin.Content>
  </bing:Pushpin>
</bing:Map>
Notice the <bing:Pushpin> object named SinglePushpin nested within the Map object. The Content property for the Pushpin is set to an Ellipse object. Notice that Visibility is set to Collapsed initially. All that's missing is a location.
The event handler for the left application bar button titled "add a pin" sets the position on the Pushpin object by name and then configures Visibility to Visible. Here is the code:
private void AddaPinAppBarBtn_Click(object sender, EventArgs e)
{
  //SinglePushpin is defined in XAML
  GeoCoordinate location = new GeoCoordinate(34d, −84d);
  SinglePushpin.Location = location;
  SinglePushpin.Visibility = Visibility.Visible;

  //Center and Zoom in on point
  TestBingMapsControl.Center = location;
  TestBingMapsControl.ZoomLevel = 11;
//Turn on zoom bar for emulator testing
  TestBingMapsControl.ZoomBarVisibility = Visibility.Visible;
}
The Location property for the Pushpin object is set and Pushpin made visible. The Map control is also centered on the configured Location and zoomed in a bit. Figure 1 shows the results of clicking the application bar button.

You could add another Pushpin object, and have one represent current location and the other represent desired location. Using Pushpin objects is a quick and easy way to get data on the Map control. For a large number of positions to plot, a MapItems control is recommended. We cover that in the next section.
Note that the zoom-in (+) and zoom-out (-) buttons
are just there to ease development within the Emulator. You should have
zoom-in and zoom-out buttons in a real application. The user should use
pinch-zoom instead.
3. Data Bind to a Collection
In this section, we use the same MainPage.xaml and TestBingMapsControl Bing Maps control to plot a collection of points. A <bing:MapItemsControl> is nested within the TestBingMapsControl. The MapItemsControl represents a collection of points to plot on the Bing Maps control.
Two classes are added to the project:PushpinCollection and PlotPoint. The class PushpinCollection publishes a list of PlotPoint objects, and provides a method to initialize the collection. The PlotPoint class represents a point that is plotted, containing Quantity and Location properties. Quantity is what is displayed and Location represents where to plot the point. Listing 1 contains the source for the classes.
Example 1. The PushpinCatalog and PlotPoints Classes
using System.Collections.Generic;
using System.Device.Location;

namespace BingMapsControl
{
  public class PushpinCollection
  {
    private List<PlotPoint> points;
    public List<PlotPoint> Points { get { return points; } }

    public void InitializePointsCollection()
    {
      //Generate sample data to plot
      points = new List<PlotPoint>()
      {
        new PlotPoint()
        { Quantity = 50,
          Location= new GeoCoordinate(35d, −86d)
        },
        new PlotPoint()
        { Quantity = 40,
          Location= new GeoCoordinate(33d, −85d)
        },
         new PlotPoint()
        { Quantity = 60,
          Location= new GeoCoordinate(34d, −83d)
        },
        new PlotPoint()
        { Quantity = 20,
          Location= new GeoCoordinate(40d, −120d)
        },
      };
    }
  }

  public class PlotPoint
  {
    public int Quantity { get; set; }
    public GeoCoordinate Location { get; set; }
  }
}
|
Expression Blend is used to data bind the MapItemsControl to the Points collection of the PushpinCatalog class. A DataTemplate is created to render the PlotPoint items into a customized Pushpin template. Listing 2 the XAML for the BingMapsControl project's MainPage.xaml page.
Example 2. The BingMapsControl's MainPage.xaml
<phone:PhoneApplicationPage
xmlns="http://schemas.microsoft.com/winfx/2006/xaml/presentation"
xmlns:x="http://schemas.microsoft.com/winfx/2006/xaml"
xmlns:phone="clr-namespace:Microsoft.Phone.Controls;assembly=Microsoft.Phone"
xmlns:shell="clr-namespace:Microsoft.Phone.Shell;assembly=Microsoft.Phone"
xmlns:d="http://schemas.microsoft.com/expression/blend/2008"
xmlns:mc="http://schemas.openxmlformats.org/markup-compatibility/2006"
xmlns:bing="clr-namespace:Microsoft.Phone.Controls.Maps;assembly=Microsoft
|
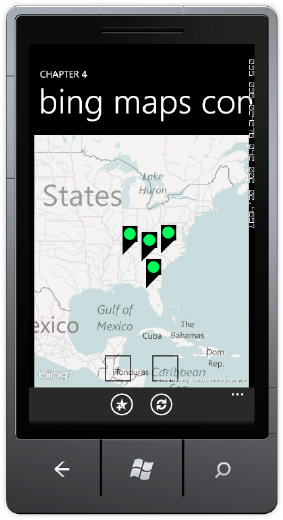
The following is the application bar button event handler that loads the Points collection:
private void DatabindAppBarBtn_Click(object sender, EventArgs e)
    {
      PushpinCollection collection = LayoutRoot.DataContext as PushpinCollection;
      if (collection != null)
        collection.InitializePointsCollection();
    }
This code needs to grab the instance of the PushpinCollection that is configured as the DataContext of the LayoutRoot Grid object. See Figure 2.