When creating applications for the global
market, it becomes important to be able to allow users to use your
application in their native language. Because the Windows Phone uses the
.NET Framework, many of the same techniques can be used.
Many of these changes are supported in the templates. If you create a new phone application, by default a string resource file (AppResources.resx file) is created with some basic string localization. This generates a new class called AppResources
that provides access to the localized resources based on the current
culture of the app. The template also generates a class called LocalizedStrings that wraps the AppResources class so you can use it in data binding, but we’ll get to how that works in a minute. If you look at Figure 1, you can see the AppResources.resx file and the LocalizedStrings.cs file:

FIGURE 1 AppResources.resx and LocalizedString.cs in the project
If you double-click the AppResources.resx file, you’ll see the string table shown in an editor that will let you modify, add, and remove specific strings, as shown in Figure 2.
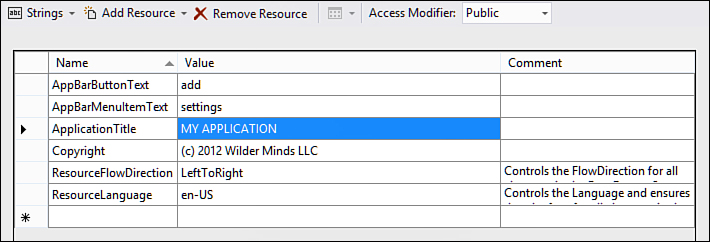
FIGURE 2 Editing the AppResources.resx file
The default AppResources.resx file
contains resources for the default language (for example, U.S. English).
The name column specifies the identifier that you will use to access
the resource. The second column is the localized value (U.S. English is
this default resource file). Finally, the comment column is to document
the resource if necessary.
To access the resources, you can just use the static methods and properties on the generated AppResource class. For example, to set the text of a TextBlock via code:
void MainPage_Loaded(object sender, RoutedEventArgs e)
{
contentBlock.Text = AppResources.Copyright;
}
Because you’re building applications with XAML,
it would be useful if this same technique can be used via data binding.
The problem is that data binding does not work against static classes.
So to solve that, the template creates a simple wrapper class that
exposes the entire AppResources static class:
public class LocalizedStrings
{
private static AppResources _localizedResources =
new AppResources();
public AppResources LocalizedResources
{
get { return _localizedResources; }
}
}
To enable all the XAML to access this class, the template adds an instance of this class in the app.xaml file:
<Application x:Class="LocalizedApp.App"
...
>
<!--Application Resources-->
<Application.Resources>
<local:LocalizedStrings xmlns:local="clr-namespace:LocalizedApp"
x:Key="LocalizedStrings" />
</Application.Resources>
// ...
</Application>
Because this is exposed in the App.xaml file, you can use this object utilizing a StaticResource. For example:
<TextBlock Text="{Binding LocalizedResources.ApplicationTitle,
Source={StaticResource LocalizedStrings}}"
Margin="12,0" />
The binding walk down the LocalizedResources object (as named in the app.xaml resource) and then the property (which is just the name in the AppResource.resx file).
Bindings works with most types of controls, but unfortunately because the ApplicationBar control doesn’t support data binding in a real way, you can’t use this binding technique to handle localization of the ApplicationBar. Instead, the project template creates a localized ApplicationBar for you in code but leaves it commented out. Like the earlier example, this template code just uses the AppResources class to set the localized text:
private void BuildLocalizedApplicationBar()
{
// Set the page's ApplicationBar
ApplicationBar = new ApplicationBar();
// Create a new button and set the text value
ApplicationBarIconButton appBarButton =
new ApplicationBarIconButton(
new Uri("/Assets/ApplicationIcon.png", UriKind.Relative));
appBarButton.Text = AppResources.AppBarButtonText;
ApplicationBar.Buttons.Add(appBarButton);
// Create a new menu item with the localized string
ApplicationBarMenuItem appBarMenuItem = new
ApplicationBarMenuItem(AppResources.AppBarMenuItemText);
ApplicationBar.MenuItems.Add(appBarMenuItem);
}
Note
The image URI the template code uses doesn’t
point to an actual image so that the example out of the box in the
template will simply not show an icon in the button.
The real magic happens when you add more
language support. After you have your app written, you can simply go to
the properties of the project and look at the Supported Cultures list;
you’ll see all the possible supported languages, as shown in Figure 3.
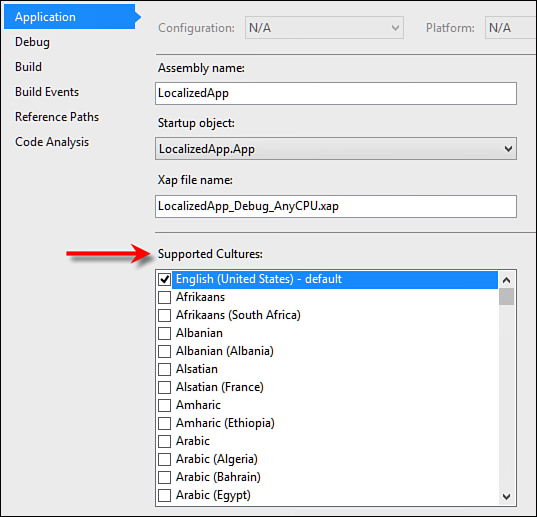
FIGURE 3 Adding supported cultures
If you click one of the languages and save the
changes, a new resource file will be created specific to that language,
as shown in Figure 4.
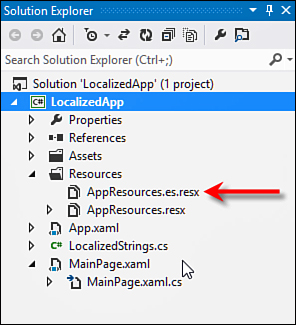
FIGURE 4 New language-specific resource file
The name of the new file is still AppResource
but before the .resx extension is the name of the language (for
example, “es” signifies that I chose generic Spanish). The new resource
file copies all the strings from the original AppResource.resx
file. It leaves the values that were in the original. You would change
the values for the Spanish version of your app. You can see the strings
converted to Spanish in Figure 5.
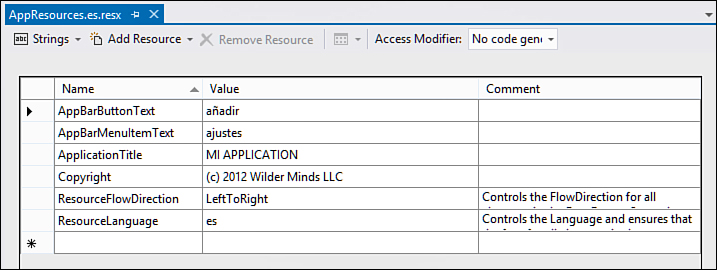
FIGURE 5 Spanish version of the resources
Now that you have Spanish resources, you can
change the emulator to use Spanish as the primary language. To do this,
go to the Settings apps (either on a device or in the emulator) and find
the Languages and Region section, as shown in Figure 6.
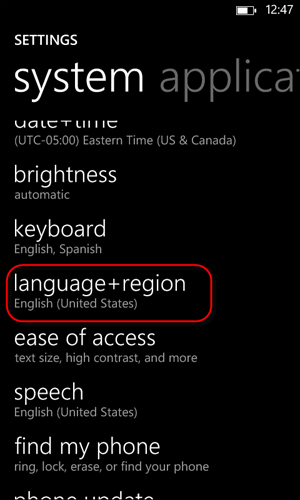
FIGURE 6 The languages and region settings
After you change the language, you will have to restart the phone. You can see the language drop-down and the restart button in Figure 7.
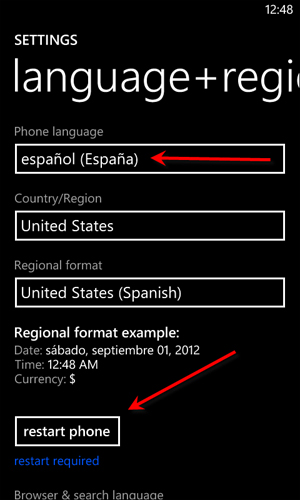
FIGURE 7 Changing the language on the phone
Finally,
if you run the application, you’ll see that the new Spanish application
name is shown. Note that no code was required—all the magic is
happening in the AppResources class. You can see the app shown with Spanish resources in Figure 8.
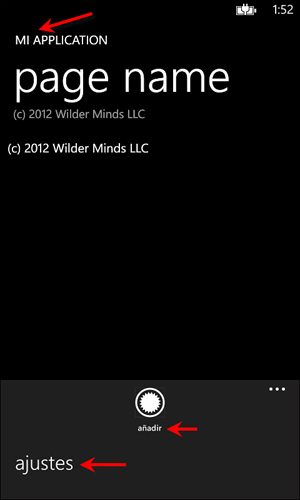
FIGURE 8 The app with Spanish resources
Not all resources you want to use will have
replacements in other languages. The default language is used as a
fallback for any resources that aren’t implemented in other languages.
For example, because the Copyright string does not need to be
localized, you can remove it from the Spanish resources. When it is
missing in the Spanish resources, the AppResources class just falls back to using the default (for example, English) resource.
