The interface that InfoPath generates when we chose Section with Controls
is fully functional but not very aesthetically pleasing nor does it
contain all the correct control configurations. We can rearrange the
controls on the form by simply dragging and dropping them into different
areas.
Firstly, let’s get all the common posting and template properties laid out a little better.
1. | Place the cursor to the left of the topmost Name: label (the label directly below the title) and from the Table menu, select Insert | Layout Table.
|
2. | Set the number of columns to 2, the number of rows to 7, and click OK.
|
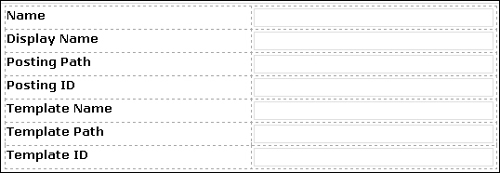
3. | A layout table has now been generated. Add the following text into separate cells in the first column:
Name
Display Name
Posting Path
Posting ID
Template Name
Template Path
Template ID
|
4. | Select the cells and set the text to be bold.
|
5. | We must now move the text fields that were generated next to their corresponding label. Drag the four text fields next to the Name, Display Name, Posting Path, and ID labels below the table up into the right-hand column of the first four rows. Then delete the superfluous labels.
|
6. | The
textboxes relating to template properties have been generated in the
section right at the bottom of the form as they are represented by
another XML element. Drag these textboxes up into the column next to
their corresponding label. You can easily verify to which object the
properties are related by selecting them and having a look in the Data Source pane on the right-hand side. The top table should now look like this:
 |
7. | To remove the now-redundant template optional section at the bottom of the form, simply click on the Optional Section label and press the Del key.
 |
The following properties in the table we just created are read-only:
Posting Path
Posting ID
Template Name
Template Path
Template ID
To set a textbox to be read-only, right-click on the textbox and select Text Box Properties. Select the Display tab, check the Read-only box, and click OK. Do this for all of the above textboxes.
The next thing we must do is clean up the custom properties section of the form.

Follow this procedure to improve this section’s look and feel:
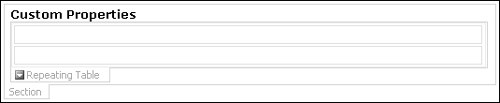
1. | Click the Repeating Table label and then press Ctrl-Home to go to the beginning of the box. Enter the title Custom Properties in bold text.
|
2. | Inside the repeating table, click on the textbox underneath Name, press the right arrow, then Enter to insert a line break.
|
3. | Drag the Value textbox (the textbox, not the label) under the Name textbox, and right-click on the second column and select Delete | Columns. Then right-click on the Name label and select Delete | Rows.
|
4. | Set the Name textbox to be read-only following the steps discussed before, as users cannot modify this field. With the Name textbox selected, select Format | Font from the menu and check the Bold box.
|
5. | Next, drag the repeating table’s right-hand side to fit the width of the optional section.
|
6. | Right-click on the LightweightCustomProperty repeating table and select Borders and Shading. Choose a border for the bottom and the top of the table and click OK.
|
Next
we must to stop users from being able to insert or delete the custom
property sections as the number of custom properties will not vary and
is determined by the response of the ASP.NET Web service.
1. | Right-click on the Repeating Table label and select Repeating Table Properties.
|
2. | In the Default settings section on the Data tab, uncheck the Allow users to insert and delete rows box and click OK.
|
3. | Right-click on the optional section that contains the Custom Properties label, and select Section Properties.
|
4. | Uncheck the Allow users to delete the section box and click OK.
 |
Let’s now clean up the generated placeholders section below the LightweightPlaceholder Repeating Table.
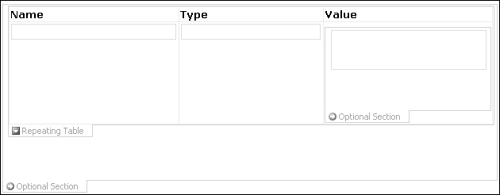
1. | Place the cursor to the left of the LightweightPlaceholder Repeating Table. Enter the heading Placeholders, and set it to bold.
|
2. | Drag the Type textbox into the first column under the Name textbox.
|
3. | Right-click on the Name label, and select Delete | Rows. Right-click on the second column and select Delete | Columns.
|
4. | Click on the theNode rich text box and press Del.
|
5. | Right-click in the third column and select Delete | Columns.
|
6. | Set the Name textbox to bold, and set the Type textbox to italics.
|
7. | From the top of the Task Pane on the right-hand side of the screen, select the Data Source category (or select View | Data Source from the menu) and expand the following nodes: dataFields, s0:GetPostingResponse, GetPostingResult, Placeholders, LightweightPlaceholder, and Value and drag the theNode into the placeholders Repeating Table.
If the task pane doesn’t appear on the right-hand side, select View | Task Pane to show it.
|
8. | Drag the right-hand side of the LightweightPlaceholder table to the right so the width is consistent with the LightweightCustomProperty table.
|
9. | Set the Name and Type textboxes to be read-only.
|
10. | Right-click on the LightweightPlaceholder table and select Borders and Shading. Apply a border to the bottom and the top of the table and click OK.
|
11. | Modify
the placeholder table so that users cannot insert or delete rows, and
set the placeholder’s optional section so that users cannot delete it.
|
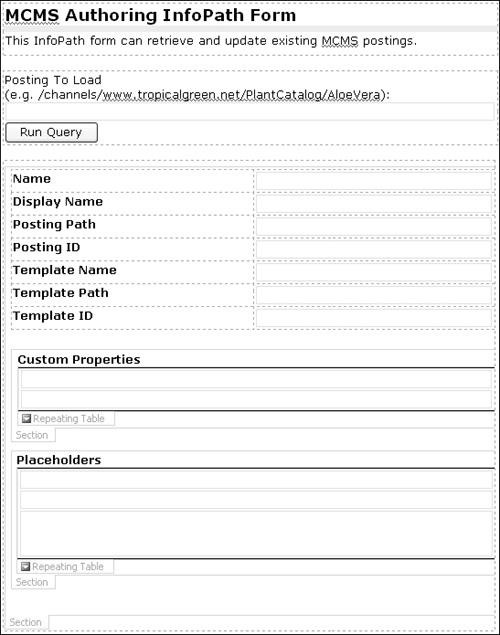
12. | Delete
the excess line breaks after the end of the placeholder repeating
table, and your form should resemble the following figure:
 |
