First generation websites
were made up of collections of HTML files. To create a page, a webmaster
would open an HTML editor (for the die-hard developer, the tool would
most probably be a text-editing tool like Notepad) and hand-code lines
and lines of tags and code; a very time consuming task indeed.
With
the introduction of scripting languages like ASP, static websites
evolved to second-generation sites that included dynamic components. Web
developers wrote much less code to generate much more HTML using
scripting languages like ASP and Cold Fusion. For example, a single do-while
loop could generate hundreds of table rows with only a few lines of
code. Nevertheless, content was often mixed with code and webmasters
were still tasked to update the site when fresh content came in.
As with all trends, the
migration of static sites to dynamic ones was not an overnight
phenomenon. The earlier version of MCMS, MCMS 2001, provided a utility
known as Site Stager that generated static pages of a website. Site
Stager was designed to bridge the gap between yet-to-be-upgraded static
websites and the second-generation dynamic website. With Site Stager,
site owners could continue to create collections of static HTML or ASP
pages, while gradually moving towards the more fluid ASP-database
designs.
Power websites of today
are managed by enterprise content management systems like MCMS. A
content management system delegates the task of authoring to business
users. Information gets delivered as soon as it becomes available,
bypassing old bottlenecks. Webmasters now concentrate their efforts on
coding templates. Code in a single template can be used to serve up
unlimited numbers of pages!
In the Enterprise
version of MCMS 2002, Site Stager still exists but works only for
postings created from ASP-based templates. If you are using
ASP.NET-based templates, Site Stager will not churn out valid static
snapshots of the site. Pages will be created but they probably won’t
contain content from placeholders and will appear to be empty.
Microsoft’s stand is that websites today are too dynamic in nature and
that most sites will probably not need to support static pages. Future
versions of MCMS may not include Site Stager.
|
Site Stager is not available in the standard edition of MCMS 2002.
|
Let’s try out first-hand
how Site Stager works. For the purpose of the example that follows, get
access to a site that uses ASP-based template files if you can.
Otherwise, if your site uses ASP.NET-based templates, such as the
TropicalGreen site, you can follow the example below, but the generated
static pages will not contain placeholder content and will appear to be
empty files.
Installing Site Stager
The
first step to using Site Stager is to install it. To find out if Site
Stager has already been installed on your machine, select Start | Programs | Microsoft Content Management Server. See if an entry for Site Stager is listed.
Otherwise, follow the steps below to install Site Stager:
1. | From the Control Panel, choose to Add/Remove Programs.
|
2. | Select Microsoft Content Management Server from the list of currently installed programs. Click Change.
|
3. | In the Program Maintenance dialog, choose to Modify the program features.
|
4. | In the Custom Setup dialog, select the Site Stager component.
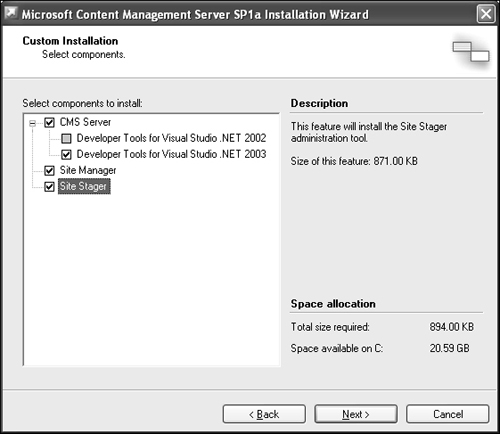 |
5. | Click Next to confirm your selection.
|
6. | Click Install to begin the installation process.
|
7. | When the installation completes, click Finish to close the dialog.
|
An entry for Site Stager is now available in the Start menu. Click on it to start it.
Defining the Destination User
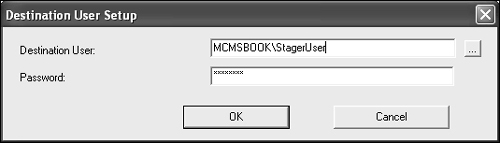
When you first start
Site Stager, you will be asked to specify the destination user, that is,
the user whose credentials will be used to create folders and files on
the target server. The user should have the following rights on the
machine running Site Stager:
In addition, the user needs to have write access to all directories where the generated HTML files are to be stored.
I
have entered the credentials of the destination user. Each time I click
on the OK button, I get an error message that says “Destination User
Invalid – Destination User does not have ‘log on as a batch job’ access.
Please choose another user”. What can I do?
To give a user “log on as a batch job” access, follow these steps:
- Select Administrative Tools | Local Security Policy.
- In the Local Security Settings dialog, navigate to the Security Settings | Local Policies | User Rights Assignment folder.
- Right-click on the Log on as a batch job entry and select Properties from the context menu.
- To add a user to the list, in the Properties dialog, click Add User or Group....
- When you have added the user, click OK to close the dialog.
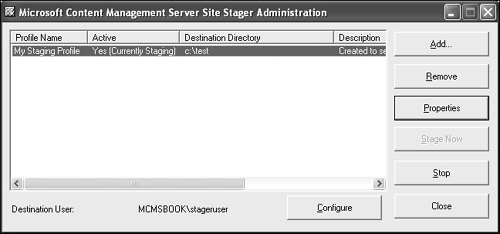
The Site Stager Administration Dialog
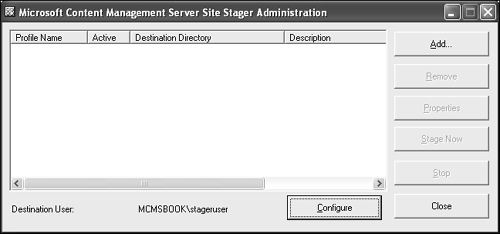
The Site
Stager Administration dialog lists all staging profiles. It displays the
profile’s name, activity (whether or not it is active and/or running),
destination directory, and description as entered by the developer.
Creating a Staging Profile
To create a new profile click Add.... The following dialog appears:
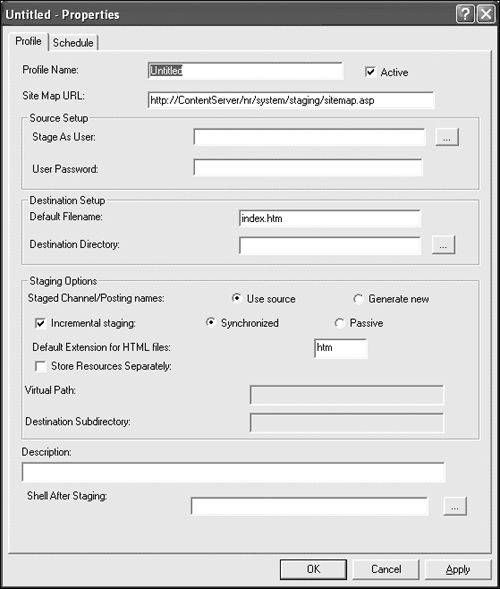
The dialog is divided into four sections:
General area:
Specify a name for the profile, a URL to a site map page that contains
links to all pages that will be staged, a description for the profile,
and check the Active
checkbox to indicate whether or not this profile is enabled. You can
also specify a shell application that will be launched after the files
have been staged.
Source Setup: Specify the MCMS user account and password that will be used to retrieve the channels and postings.
Destination Setup: Provide the path where all files and folders will be generated as well as the name of the index files.
Staging Options:
Provides several options used to configure whether or not staging is
done incrementally as well as the file names and location of resources.
The table below describes each field. Enter the test values as indicated. Click OK when you are done.
| Field | Description | Test Value |
|---|
| Profile Name | Enter
the name of the profile. Give it a meaningful name. This value will be
used by administrators to differentiate various profiles on the same
server. | My Staging Profile |
| Active | Check this box to activate the profile. Or, uncheck it to prevent scheduled jobs from running at the specified times. | Checked |
| Site Map URL | Contains the default setting of: http://ContentServer/nr/system/staging/sitemap.asp
The sitemap.asp file provides the stager with an XML list of all channels and postings to be staged.
You can make copies of sitemap.asp and customize it. For example, instead of staging the entire site, you can generate selected portions of it. | http://localhost/nr/system/staging/sitemap.asp |
| Description | Enter
a description of the profile. Again, this is displayed on the Site
Stager Administration dialog, so it is a good idea to provide meaningful
descriptions. Consider adding background information such as what the
profile does and who created it. | Created by [Your Name] to see how Site Stager works |
| Shell After Staging | Specify
an application to run right after the stager completes here. A common
practice is for administrators to attach scripts that double-check that
all files have been successfully generated. | Leave blank |
Source Setup
| Stage As User | Enter the name of the MCMS user that will be used to stage files. This user should be given the following access rights:
Subscriber
access to all channels that will be staged. To prevent certain portions
of the site from being staged, simply deny the user access to these
areas of the site.
Member of at least one resource manager or template designer
rights group. The rights group need not be assigned to any container. | Enter
the ID of a user with at least subscriber rights to the channels and
template designer rights to the templates in the following format:
DOMAIN\UserName |
| User Password | Enter the password of the ‘Stage As’ user. | Enter password |
Destination Setup
| Default Filename | Indicate the file name of all channel rendering scripts. Site Stager suggests the name index.htm. Feel free to change this value accordingly. You could rename the files to default.asp, default.htm, or even default.abc. | Default.htm |
| Destination Directory | Specify
the destination directory. This could be a local directory on the host
server or a mapped path to a remote server. Be sure that the destination
user defined earlier has write access to this path. | Let’s try staging to a folder in the c:\drive.
C:\test |
Staging Options
| Staged Channel/Posting names | Choose one of two options:
Use Source.
Follows the names of channels and postings on the source. As an
example, for a posting named About, the generated file will be named About.htm. Generate New. Instructs Site Stager to generate a new name for each folder and file. All folders generated start with the letters ch followed by a number (such as ch1, ch2). Files start with the letter p followed by a number (such as p1, p2).
| Choose Use Source |
| Incremental Staging | Choose one of two options:
Synchronized.
Deletes all files on the destination folder and creates new files and
folders to replace them. This ensures that all postings deleted on the
source server are also removed on the destination. Passive.
Does not delete any files on the destination folder. Postings that have
been deleted on the source will continue to remain on the destination.
| Choose synchronized staging |
| Default extension for HTML files | By default, all staged files are generated as HTML files. To stage other file types, specify the file extension here. | htm |
| StoreResourcesSeparately | All resources will be generated in a folder named /Resources/. To specify a separate directory, check this box. | Leave this box unchecked |
| Virtual Path | Enter
the virtual path of the directory where resources will be staged. All
URLs pointing to resources will be amended to use this path. | Leave blank |
| Destination Subdirectory | Specify the name of the subdirectory where the resources will be staged. | Leave blank |
Running a Job
Back at the Site Stager Administration dialog, highlight the profile that we have just created and click Stage Now
to start the staging process. You will receive a message letting you
know that the staging process may take a while, depending on the number
of pages staged and that all details will be logged to Site Stager’s log
file. Click OK.
Notice that the text in the Active column changes from Yes to Yes (Currently Staging). The process will run for as long as is required for all pages to be staged. If you open Windows Explorer and navigate to the c:\test folder, you will see several new folders and HTML files being added.
Scheduling a Profile
You could also schedule the job to run at specific times.
To edit an existing profile, select it in the Site Stager Administration dialog and click Properties.
A quick way to edit a profile is to double-click on it.
Click on the Schedule tab.
Click New to add a schedule.
Set
the time and the frequency with which the job will be repeated. You can
choose to schedule the job daily, weekly, monthly, once, at system
startup, or at logon. For more complex schedules, click on the Advanced... button.
To delete an existing schedule, click Delete.
When you are ready, click OK to close the Properties dialog.
To save processing power on
both destination and source servers and to minimize network traffic,
try to schedule jobs as far apart as possible. It’s also a good idea to
ensure that jobs do not overlap. In addition, schedule the jobs at the
low usage times of your website, such as the early hours of the morning.
Deleting a Profile
To delete a profile, simply select it from the Site Stager Administration dialog and click Delete.
