The first task involved in getting Lync
Online up and running is adding the SIP domains that will be used with
the service. When you are signing up for a Lync Online or Office 365
subscription, a single DNS domain is assigned. This initial domain is
referred to as the tenant domain, and always has a suffix of .onmicrosoft.com.
This tenant domain is meant only for administration of the Lync Online
organization, and is not intended to be used as a SIP domain.
To add a new domain to Lync Online/Office 365, follow these steps:
1. Log on to the Office 365 Portal.
2. On the left side of the main page, click Domains.
3. At the Domains page, click the link for Add a domain.
4. At the Add a domain to Office 365 page, click the link for Specify a domain name and confirm ownership.
5. At the Provide
domain name page, enter the fully qualified name of the domain owned by
the organization that will be used for Lync Online, and click Next.
6. At the Confirm
ownership page, read the instructions presented regarding the
requirement for adding a DNS record to verify ownership of the domain.
The drop-down menu offers a choice of common DNS providers; select one
of these to view instructions for adding the required DNS record using
that DNS provider. If the DNS registrar for the SIP domain being added
does not appear in this drop-down list, select General Instructions to
view the generic steps for adding the required DNS record, as shown in Figure 1.
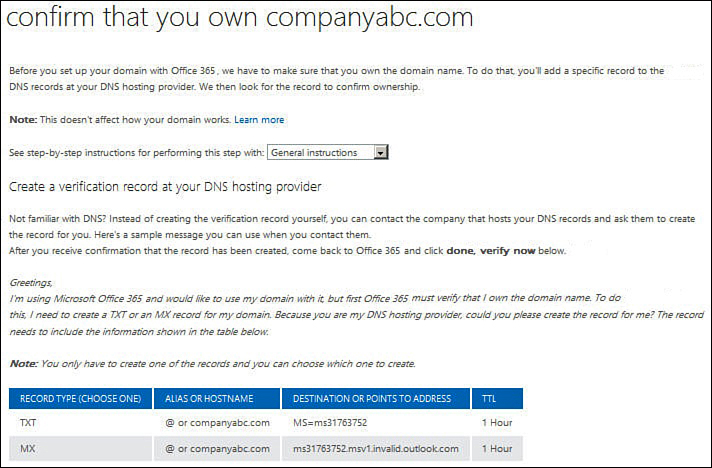
Figure 1. Office 365 domain verification instructions.
7. Follow through with
the instructions to add either the TXT or the MX record to the public
DNS zone, and then wait for the change to take effect. The amount of
time required will depend on DNS propagation delay, as well as the DNS
provider being used.
Note
Although either the TXT or the MX record can
be used for validation with Office 365, the TXT record is the preferred
method of validation. The reason for this is that the MX record
required for validation specifies an address value ending in .invalid, and not all DNS providers support this record. The TXT record, on the other hand, is much more commonly supported.
8. Click the Done, go
check button to complete the verification process. If the domain
verification is not successful, it might be necessary to wait some
additional time and continue clicking this button until the
verification succeeds.
9. After the
verification is successful, the next screen confirms that the domain
has now been added to the account. Click Finish to return to the Add a
domain to Office 365 page.
10. If new users will
be added to the domain right away, click the link for Add users and
assign licenses. Once the new users
have been added, return to the Add a domain to Office 365 page and
click the link for Set the domain purpose and configure DNS.
11. At the Set domain
purpose page, select the check box for Lync Online. If the domain will
also be used with Exchange Online or SharePoint Online as part of an
Office 365 subscription, these can be selected as well. When finished,
click Next.
12. At the Add DNS
records page, the online portal displays a list of DNS records required
for the domain, based on the services that were selected on the
previous page.
13. Once the DNS
records are in place, click the Done, go check button to complete the
DNS record verification process. If the domain verification is not
successful, it might be necessary to wait some additional time and
continue clicking this button until the verification succeeds.
14. After the DNS
record verification is successful, the next screen confirms that the
required DNS records were found. Click Finish to complete the
procedure. The new domain now appears in the list of verified domains,
as shown in Figure 2.
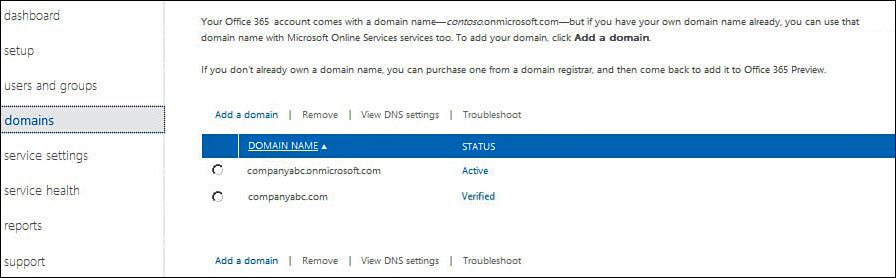
Figure 2. Newly verified domain listed in the Office 365 portal.
