Aside from a DP and the ever-present MP,
there are also two optional site system roles used by OSD: a PXE service
point and a state migration point. DPs serve the same role for OSD that
they do in software distribution: to deliver software packages to
client systems and are required for OSD to work properly.
The next sections discuss the use of these site systems with OSD.
Distribution Points
Distribution points provide clients with all
packages defined for use in ConfigMgr. This includes packages specific
to OSD including drivers, applications, images, and operating system
installs. These packages must be made available on distribution points
just like any software distribution package.
Utilizing Multicasting
Multicasting is a new feature provided by
Windows Deployment Services (WDS) in Windows Server 2008; ConfigMgr 2007
Release 2 (R2) can take advantage of multicasting if the DP is
installed on a Windows Server 2008 system with the WDS role also
installed. Multicasting enables transporting a single stream of data
over a network. Clients can then subscribe to this stream of data. The
main advantage of multicasting over the traditional unicast model is
this single stream of data for multiple destination systems. Unicast
communication requires a separate stream of data for every client
system.
In addition to WDS, you must install Internet
Information Services (IIS) on the site system, including Internet Server
Application Program Interface (ISAPI) extensions and IIS 6 management
compatibility.
A downside for many multicast implementations
for image deployment is that you must manually coordinate the start of
the data stream. All client systems that you want to receive the stream
must be waiting for the stream prior to it being sent. With WDS
multicasting in Windows Server 2008, Microsoft implemented a catch-up
feature. This enables clients that join a stream midway through to
continue to receive the entire stream. WDS tracks when clients join the
image stream and replays the stream until all clients subscribed to the
stream have received the entire image.
Multicasting is used only for image deployment
in OSD; it is not used for any type of package delivery including
driver, application, or operating system install. If you plan to use
multicasting heavily, this might affect the decisions you make about
what to put into the actual image. It might make more sense to make the
image fatter to improve distribution times by using multicasting.
Installing Multicasting
To enable and configure multicasting, perform the following steps:
1. | Install ConfigMgr 2007 R2.
|
2. | In the ConfigMgr console, navigate to Site Management -> <Site Code> <Site Name> -> Site Systems -> <Site System> where <Site System> is the name of the system with a distribution point installed.
|
3. | In
the results pane, right-click the ConfigMgr distribution point; then
select Properties. The ConfigMgr distribution point Properties dialog
box opens.
|
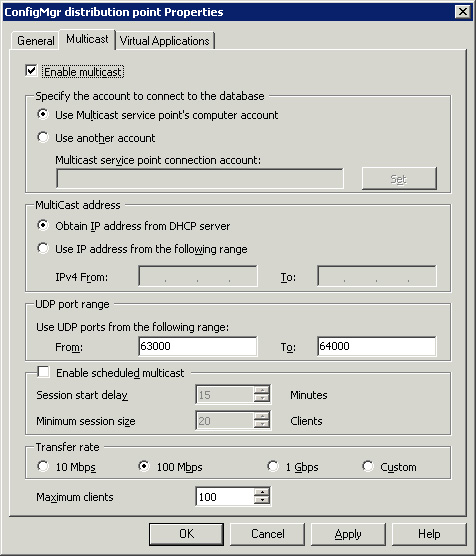
4. | Click the Multicast tab (shown in Figure 1), and select the Enable multicast check box. You can configure the following from this tab:
- Specify the account to connect to the database—
As the text implies, you can specify an alternate account to use to
connect to the site database if the Local System account cannot be used.
- Multicast Address— This allows you to specify a specific multicast address according to Request for Comment (RFC) 3171 (http://www.ietf.org/rfc/rfc3171.txt) or obtain one from a DHCP server.
- UDP Port Range— Specify which User Datagram Protocol (UDP) ports to use for multicasting.
- Enable scheduled multicast—
Scheduled multicast configures a multicast session to wait for a
specific number of clients to join a session or a number of minutes to
wait before starting a session. This allows you to coordinate the client
systems and ensure they are all online and available before the session
starts. The use of the catch-up feature described in the “Utilizing Multicasting” section reduces the importance of this functionality, but it is still available.
- Transfer rate— This setting optimizes the performance of the multicast data stream for the selected network type.
- Maximum clients—
This caps the number of clients that this distribution point serves
using multicast. This number is cumulative across all multicast
sessions.
|
PXE Service Point
PXE service points enable the distribution of OSD boot images to clients via PXE. PXE
service points are actually dependent on an installation of WDS; a PXE
service point essentially just takes over control of WDS. You can
install WDS on Windows Server 2003 and Windows Server 2008 only, and it
does not need to be collocated with any other site roles. WDS in Windows
Server 2008 adds the ability to multicast images over a network enabled
for multicast.
- To install
WDS in Windows Server 2003, use Add/Remove Windows Components from the
Add/Remove Programs applet in the Control Panel—WDS is listed near the
bottom. WDS in Windows Server 2003 actually has multiple modes to
support legacy Remote Installation Service (RIS) images; ensure you
install WDS in mixed or native mode to support WIM based images.
- To
install WDS in Windows Server 2008, use the Add Roles functionality of
Server Manager. WDS is typically the last listed role and offers two
subservices: Deployment Server and Transport Server. You should select
both of these.
You do not need to configure WDS in any way
after installing it. ConfigMgr seizes control over WDS after you install
the PXE Service Point. If you do configure WDS, conflicts often arise
and cause you endless hours of troubleshooting.
|
A question often fielded by ConfigMgr OSD
implementers is how an organization can have multiple PXE providers on
the same network subnet. Usually, the client organization already has a
PXE server in place to support a legacy imaging product. The real answer
to this question is that it depends on the network infrastructure, not
on ConfigMgr.
PXE is a standards-based protocol based on DHCP
and network broadcasts. The network card installed on a system controls
the actual booting of a system; this is completely independent of
ConfigMgr. Generally, the first PXE provider to respond to a PXE request
is chosen by the network card being booted from. On a network level, it
is best to segregate PXE providers on separate subnets to control the
broadcasts.
It is also possible to specify a specific PXE
server using DHCP options 60, 66, and 67; however, these options are
specific to a single network subnet and cannot be made more granular for
PXE booting purposes. There are other options including a newer PXE
specification, but this problem is completely outside the bounds of
ConfigMgr and WDS.
Two excellent resources for detailed PXE information are at http://technet.microsoft.com/en-us/library/cc732351.aspx and http://support.microsoft.com/kb/244036. The second reference is a dated KB article referring to RIS, but the general PXE information is still valid.
|
Adding
a PXE Service Point role to a site system is similar to adding any
ConfigMgr role to any other site system. Perform the following steps:
1. | In the ConfigMgr console, start by navigating to Site Database -> Site Management -> <Site Code> <Site Name> -> Site Settings -> Site Systems.
If the system running WDS is not
currently a site system, right-click Site Systems; then choose New ->
Server. This launches the New Site System Server Wizard. Enter the name
of the site system and the intranet accessible fully qualified domain
name (FQDN) of the WDS server. If the WDS
server already is a ConfigMgr site system, right-click the server and
choose New Roles. This launches the New Site Role Wizard which looks and
acts exactly like the New Site System Server Wizard, except that the
wizard has already filled in the site system name and intranet FQDN for
you.
|
2. | On the System Role Selection page, choose PXE service point.
|
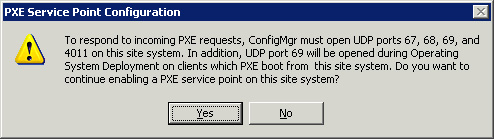
3. | Note the information given in the PXE Service Point Configuration dialog box, as shown in Figure 2, and click Yes.
|
4. | On the PXE – General wizard page, you have the following choices:
- Allow this PXE service point to respond to incoming PXE requests— This first check box does exactly what it says, enables or disables PXE booting.
- Enable unknown computer support— This option only exists if you have installed ConfigMgr 2007 R2. It enables exactly what the name implies.
- Require a password for computer to boot to PXE—
This check box requires entering a password during the PXE boot process
on the client. If enabled, you must also enter a password.
- Interfaces— On a multihomed system, this section allows you to limit which interfaces listen for PXE boot requests.
- Specify the PXE server response delay—
This setting determines how long to wait before responding to PXE boot
requests. The setting might help in situations where multiple PXE
servers exist on the same subnet.
|
5. | On
the PXE – Database wizard page, you can choose an alternate account to
use to connect to the site database and a certificate to provide mutual
authentication during the OSD process. If your ConfigMgr site is not in
native mode, the wizard automatically generates a self-signed
certificate. If in native mode, you must supply a single certificate
that all PXE booted clients can use.
|
To review or change any of these settings after you install the PXE Service Point, navigate to Site Management -> <Site Code> <Site Name> -> Site Systems -> <Site System> in the ConfigMgr console, right-click ConfigMgr PXE service point in the right pane, and choose Properties.
PXE service points also become pseudo
distribution points, listed alongside all other distribution points when
copying packages. You can tell the difference between standard DPs and
PXE service points by the addition of “\SMSPXEIMAGES$” to the name of
the PXE service point as listed in distribution point selection list
boxes. You should distribute boot images to PXE service points only
because this is the only type of image provided by PXE service points
with ConfigMgr OSD.
Tip: Make 32-Bit and 64-Bit Images Available
You should make both a 32-bit and 64-bit boot
image available from the PXE distribution point. This enables WDS to
deliver boot images to systems with either architecture. The properties
of a task sequence determine the actual boot image regardless of the
physical architecture of the target system; however, if the target
system is a 64-bit system and a 64-bit boot image is not available, the
PXE boot will not succeed.
State Migration Point
The
other optional site system role is the state migration point. These
site systems store user state data captured from a system.
State migration points are simply shared folders
on a designated site system. Multiple state migration points are
allowed in a site to provide some load balancing and better availability
based on connectivity.
Adding a state migration point to a site system
is similar to adding any ConfigMgr role to any other site system.
Perform the following steps:
1. | In the ConfigMgr console, start by navigating to Site Database -> Site Management -> <Site Code> <Site Name> -> Site Settings -> Site Systems.
If the system is not currently a site
system, right-click Site Systems; then choose New -> Server. This
launches the New Site System Server Wizard. Enter the name of the site
system and the intranet accessible FQDN of the server. If
the system already is a ConfigMgr site system, right-click the system
and choose New Roles. This launches the New Site Role Wizard, which
looks and acts exactly like the New Site System Server Wizard, except
that the wizard has already filled in the site system name and intranet
FQDN for you.
|
2. | On the System Role Selection page, choose State migration point.
|
3. | On the State Migration Point Wizard page, you have the following choices:
- Folders— This list box
allows you to designate specific folders on the site system to use. You
must specify a specific local path, the maximum number of clients to
serve, and the minimum amount of free space on the drive hosting the
folder to consider the state migration point healthy.
- Deletion policy— In this section you specify how long to save user state on a state migration point after it is restored.
- Restore-only mode—
This mode prevents this state migration point accepting new user state
but allows retrieval of previously saved user state data.
|
To review or change any of these settings after you install the state migration point, navigate to Site Management -> <Site Code> <Site Name> -> Site Systems -> <Site System> in the ConfigMgr console, right-click ConfigMgr state migration point in the right pane, and choose Properties.
