1. Using the W3WP Utility
Normally, you won't worry
about launching a worker process at all—you'll let IIS do it. However,
the World Wide Web Worker Process (W3WP) utility can help you launch a
worker process manually. The only times you'd need this utility are to
determine why a worker process isn't working properly or to perform a
remote execution from the command line (rare). This utility uses the
following syntax:
W3WP -debug [-s <site id>]
W3WP -h [Application Host File] [-w <Root Web.CONFIG File>]
     [-in <Instance Name>]
The following list describes each of the command line arguments.
-debug
Use this argument
to launch a worker process using the default application host
configuration file. The default settings use the default Web site (site ID 1). You can modify this behavior using the -s argument.
-s
SiteID
Defines the site
identifier to use for launching the worker process. Getting the right
site identifier is important. The easiest way to find this number is to
choose the Web site in the Connections pane of the Internet Information
Services (IIS) Manager. Click Advanced Settings in the Actions pane and
you'll see the Advanced Settings dialog box. The site identifier appears
in the ID field. You can also locate this information in the \Windows\System32\inetsrv\config\ApplicationHost.CONFIG file. The information appears in the configuration\system.applicationHost\sites element as one of the site element entries.
-h
[ApplicationHostConfigurationFilename]
Launches a
worker process using the specified application host configuration
filename. If you don't specify a filename, then the utility uses the
default Web site (site ID 1).
-in
InstanceName
Defines the
instance name to use. The default setting uses HWC- followed by the
process identifier (PID) for the worker process. Consequently, when the
instance has a PID of 1001, you'll see a name of HWC-1001 for it.
-w
RootWebConfigurationFilename
Defines the root Web configuration file to use when launching the worker process.
2. Modifying the CONFIG Files
IIS 7 relies on a number of
configuration (CONFIG) files. You'll find that it includes configuration
files for the Web site as a whole and individual configuration files
for each Web site your server supports. Normally, you'll use a GUI
utility to change the CONFIG files or work with the AppCmd utility,
rather than change these files directly. However, in some cases, you'll
need to perform direct edits of the CONFIG files to achieve specific
goals. For example, you can't easily modify the verbosity of area
entries for a trace log using AppCmd—you must set the verbosity using a
direct CONFIG file entry. The following sections describe each of the
CONFIG files you need to consider when working with IIS 7.
2.1. Understanding the Web.CONFIG File
The Web.CONFIG file appears more than once on your server. In fact, you'll see one Web.CONFIG file for each Web site and application. Every virtual directory includes a Web.CONFIG file as well. In fact, you'll run into the Web.CONFIG
file so often, it's easy to become confused. The sections that follow
describe some of the issues you need to consider when working with Web.CONFIG, tell you the easiest way to make the changes, and describe some of the most common elements that you'll modify.
2.1.1. Understanding the Configuration File Hierarchy
IIS starts out
with basic settings. These settings don't appear in any of the standard
folders for the Web site. You'll find them in the \Windows\Microsoft.NET\Framework\v2.0.50727\CONFIG\ folder on your system, which is the starting point for all of the Web.CONFIGsettings. When you need to make a server-level setting change, you must open the server-level Web.CONFIG file to do it. Any settings you make in this Web.CONFIG file affect every other level unless you provide a specific override at that level.
|
If you ever make a mistake in the Web.CONFIG
file for the Web server that completely disables the Web server (or, at
least, damages it in such a way that fixes are difficult), you'll find a
Web.CONFIG.Default file in the \Windows\Microsoft.NET\Framework\v2.0.50727 \CONFIG\ folder on your system. Copy this file to the Web.CONFIG file. Don't simply rename the Web.CONFIG.Default
file because you won't have a backup for later. Using this approach
resets the server to defaults—you'll lose all of your settings, but
you'll regain access to the server and be able to restart it. Use this
technique as a last ditch fix for severe configuration problems.
|
|
The next level is the
Web site. The root folder for the Web site contains the Web site
settings. The default Web site settings appear in the \inetpub\wwwroot folder. Any other Web site you create has a Web.CONFIG
file in its root folder. Any changes you make to these files affect the
entire Web site, including all applications, unless you specifically
override them at the folder or application level. These changes also
override any settings you define at the Web server level. The important
point is that these files affect the next level in the Web server
hierarchy, even though they don't appear at the next level in the
Windows folder hierarchy. The two hierarchies are different and it's
important not to confuse them.
Folders and
applications come next. When a folder or application appears within the
Windows folder hierarchy, it's easy to determine that folder's or
application's position in the Web server hierarchy as well. However,
folders and applications can rely on virtual directories. When you use a
virtual directory for the folder or application, the Web.CONFIG
file appears in the root folder of that virtual directory. Again, even
though the Windows hierarchy differs from the Web server hierarchy, the
Web server hierarchy is the one that matters. Folder and application Web.CONFIG file settings always override those of the Web site and the Web server.
2.1.2. An Overview of the Web.CONFIG Elements
It's time to put a number of puzzle pieces together to obtain a better understanding of how things work with the Web.CONFIG file. The important issue to remember is that only changed items appear in the Web.CONFIG file. For example, if you create a trace log entry for the Default Web Site using the AppCmd utility (type AppCmd Configure TRACE "Default Web Site/" /enable /path:*.ASP /timeTaken:"00:01:00" /verbosity:Warning and press Enter to see this example), Web.CONFIG file for the Default Web site will look like Listing 1.
Example 1. Creating a CONFIG File Entry for a Trace
<?xml version="1.0" encoding="UTF-8"?>
<configuration>
    <system.webServer>
        <tracing>
            <traceFailedRequests>
                <add path="*.ASP">
                    <traceAreas>
                        <add provider="WWW Server"
                             areas="Authentication,Security,
                                    Filter,StaticFile,CGI,Compression,
                                    Cache,RequestNotifications,Module"
                             verbosity="Verbose" />
                        <add provider="ASP"
                             areas="" verbosity="Verbose" />
                        <add provider="ISAPI Extension"
                             areas="" verbosity="Verbose" />
                    </traceAreas>
                    <failureDefinitions timeTaken="00:01:00"
                                        verbosity="Warning" />
                </add>
            </traceFailedRequests>
        </tracing>
    </system.webServer>
</configuration>
|
The XML for this example points out a reason that you might want to edit the CONFIG file manually. Notice that the /verbosity command line switch sets the verbosity attribute in the <failureDefinitions>
element. Microsoft doesn't provide a way to change the verbosity
setting for each of the providers. These settings include General,
Critical Errors, Errors, Warnings, Information, and Verbose.
You'll find
additional reasons to modify the settings directly as you work with IIS
to configure your Web site. Microsoft provides a complete listing of the
various Web.CONFIG elements at http://msdn2.microsoft.com/en-us/library/ms228147(VS.80).aspx. You'll also want to view the entries at http://msdn2.microsoft.com/en-us/library/1fk1t1t0(VS.80).aspx. The default settings for the Web server include these elements:
location
Determines
whether the administrator can override the settings provided as child
elements. The default value is True. Any elements contained within this
element are subject to the override setting. You can learn more about
this element at http://msdn2.microsoft.com/en-us/library/b6x6shw7(VS.80).aspx.
system.net
Determines the basic settings for Internet applications. The most common child element is defaultProxy, which determines the proxy used to handle HTTP requests. You can learn more about this element at http://msdn2.microsoft.com/en-us/library/6484zdc1.aspx or http://msdn2.microsoft.com/en-US/library/aa309410(VS.71).aspx.
system.web
Defines the
settings for the ASP.NET application environment. For example, this
element contains child elements that control both authorization and
compilation of ASP.NET applications. You can learn more about this
element at http://msdn2.microsoft.com/en-us/library/dayb112d.aspx or http://msdn2.microsoft.com/en-us/library/dayb112d(VS.71).aspx.
The Web server
settings tend to define the big picture—how the Web server reacts with
all of the Web sites and the applications they contain by default. Once
you move past the Web server, to the Web site, you'll see other
elements. The two default elements are system.web and system.webServer. The system.web entries tend to define the ASP.NET application environment in more detail.
The system.webServer
settings are the root entries for the IIS 7 configuration. These
settings control the Web server engine and modules. In some cases, these
settings used to appear in the binary database that IIS used to hold
metadata, but these settings all appear in XML form now. For example,
this is where you'll find the default document, directory browsing,
failed request tracing, and the handler mappings. You can learn more
about this element at http://msdn2.microsoft.com/en-us/library/ms689429.aspx.
There aren't any default elements for folders and applications. The
elements you see depend on the configuration requirements of the folder
or application. In many cases, folders won't require any settings at
all. Applications generally require settings to perform tasks. The system.webServer element contains a defaultDocument child element that has the default document for the application, as shown in Figure 1. Because this is an ASP.NET application, the default document is default.aspx,
as shown in the figure. The Visual Studio environment automatically
changes this entry as needed to match the default document set by the
developer.
The configuration element normally contains a system.web element as a minimum. Notice the comments shown in Figure 1. These comments provide instructions that help you modify the entries correctly. For example, the compilation element normally contains a debug
attribute that determines whether the application is using a debug or
release compilation. This same setting appears in the graphical
interface as part of the .NET Compilation pane. You change it using the
Debug property.
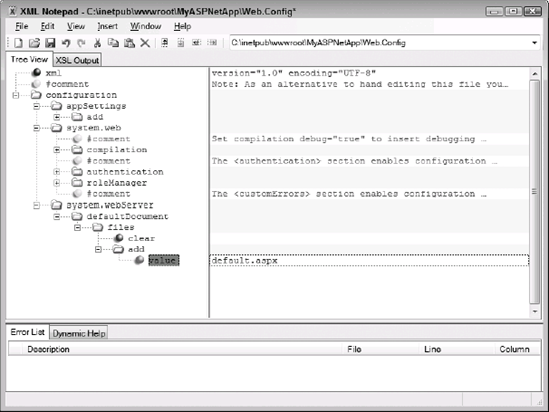
In many instances, applications also contain an authentication element. Most ASP.NET applications rely on forms authentication, so you'll see the mode attribute set to Forms. The other valid options include None, Windows, and Passport. The interesting part about this setting is that it includes the Passport
option, which doesn't appear in the Authentication pane. However, it
doesn't include the basic or digest authentication options, which do
appear in the Authentication pane of the graphical tool, so there isn't a
one-to-one correlation between the graphical tool and the Web.CONFIG file.
When you choose the basic or digest options, the mode attribute contains the Windows
option. Of course, this makes it impossible to know where the basic and
digest settings actually appear since IIS 7 does rely on XML for all
settings. It turns out that implementing basic or digest security
requires additional entries that you'll find in the \Windows\System32\inetsrv\config\ApplicationHost.CONFIG file .
