Now that we've covered all the core topics of using
WCF-based adapters with BizTalk, we'll put them all together to provide
an end-to-end example.
In the example, we will do the following:
Create a simple math orchestration that adds two numbers together.
Expose the receive location using a WCF-CustomIsolated adapter.
Attach a certificate to support message-level encryption.
Attach a custom behavior that adds copyright information to the WSDL.
Create a test WCF client to call the service.
1. Creating an Addition Orchestration
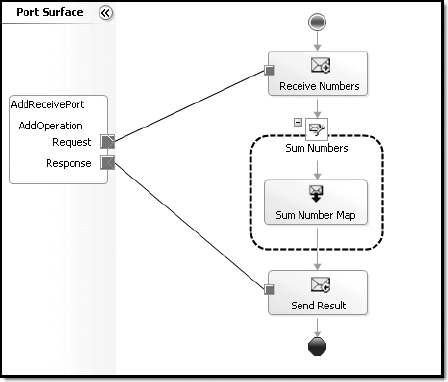
Figure 1
shows the simple orchestration created to support our math service. It
receives two numbers from a request-response port and uses a map with an
addition functoid to sum the numbers into our response message.
2. Exposing the Orchestration via the WCF-CustomIsolated Adapter
Once the orchestration has
been signed, compiled, and deployed, we're ready to expose the
orchestration using the WCF-CustomIsolated adapter. We're using this
adapter because it provides a higher degree of customization than the
other WCF adapters that we'll use in subsequent steps.
Using the BizTalk WCF Service
Publishing Wizard, we've created a receive location for the service.
During the wizard, we chose the following options:
Selected Create a Service Endpoint
Selected the WCF-CustomIsolated adapter
Enabled the Metadata Endpoint option
Created a BizTalk receive location in the WCFMath application
Selected Publish BizTalk Orchestrations as WCF Service
Selected the BizTalk orchestration assembly DLL
Set the namespace to http://probiztalk2009/mathservice/v1
Set the endpoint location to http://localhost/math
Allowed anonymous access to the WCF service
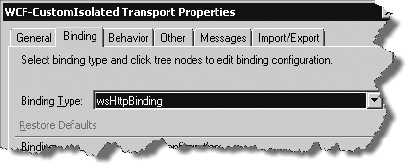
After the orchestration is
published with the wizard, we're left with a basic receive location that
needs additional configuration before it can be used. During the
wizard, we chose the WCF-CustomIsolated adapter. Therefore, the receive
location does not have any binding associated with it. The binding can
be set by simply clicking the Configuration button of the receive
location's properties, going to the Binding tab, and selecting a binding
from the dropdown. For the example, we chose wsHttpBinding, as shown in
Figure 2.
3. Securing Requests with Message-Level Certificate Encryption
To encrypt the message, a development certificate is necessary. We can use makecert to create nonproduction certificates.
Two certificates are
necessary, a trusted root authority and an x.509 certificate issued by
the trusted root. To create the trusted root, execute the following
command from the Visual Studio command prompt:
makecert -pe -n "CN=My Root Authority" -ss root -sr LocalMachine -a sha1
    -sky signature -r
This command creates the
root with a common name of My Root Authority in the Trusted Root
Authorities container. Once this is done, we can create an x.509
certificate issued by the new trusted root by executing the following:
makecert -pe -n "CN=certsample" -ss my -sr LocalMachine -a sha1
    -sky exchange -eku 1.3.6.1.5.5.7.3.1 -in "My Root Authority" -is root
    -ir localmachine
    -sp "Microsoft RSA SChannel Cryptographic Provider" -sy 12
This command creates a certificate with a common name of "certsample" in the Personal container of the local computer.
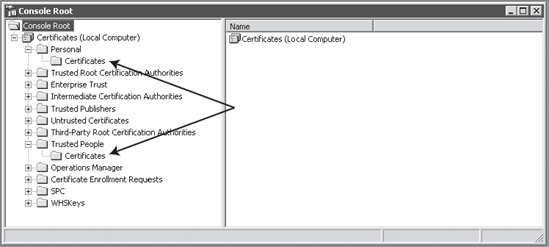
Before the certificate can be
used, though, the certificate also needs to be copied to the Trusted
People container. We need to do that because we are using the same
certificate for both the service and the client. WCF has the ability to
support different certificates for each end of the communication, but
for simplicity we are using the same certificate on both ends.
To copy the certificate to the Trusted People container, follow these steps:
Load a Microsoft Management Console (MMC).
Click Add/Remove Snap-ins and Add Certificates.
Select Computer, click Next, and select Local Computer.
Open the Personal  Certificates tree.
Right-click the certificate named "certsample," and select Copy.
Open the Trusted People Certificates tree node.
Right-click and select Paste.
Figure 3 shows the containers where the certificate needs to be installed.
Now that the certificates are in
place, we can customize the receive location with the required
information to use these certificates. Using the Configuration screen of
the WCFCustomIsolated adapter, make the following changes:
Binding: In the Binding tree, expand Security, and click Message. Change the client-CredentialType value from Windows to Certificate.
Behavior:
In the Behavior tree, right-click Service Behavior, and select Add
Extension. Select serviceCredentials, and click OK. Expand the new
serviceCredentials node, and click ServiceCertificate. Set the findValue
property to "certsample," set x509FindType to FindBySubjectName Expand
ClientCertificate, and select Authentication. Set revocationMode to
NoCheck. This is required to stop WCF from checking the certificate
revocation list (CRL) because we are using development certificates.
