When you share a printer, default share setting are
configured. The following permissions are created and configured
automatically after you share a printer:
Everyone who has access to the printer can print to it.
Administrators can print, manage printers, and manage documents.
The creator/owner can manage documents. The creator/owner is the person who installs the printer.
Understanding what these
terms mean is important, and once you understand what printing, managing
printers, and managing documents entail, you may want to give others on
the network more or fewer permissions.
Understand Share Permissions on Printers
Three Share permissions
exist: Print, Manage Documents, and Manage Printers. There’s also an
option to apply Special Permissions, which I’ll introduce only briefly:
Print By default, each user can print and then cancel, pause, or restart documents or files they send to the printer.
Manage Documents
Users with this permission can manage print jobs in the print queue,
including those created by other users on the network. This means users
with this permission can cancel, pause, and resume other people’s print
jobs.
Manage Printers Users
with this permission can rename, delete, share, and choose preferences
for the printer. Users can set printer permissions for other users and
manage all jobs in the print queue.
Special Permissions
These permissions are generally reserved for system administrators and
allow a user to change the printer owner. The Creator/Owner is the
person who installed the printer.
Caution
Although you can set
advanced NTFS permissions for printers, don’t. Set advanced permissions
only if the share permissions won’t work for you. Mixing share and NTFS
(advanced) permissions can result in problems with “effective”
permissions later that will be difficult to diagnose.
Change Default Share Permissions
If you want to change
the default permissions for a printer, it’s as simple as selecting Allow
or Deny for the desired person or group on the Security tab in the
printer’s Properties dialog box. For instance, you might trust everyone
on your network to use and manage the printer appropriately, and if
those users need more access than the default Print permission, you can
select other permissions as desired. You might also want to do this to
avoid having to input administrator credentials to use the printer from
another computer when logged on as a standard user.
To change the default share permissions, follow these steps:
1. | Locate the printer in the Printers folder, right-click it, and select Run As Administrator.
|
2. | Click Sharing.
|
3. | Click Continue.
|
4. | On the Security tab, under Group Or User Names, select Everyone.
|
5. | In
the Permissions For Everyone box, select Allow for Manage Printers and
Manage Permissions. Do not select Special Permissions. See Figure 1.
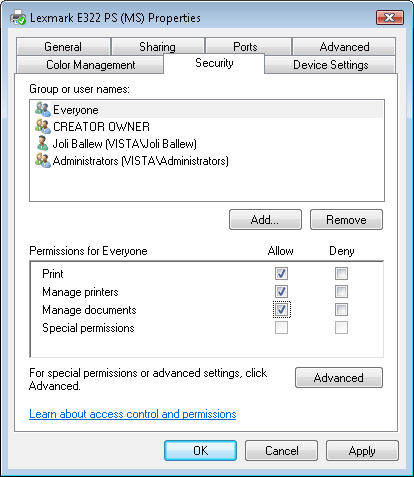
|
6. | Click OK.
|
Remove Everyone
If
you don’t want everyone who has access to the network to be able to
print to your printer, you’ll need to remove the Everyone group and
configure users individually. This will require you to add each user
separately who you want to give permission to print. This is a good way
to go if you do not want your 6- and 12-year-old kids to print to the
printer but you want your wife and grown son to be able to do so.
To remove the Everyone group, follow these steps:
1. | Locate the printer in the Printers folder, right-click it, and select Run As Administrator.
|
2. | Click Sharing.
|
3. | Click Continue.
|
4. | On the Security tab, under Group Or User Names, select Everyone.
|
5. | Click Remove.
|
6. | Click OK.
|
Add Users and Apply Permissions
To
add users and apply permissions for each—for instance, you want to give
limited permissions to your 15-year-old daughter with a new digital
camera, and you want to give your wife full access—follow these steps:
1. | Locate the printer in the Printers folder, right-click it, and select Run As Administrator.
|
2. | Click Sharing.
|
3. | Click Continue.
|
4. | On the Security tab, under Group Or User Names, click Add.
|
5. | Type the name of the user to add, and click Check Names. See Figure 2.

|
6. | To add another user, type a semicolon, and repeat step 5.
|
7. | Click OK.
|
8. | On the Security tab, select the first user you added in step 5.
|
9. | In Permissions, select the permission to apply.
|
10. | Repeat steps 8 and 9 until all users have the required permissions.
|
11. | Click OK. |
