Changing the Default Startup Operating System
To change which operating system is chosen by default at startup, you need to modify the default value in the [boot loader] section. To do that, find the operating system in the [operating systems] section, copy all the text to the left of the equal sign, and then paste it as the new default value. For example, suppose that the [operating systems] section includes the following entry:
In that case, you’d copy just the C:\ text and use that as the new default value:
If you always want your system to boot immediately to Windows XP and bypass the BOOT.INI menu, you have two choices:
Using the BOOT.INI Switches
The ARC pathname syntax
supports more than 30 different switches that enable you to control
various aspects of the Windows XP startup. Here’s a summary of the
switches that are most useful:
| /3GB | Configures
Windows XP to allocate 3GB of virtual memory to User mode processes
(programs) and 1GB to Kernel mode (system) processes. (Normally, Windows
XP allocates 2GB to each mode.) Use this switch if you have one or more
programs that can take advantage of the extra virtual memory. To
fine-tune the amount of virtual memory allocated to programs, see the /userva switch. |
| /basevideo | Boots
XP using the standard VGA mode: 640×480 with 256 colors. This is useful
for troubleshooting video display driver problems. Use this switch if
Windows XP fails to start using any of the safe mode options, if you
recently installed a new video card device driver and the screen is
garbled or the driver is balking at a resolution or color depth setting
that’s too high, or if you can’t load the Windows XP GUI. After Windows
XP has loaded, you can reinstall or roll back the driver, or you can
adjust the display settings to values that the driver can handle. |
| /bootlog | Boots XP and logs the boot process to a text file named NTBTLOG.TXT that resides in the %SystemRoot%
folder. Move to the end of the file and you might see a message telling
you which device driver failed. You probably need to reinstall or roll
back the driver. Use this switch if the Windows XP startup hangs, if you
need a detailed record of the startup process, or if you suspect (after
using one of the other Startup menu options) that a driver is causing
Windows XP startup to fail. |
Note
%SystemRoot% refers to the folder into which Windows XP was installed. This is usually either C:\WINNT or C:\WINDOWS.
| /burnmemory=MB | Specifies the amount of physical memory that Windows XP cannot use. For example, if you set this value to 256,
the memory available to Windows XP is reduced by 256MB. Use this switch
to simulate a low-RAM situation if you suspect that RAM depletion is
causing problems. |
| /debug | Enables
remote debugging of the Windows XP kernel. This sends debugging
information to a remote computer via one of your computer’s serial
ports. If you use this switch, you can specify the serial port by also
using the \debugport=port switch, where port is one of com1, com2, com3, com4, or 1394. If you use a COM port, you can specify the transmission speed of the debugging information by also using the \baudrate=speed switch, where speed is one of the following: 300, 1200, 2400, 4800, 9600, 19200, 38400, 57600, or 115200. If you use an IEEE 1394 (FireWire) connection, you can also add the /channel=numbernumber is a channel value between 1 and 62. switch, where |
| /fastdetect | Tells
Windows XP to not enumerate the system’s serial and parallel ports
during startup. These ports aren’t needed during the boot process, so
this reduces the system startup time. |
| /maxmem=MB | Specifies
the maximum amount of memory, in megabytes, that Windows XP can use.
Use this value when you suspect a faulty memory chip might be causing
problems. |
| /noexecute=level (Service Pack 2 only) | Sets
the Data Execution Prevention (DEP) policy level. DEP prevents
malicious code from executing in protected memory locations. There are
four levels: |
| | OptIn—Windows
system programs are protected by DEP, as well as any applications that
have been programmed to take advantage of (opt into) DEP protection. OptOut—Provides DEP protection for the entire system, except for programs that have been specified to not use (opt out of) DEP. AlwaysOn—Provides DEP protection for the entire system. AlwaysOff—Provides no DEP protection for the system.
|
| /noguiboot | Tells
Windows XP not to load the VGA display driver that is normally used to
display the progress bar during startup. Use this switch if Windows XP
hangs while switching video modes for the progress bar, or if the
display of the progress bar is garbled. |
| /numproc=n | In
a multiprocessor system, specifies the maximum of processors that
Windows XP can use. Use this switch if you suspect that using multiple
processors is causing a program to hang. |
| /pcilock | Tells
Windows XP not to dynamically assign hardware resources for PCI devices
during startup. The resources assigned by the BIOS during the POST are
locked in place. Use this switch if installing a PCI device causes the
system to hang during startup. |
| /safeboot:minimal | Boots Windows XP in safe mode,
which uses only a minimal set of device drivers. Use this switch if
Windows XP won’t start, if a device or program is causing Windows XP to
crash, or if you can’t uninstall a program while Windows XP is running
normally. |
| /safeboot:minimal(alternateshell) | Boots
Windows XP in safe mode but also bypasses the Windows XP GUI and boots
to the command prompt instead. Use this switch if the programs you need
to repair a problem can be run from the command prompt or if you can’t
load the Windows XP GUI. |
Note
The shell loaded by the /safeboot:minimal(alternateshell) switch is determined by the value in the following Registry key:
HKEY_LOCAL_MACHINE\SYSTEM\CurrentControlSet\SafeBoot\AlternateShell
The default value is CMD.EXE (the command prompt).
| /safeboot:network | Boots
Windows XP in safe mode but also includes networking drivers. Use this
switch if the drivers or programs you need to repair a problem exist on a
shared network resource, if you need access to email or other
network-based communications for technical support, or if your computer is running a shared Windows XP installation. |
| /safeboot:dsrepair | Boots
Windows XP in safe mode and also restores a backup of the Active
Directory directory service (this option applies only to domain
controllers). |
| /sos | Displays
the path and location of each device driver (using the ARC pathname
syntax) as it is loaded, as well as the operating system version and
build number and the number of processors. |
| /userva=MB | Specifies the amount of virtual memory allocated to programs when you also include the /3GB
switch. Set the value to a number between 2,048 (2GB) and 3,072 (3GB).
The difference between the value you specify and 3GB is allocated to the
Kernel mode. |
Using the System Configuration Editor to Modify BOOT.INI
Rather than edit the BOOT.INI
file directly, you can modify the file indirectly by using the System
Configuration Editor. To start this program, select File, Run, type msconfig in the Run dialog box, and then click OK. When the System Configuration Window appears, select the BOOT.INI tab, shown in Figure 1.

Note
To change any options in
the System Configuration Utility, you must be logged on to Windows XP
with Administrator-level permissions.
The large box near the top of the tab displays the current BOOT.INI text. You can’t edit this text directly, however. All you can do is highlight one of the items in the [operating systems] section and then click one of the following buttons:
| Check All Boot Paths | Click this button to check the paths of each operating system to ensure they’re valid. |
| Set as Default | Click this button to set the highlighted operating system as the default for the BOOT.INI menu. |
| Move Up | Click this button to move the highlighted operating system higher in the menu. |
| Move Down | Click this button to move the highlighted operating system lower in the menu. |
You can also use the Timeout text box to adjust the timeout value of BOOT.INI.
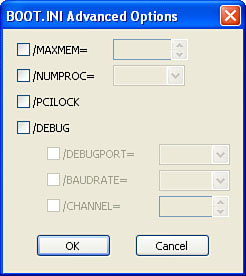
Use the check boxes in the
Boot Options group to set the switches used with the currently
highlighted operating system (assuming that operating system is Windows
XP, 2000, or NT). You can add other switches (such as /maxmem and /debug) by clicking the Advanced Options button, which takes you to the BOOT.INI Advanced Options dialog box shown in Figure 2.
Custom Startups with the Advanced Options Menu
When the BOOT.INI menu appears at startup, you see the following message at the bottom of the screen:
For troubleshooting and advanced startup options for Windows, press F8.
This message remains on the
screen while the progress bar that tracks the loading of startup devices
is displayed. If you press F8, you get to the Advanced Options menu,
which looks like this:
Tip
If your system doesn’t
automatically display the OS Choices menu at startup, you can display
it manually. After you start your computer, wait until the POST is
complete, and then press F8 to display the OS Choices menu. If your
computer is set up to “fast boot,” it might not be obvious when the POST
ends. In that case, just turn on your computer and press F8 repeatedly
until you see the OS Choices menu. Note, however, that if your system
picks up two separate F8 presses, you might end up directly in the
Advanced Options menu.
Microsoft Advanced Options Menu
Please select an option:

    Safe Mode
    Safe Mode with Networking
    Safe Mode with Command Prompt

    Enable Boot Logging
    Enable VGA Mode
    Last Known Good Configuration (your most recent settings that worked)
    Directory Services Restore Mode (Windows domain controllers only)
    Debugging Mode
    Disable automatic restart on system failure

    Boot Normally
    Reboot
    Return to OS Choices Menu

Use the up and down arrow keys to move the highlight to your choice.
The Boot Normally
option loads Windows XP in the usual fashion. You can use the other
options to control the rest of the startup procedure:
| Safe Mode | If
you’re having trouble with Windows XP—for example, if a corrupt or
incorrect video driver is mangling your display, or if Windows XP won’t
start—you can use the Safe Mode option to run a stripped-down version of
Windows XP that includes only the
minimal set of device drivers that XP requires to load. You could
reinstall or roll back the offending device driver and then load XP
normally. When Windows XP finally loads, the desktop reminds you that
you’re in safe mode by displaying Safe Mode
in each corner. (Also, the Help and Support Center appears with the
Safe Mode Troubleshooter loaded.) Choosing the Safe Mode option is the
same as using the following BOOT.INI switches:/safeboot:minimal /bootlog /noguiboot /sos
|
Note
If you’re curious to know which drivers are loaded during a safe mode boot, see the subkeys in the following Registry key:
HKEY_LOCAL_MACHINE\SYSTEM\CurrentControlSet\Control\SafeBoot\Minimal\
| Safe Mode with Networking | This
option is identical to plain safe mode, except that Windows XP’s
networking drivers are also loaded at startup. This enables you to log
on to your network, which is handy if you need to access the network to
load a device driver, run a troubleshooting utility, or send a tech
support request. Choosing this option is the same as using the following
BOOT.INI switches:/safeboot:network /bootlog /noguiboot /sos
|
| Safe Mode with Command Prompt | This option is the same as plain safe mode, except that it doesn’t load the Windows XP GUI. Instead, it runs CMD.EXE to load a command prompt session. Choosing this option is the same as using the following BOOT.INI switches:/safeboot:minimal(alternateshell) /bootlog /noguiboot /sos
|
| Enable Boot Logging | This option is the same as the Boot Normally option, except that Windows XP logs the boot process in a text file named NTBTLOG.TXT that resides in the system root. Choosing this option is the same as using the following BOOT.INI switch:
|
| Enable VGA Mode | This
option loads Windows XP with the video display set to 640×480 and 256
colors. Choosing this option is the same as using the following BOOT.INI switch:
|
| Last Known Good Configuration | This option boots Windows XP using the last hardware configuration that produced a successful boot. |
| Directory Services Restore Mode | This option is the same as using the following BOOT.INI switch:
|
| Debugging Mode | This option is the same as using the following BOOT.INI switch:
|
| Disable Automatic Restart on System Failure | This
option (which is new with Service Pack 2) prevents Windows XP from
restarting automatically when the system crashes. Choose this option if
you want to prevent your system from restarting so that you can
troubleshoot the problem. |
| Boot Normally | This options loads Windows XP normally. |
| Reboot | This option reboots the computer. |
| Return to OS Choices Menu | This option displays the BOOT.INI menu. |
Tip
For those advanced options that have equivalent BOOT.INI
switches, you can use those switches to place individual advanced
options on the OS Choices menu. You do this by adding an item to BOOT.INI’s [operating systems]
section that starts Windows XP with the appropriate switches. For
example, to add an option to the OS Choices menu to start Windows XP in
safe mode, you’d add the following to BOOT.INI’s [operating systems] section:
multi(0)disk(0)rdisk(0)partition(1)\WINDOWS="Safe Mode" /safeboot:minimal /bootlog /noguiboot /sos
If you modify BOOT.INI using the System Configuration Utility, Windows XP maintains a copy of the original BOOT.INI.
If you want to revert to that copy, display the General tab in the
System Configuration Utility and activate the Use Original BOOT.INI
option. If you need to use the edited version of BOOT.INI again, activate the Use Modified BOOT.INI option instead.
