1. Printing an Outline
If text is the main part of
your presentation, you might prefer to print an outline instead of
mini-slides. You can use the outline for speaker notes, audience
handouts, or both. To print the text from Outline view, follow these
steps:
View the outline in Normal or Outline view.
Choose File => Print. The Print controls appear.
Click the button immediately below the Slides text box, and choose Outline as the type of layout to print.
Set any other print options.
Be
aware, however, that the outline will not contain text that you've typed
in manually placed text boxes or any other non-text information, such
as tables, charts, and so on.
2. Exporting Handouts or Notes Pages to Word
One of the drawbacks to
PowerPoint is that the notes and handouts pages cannot be fully
formatted. There's a lot you can't do with them — such as set margins,
or change the sizes of the slide images for handouts. To get around
this, you might want to create your handouts in Microsoft Word. To send
your presentation to Word, follow these steps:
Choose File => Save & Send => Create Handouts => Create Handouts. The Send to Microsoft Office Word dialog box appears as shown in Figure 1.
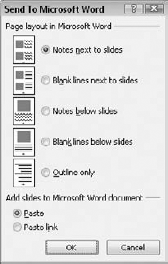
Choose one of the formats shown in Figure 1. You can send to Word in a variety of formats. Some formats are more appropriate for handouts, others for speaker notes. Table 1 gives some suggestions:
Table 1. Word Formats for Imported Text
| For Handouts | For Speaker Notes |
|---|
| Blank Lines Next to Slides | Notes Next to Slides |
| Blank Lines Below Slides | Notes Below Slides |
| Outline Only | Outline Only |
(Optional)
If you want to maintain a link between the PowerPoint file and the Word
file, choose Paste Link. Otherwise, leave Paste selected. If you
maintain a link, then the changes you make to the PowerPoint file are
reflected in the Word file.
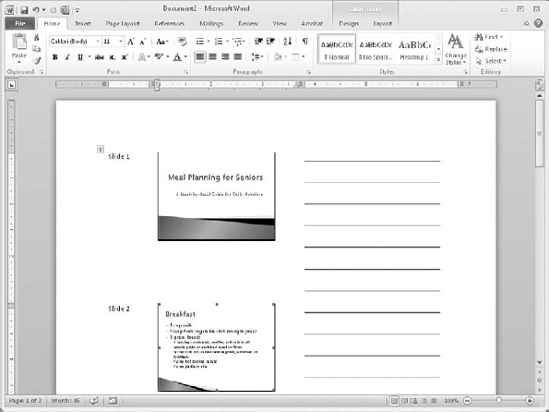
Click OK. Word opens and the slides appear in the format you chose. See Figure 2.
Modify the formatting as desired, and then print from Word.
(Optional)
Save your work in Word if you want to print the same pages again later.
(You may choose to resend to Word later, after making changes in
PowerPoint instead.)
NOTE
The slides appear in
Word in a table (if you chose a Next to Slides option), but without
visible gridlines showing. You can resize (or even delete) the columns
for each element by dragging the column dividers, just like you do in a
table in PowerPoint.
2.1. Changing the Margins in Word
One benefit of
exporting handouts to Word is being able to change the margins. In Word,
on the Page Layout tab, click the Margins button, and choose a margin
preset or choose Custom Margins.
However, note that changing
the page margins does not resize the table. If you change the left
margin, the table may start at a different place in relation to the left
margin (because the table is left-aligned), but if you want to increase
the margins so that you can increase the table width, those are two
separate activities.
You can also set internal margins in the cells in a table. To do so, on the Table Tools Layout tab, click Cell Margins.
2.2. Change the Table Alignment
The table itself has a
default alignment in relationship to the page: Top Left. If you prefer
the look of a centered table, you may want to switch this:
To make the table
horizontally centered on the page, select the table as a whole. To do
this, click the square above and to the left of the table with the
four-headed arrow in it. Then use the Center button on the Home tab
(Paragraph group) to center it. Note that this does not center the text
within the cells; this refers only to the table.
To
vertically center the table on the page, you need to set the vertical
alignment for the document. To do so, on the Page Layout tab in Word,
click the dialog box launcher in the Page Setup group, and on the Layout
tab in the Page Setup dialog box, set the vertical alignment to Center.
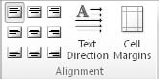
2.3. Change Alignment Within a Cell
To center the content
within a cell horizontally, click in that cell and then on the Table
Tools Layout tab, click the Middle Center button (or any of the other
buttons that are combinations of vertical and horizontal alignment) as
shown in Figure 3.
2.4. Resize Rows and Columns
To resize a column, drag
the border between that column and the one to its right. When the mouse
pointer is over a column border, it changes to a double-headed arrow
with a line between the arrows. Alternatively you can specify an exact
size by clicking in the column, and then on the Table Tools Layout tab,
set a value in the Cell Size group. Do the same for row heights. For a
better look at the gridlines, on the Table Tools Format tab, enable View
Gridlines. These appear only on-screen; they will not print.
NOTE
You cannot resize a row
or column to the point that its text content no longer fits. (And the
lines for the audience to write on are comprised of underline
characters, which are considered text.) Therefore, you may need to
resize the content or even delete some of it. For example, if you use a
layout that includes blank lines, you'll get several blank lines in some
of the cells. To make these cells narrower, you need to decrease the
length of the lines first. To make these cells shorter, you may need to
delete one or more of the lines.
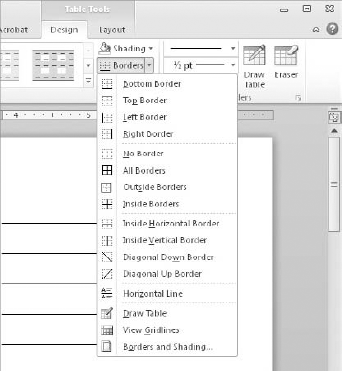
2.5. Turn On/Off Cell Borders
By default, all borders are
turned off for all cells in the table. You can turn them on in a variety
of ways, but perhaps the easiest is to select one or more cells, and
then use the Borders button on the Table Tools Design tab. Choose the
button that has no borders (all dotted lines) to turn all borders off
again. See Figure 4.
NOTE
One thing to note about
these borders is that whatever you choose applies to the selected range,
not to the individual cells. For example, suppose you choose a range of
cells that contains three rows and you apply a bottom border. The
border would be applied only to the bottom of the bottom row of cells.
2.6. Apply a Background
To apply a background to the
entire page, use the Page Color button on the Page Layout tab in Word. A
palette of colors appears. The choices are much the same as in
PowerPoint.
|
Word 2010 uses the same themes
as PowerPoint. You can apply a theme to the document in Word to make it
match the formatting of the presentation in PowerPoint.
|
|
To apply a background to
only certain cells, select the cells and then on the Table Tools Design
tab, click the Shading button and select a color. This is a lot like
applying a fill color in PowerPoint.
2.7. Resize the Graphics
Resizing the slide images is
one of the most common reasons why people export PowerPoint handouts to
Word. Each image is resizable individually, so they need not necessarily
be the same size (although it usually looks better if they are).
If you want to make the slides
larger, you can first increase the column width for the column in which
they reside. Then drag the selection handles on the slide thumbnail to
resize.
NOTE
If
you want to resize all of the slide images and you want them all to be
the same size, set the table column width to the width you want for the
images and then resize each picture as large as it can be while still
fitting in that column. Unfortunately you cannot resize multiple images
as a batch.
