The process of adding and removing columns in views
in Project 2010 is incredibly easy. However, the concept behind what
happens sometimes can be confusing, so before we get into how to add and
remove columns, let’s talk a bit about what’s going on behind the
scenes.
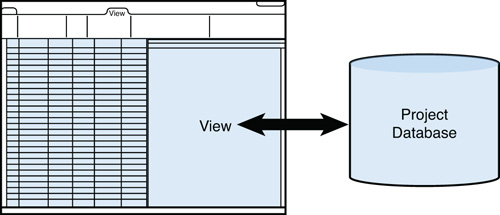
It’s important to remember
that behind the shiny interface of Project 2010, there’s a database. A
nice, stable, giant database. When you use Project to add information
about your project, that information makes its way into that database.
In the Project interface, you use views to look at the data in that
database, as illustrated in Figure 1.
Views are set up to slice and dice the information in the database, in a
way that helps make sense of it. Columns are just parts of views.
They’re a way of surfacing specific parts of the database.
The confusion around this
often comes when you go to remove a column from a view. Let’s say you’ve
had a column in a view for a long time and data has been added to the
column. You decide you no longer need that data, so you hide the column
in the view. Then later, you decide you want to use that column for
another purpose, so you add it again, and lo and behold your data is
still in there. This sometimes comes as a rude surprise to some Project
users, who thought that by hiding the column, the data would go away.
When you hide a column, that’s
really all you’re doing. You’re taking that way of viewing information
in the database out of a view. Imagine if you were simply trying to
change which view surfaced the information. Let’s say you had a column
of information in one view, and after you had been using it for a while,
you realized it would be better suited for another view. If you had to
re-create the column with its data in another view, it could really become quite an effort if you had a large project with several hundred rows of data.
So if columns are just a way
to surface information in the database, how do you remove the data from
the database altogether? Select the cells in a column that contain the
data you want to delete and then press Delete. Got a lot of rows? Click the first cell in the column, scroll to the last row in the table, press and hold Shift, click the last cell in the column, and then press Delete. Poof, your data is gone.
|
This might be a good time to
point out that Project supports multiple undo levels. That is, you can
undo things you did several actions ago by clicking Undo or pressing Ctrl+Z multiple times. You can set how many undo levels you want to support on a project. On the File tab, click Options. Click Advanced. Under General, type the number of undo levels you want to support in the Undo levels box and then click OK.
|
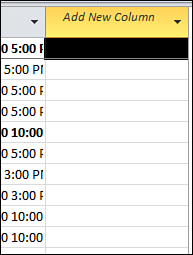
Adding a Column to a View
In any view with data
displayed in a table, such as the Gantt Chart view, simply scroll to the
right side of the table portion of the view and you’ll see the Add New
Column header, as shown in Figure 2.
To add a new column, click
that header and then click the name of the column you want to add. After
the column is added, you can click and drag it to relocate it within
the view. Click the new column header to select the column and then use
the four-direction arrow cursor to drag and drop the column within the
view.
Alternatively,
you can add a column exactly where you want it to appear. Right-click
the column header for the column that you want to appear to the right of
the column you’re adding and then click Insert Column. Click the name of the column to add it to the view.
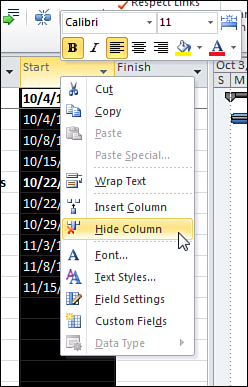
Hiding a Column in a View
If you want to remove a
column from a view without removing the data, click the column header to
select the column and then press Delete. Alternatively, you can right-click the column header and then click Hide Column, as shown in Figure 3.
With either of these options,
the data that was entered in that column is not removed from your
project. I really can’t emphasize this enough. If you want to remove the
data, select the cells containing the data and then press Delete. You’ll see the data in the cells is no longer there after you press Delete.
If you don’t actually see the data gone from the cells in the column,
there’s a good chance it’s still sitting back there in the database.
Consider this fair warning!
