Compared to the view matrix, the projection matrix is
much more difficult to explain! When thinking of the view matrix as the
camera, you can think of the projection matrix as the lens. There are
many more lens types than cameras!
Perspective
The perspective matrix lets
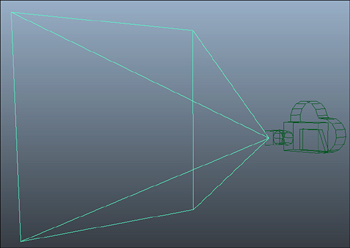
you define the viewing frustum. To visualize what this is, imagine a
pyramid. The tip of the pyramid is the location of the camera (or your
eye). Anything that exists inside that pyramid can be seen; anything
that exists outside of the pyramid cannot be seen. The various methods
to create perspective projection matrices are used to define the size
and shape of this pyramid. See Figure 1.

First, let’s look at the matrix used in the example. It was created using the CreatePerspectiveFieldOfView
method, which has a few parameters. The first is the field of view
parameter, the second is the aspect ratio, and the last two are the near
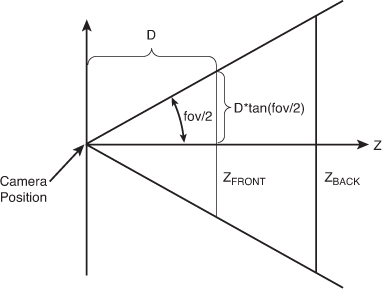
and far planes, but what do these actually mean? The field of view is
the angle that the top of the pyramid forms and is specified in radians.
In the example, we used an angle of 45 degrees, which is somewhat
common. If you used 90 degrees (MathHelper.PiOver2) instead, you’d have a much larger field of view, and thus, a larger viewing area. This would cause your rendered objects to appear smaller because the same screen area would have to render a larger world area (see Figure 2 for more information on the math of the field of view or fov).

The second parameter is the
aspect ratio, which is simply the width of your scene divided by the
height of your scene. Notice here that you use the Viewport property of the GraphicsDevice and you use the AspectRatio
property from that. This is the most common aspect ratio you use, but
if you render to something other than the back buffer (say a render
target), you might want to render at a different aspect ratio. The
aspect ratio here is just like the aspect ratio you see on televisions.
Standard-definition televisions have a 1.33 (4/3) aspect ratio, whereas
most high-definition televisions have a 1.77 (16/9) aspect ratio. Most
of the old resolutions you’ve seen in computers were 1.33 (4/3) aspect
ratios (640×480, 800×600, 1024×768, and so on).
Aspect Ratio, Integers, and Floats
Aspect ratio is defined as a float
value. If you are calculating your aspect ratio using the width divided
by the height, and your width and height parameters are both integers,
so be sure to cast at least one of them to float before the division. If
you do not, the compiler does the division as integers and casts the
final value to float, which isn’t what you want. For example, if you try
to calculate the aspect ratio of a standard definition television set,
you use the width of 4 divided by the height of 3, and in integer math,
4/3 = 1. It would then cast the 1 to the float of 1.0f, which is
incorrect. If you cast one of the values to float before the division,
though, you get 4.0f/3 = 1.3333f, which is the value you want.
The last two parameters are the
near and the far planes of the frustum. Anything closer than the near
plane or anything farther than the far plane is not visible. You can
think of the far plane as the base of the pyramid, whereas the near
plane is where you would “cut off” the top of the pyramid.
See Figure 2 for more information on the math for a field of view projection matrix.
Using the field of view is one
way to create a perspective projection matrix, but not the only way.
There are two other helper methods you can use, namely CreatePerspective and CreatePerspectiveOffCenter.
Each of these creates your pyramid in slightly different ways, but
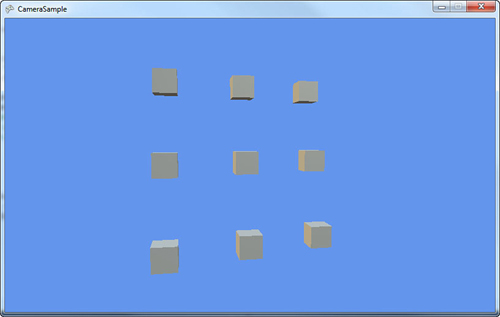
before we get to that, let’s modify the example to draw a lot of boxes
so it’s easier to see how the changes behave. Replace your draw code
with the following (this might seem way more complicated than it is) to
see a series of boxes like you see in Figure 3:
protected override void Draw(GameTime gameTime)
{
    const int numberBoxes = 3;
    const int radiusMultiple = numberBoxes + 1;
    GraphicsDevice.Clear(Color.CornflowerBlue);
    float radius = model.Meshes[0].BoundingSphere.Radius;
Matrix view = Matrix.CreateLookAt(
        new Vector3(0, radius * radiusMultiple,
            radius * (radiusMultiple * radiusMultiple)),
       new Vector3((numberBoxes / 2) * (radius * radiusMultiple) - 1,
            (numberBoxes / 2) * (radius * radiusMultiple) - 1, 0),
            Vector3.Up);
Matrix proj = Matrix.CreatePerspectiveFieldOfView(MathHelper.PiOver4,
        GraphicsDevice.Viewport.AspectRatio, 1.0f, 100.0f);
    for (int x = 0; x < numberBoxes; x++)
    {
        for (int y = 0; y < numberBoxes; y++)
        {
            Vector3 pos = new Vector3((y * (radius * radiusMultiple)) - 1,
                (x * (radius * radiusMultiple)) - 1, -(y + x));
            model.Draw(Matrix.CreateTranslation(pos), view, proj);
        }
    }
    base.Draw(gameTime);
}

Although this seems more
complicated than it is, all you’re doing here is drawing nine different
boxes. They’re rendered in a square pattern with each one rendered at a
different spot in the world and at a variety of different depths. You
should notice how ones that are farther away are slightly smaller.
The CreatePerspective
method takes only four parameters to describe what your pyramid should
look like. The first one is the width of the top of the pyramid (where
the near plane cuts it off), and the second is the height of the same.
The third parameter is the distance to the near plane, and the fourth is
the distance to the far plane (or the base of the pyramid). Modify your
matrix creation as follows:
Matrix proj = Matrix.CreatePerspective(1.0f, 0.5f, 1.0f, 100.0f);
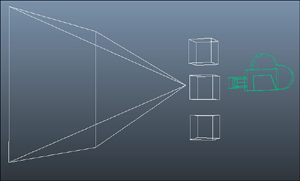
If you run the program now,
notice that the picture has changed somewhat dramatically. All nine
boxes don’t even appear fully onscreen anymore! This is because you
changed the shape of your viewing frustum (or the pyramid), and portions
of those boxes are now outside of it. See Figure 4.

The CreatePerspective
method assumes that you are looking at the center point of the near
plane (formed by the width and height), but that isn’t a requirement
either. You can use the CreatePerspectiveOffCenter
method, which is similar to the nonoff center method. Rather than a
width and height being passed in, you instead must pass in the left,
right, top, and bottom positions. For example, if you use the following
instead of the CreatePerspective method you used earlier, you would get the same output:
proj = Matrix.CreatePerspectiveOffCenter(-0.5f, 0.5f, -0.25f, 0.25f, 1.0f, 100.0f);
This is because you have the
same width and height, and they are centered. Using this method enables
you even more control over the location and size of the viewing frustum.
There is also another common type of projection matrix, the orthographic projection.
Orthographic
Much
like a perspective matrix, an orthographic matrix builds a viewing
frustum, but instead of a pyramid shaped structure, it is more
rectangular. The viewing frustum does not get larger between the near
plane and the far plane, and no perspective foreshortening occurs. All
objects of the same size are rendered the same size, regardless of how
far they are from the camera.
There are two helper methods to create these types of projection matrix: CreateOrthographic and CreateOrthographicOffCenter.
Much like the perspective counterparts, these describe the orthographic
volume, with the former being centered and the latter capable of being
off center. If you replaced your project matrix with the following, you
would see all nine boxes, but they’d all appear on the same plane:
proj = Matrix.CreateOrthographic(15.0f, 15.5f, 1.0f, 100.0f);
With the basics of projection matrices and view matrices out of the way, now you can actually create some camera types!