4. Rendering 3D Models
A 3D model consists of triangle primitives, but are
generally created in a third-party tool, such as Softimage Mod Tool, Daz
Studio 3D, blender, or Caligari trueSpace, to name a few of the freely
available modeling tools. Paint.NET is a free tool to create 2D
textures. Professional modeling tools for purchase are Autodesk's 3ds
Max, Autodesk's Maya, and Adobe's Creative Suite for texture creation.
XNA Game Studio 4.0 supports importing 3D models in both Autodesk .fbx
and DirectX .x formats generated from any of these tools.
4.1. Movable Camera
For the new project named XNA3DModels we need a Camera object to view the 3D scene and model. In the previous sample the Camera was fixed in location. In this sample we create a Camera that can create the appearance of movement based on user input.
|
The Camera Projection or field of view does not change; think of that aspect of the Camera as fixed, like looking through a pair of binoculars. The Camera. View property is the direction that the binoculars are pointed and can change based on user input.
|
|
We start with a copy of the Camera class from the XNA3DPrimitives project. Properties for View, Position, Up are added to the Camera class. We also add a private variable named direction of type Vector3 that is calculated by taking the target Vector3 (the spaceship model) and subtracting the PositionVector3. The Projection property is calculated as before.
The UpVector3 value is set to Vector3.Up as before and the View property is recalculated each time it is accessed via this read-only property declaration:
public Matrix View
{
  get { return Matrix.CreateLookAt(Position, Position+direction, Up); }
}
The recalculation is necessary since the Camera Position and direction values will change based on user input in the Camera.Update method. Listing 3 has the Camera source code.
Example 3. Updated Camera Class with Support for User Input
using System;
using Microsoft.Devices.Sensors;
using Microsoft.Xna.Framework;

namespace XNA3DModels
{
  public class Camera : Microsoft.Xna.Framework.GameComponent
  {
    #region private members
    //Camera properties
    Vector3 direction;
    Vector3 Up;

    //Accelerometer input
    Accelerometer accelerometer;
    AccelerometerReading currentReading;

    //Movement parameters
    float speed = 100f;
    //Yaw movement
    float maxLeftRight = MathHelper.PiOver4 / 10;
    float stepLeftRight = MathHelper.PiOver4 / 10000;
    float currentLeftRight = 0;
    #endregion

    public Camera(Game game, Vector3 position, Vector3 target, Vector3 upVector)
      : base(game)
    {
      Position = position;
      direction = target - position;
      direction.Normalize();
      Up = upVector;

      // Initialize frustum matrix, which doesn't change
      Projection = Matrix.CreatePerspectiveFieldOfView(
          MathHelper.PiOver4,
          this.Game.GraphicsDevice.Viewport.AspectRatio,
          1, 20000);

      currentReading = new AccelerometerReading();
    }

    public Matrix View
    {
      get { return Matrix.CreateLookAt(Position, Position + direction, Up); }
    }
    public Matrix Projection { get; private set; }
    public Vector3 Position { get; private set; }

    public void ResetPosition()
    {
Position = new Vector3(0, 1000, 15000);
      direction = Vector3.Zero - Position;
      direction.Normalize();
      Up = Vector3.Up;
    }

    public override void Initialize()
    {
      accelerometer = new Accelerometer();
      accelerometer.ReadingChanged += accelerometer_ReadingChanged;
      accelerometer.Start();

      base.Initialize();
    }

    public override void Update(GameTime gameTime)
    {
      ApplyThrust();

      ApplySteering();

      base.Update(gameTime);
    }

    private void ApplySteering()
    {
      if ((Math.Abs(currentLeftRight) < maxLeftRight) &&
    (Math.Abs(currentReading.Y) > .4))
      {
        direction = Vector3.Transform(direction,
                    Matrix.CreateFromAxisAngle(Up, currentLeftRight));
        if (currentReading.Y > .2)
        {
          currentLeftRight += stepLeftRight;
          if (currentLeftRight < 0)
            currentLeftRight = currentLeftRight * −1;
        }
        if (currentReading.Y < −.2)
        {
          currentLeftRight -= stepLeftRight;
          if (currentLeftRight > 0)
            currentLeftRight = currentLeftRight * −1;
        }
      }
    }

    private void ApplyThrust()
    {
      //Travel forward or backwards based on tilting
      //device forwards or backwards (Z axis for Accelerometer)
      if (currentReading.Z < −.65)
        Position += direction * speed;
if (currentReading.Z > −.5)
        Position -= direction * speed;
    }

    protected override void OnEnabledChanged(object sender, System.EventArgs args)
    {
      if (this.Enabled)
        accelerometer.Start();
      else
        accelerometer.Stop();

      base.OnEnabledChanged(sender, args);
    }

    private void accelerometer_ReadingChanged(
      object sender, AccelerometerReadingEventArgs e)
    {
      currentReading.X = e.X;
      currentReading.Y = e.Y;
      currentReading.Z = e.Z;
      currentReading.Timestamp = e.Timestamp;

#if DEBUG
      System.Diagnostics.Debug.WriteLine("X: " + e.X);
      System.Diagnostics.Debug.WriteLine("Y: " + e.Y);
      System.Diagnostics.Debug.WriteLine("Z: " + e.Z);
#endif

    }
  }

  class AccelerometerReading
  {
    public double X { get; set; }
    public double Y { get; set; }
    public double Z { get; set; }
    public DateTimeOffset Timestamp { get; set; }
  }
}
|
User input is based on Accelerometer sensor
input. Z axis accelerometer value changes, i.e., tilting the phone
forward and backward in landscape orientation will move the Camera
object closer or further in the direction it is pointed, think of it as
thrust. Tilting the phone left or right, i.e., Y axis accelerometer
changes, steers the Camera left or right. The hard-coded values
used to manage user input were derived empirically based on the size of
the spaceship model size, Projection size, etc. Finding the right
balance based on all the factors in a game are part of the art of
providing good game play.
In Listing 3 you can find the code to wire up the accelerometer. The OnEnabledChanged event shown here is overridden to allow Starting and Stopping the Accelerometer object readings based on whether the GameComponent is enabled:
protected override void OnEnabledChanged(object sender, System.EventArgs args)
{
  if (this.Enabled)
    accelerometer.Start();
  else
    accelerometer.Stop();
base.OnEnabledChanged(sender, args);
}
This is a good programming practice to do, so that collecting Accelerometer input does not needlessly run the battery down. The Camera class also contains a ResetPosition
method for testing purposes in the event that you fly off into 3D space
and want to get back to a known good position for the movable Camera object.
The Update method in Listing 8-6 calls to private methods, ApplyThrust and ApplySteering. ApplyThrust is pretty straight forward. It adjusts the Position of the Camera along the direction the Camera object is pointing, moving the Camera backwards and forwards.
The ApplySteering method detects changes in the left/right tilt of the phone and applies the change to the currentLeftRight float value. This is used to calculate a new value for direction with this line of code:
direction = Vector3.Transform(direction,
            Matrix.CreateFromAxisAngle(Up, currentLeftRight));
This handy piece of code applies a transform to the direction Vector3 object. The transform matrix is calculated by taking the Up Vector3
value and an angle in radians that is based on the tilt of the phone.
Now that the Camera class is updated, we move on to creating a new class
for 3D game objects and a 3D game object coordinator class.
4.2. 3D Game Object Management
In the AlienShooter 2D game, we created a class named GameObject to represent the sprite objects in the game. In the XNA3DModels project we create a class named GameObject3D to represent 3D model objects. We also create a SceneManager class that can manage multiple GameObject3D instances as part of a 3D game.
4.2.1. GameObject3D Class
The GameObject3D class is pretty simple. Just like GameObject took a 2D sprite Texture2D object, GameObject3D takes a Model instance loaded from the content project. In our case, the spacehip.fbx sample spaceship object located in the XNA3DModelsContent project Models
folder. The XNA Game
Studio 4.0 documentation covers this in detail at this link:
http://msdn.microsoft.com/en-us/library/dd904249.aspx
Figure 9 is taken from the above page and describes the relationships between the Model, Mesh and bones objects.
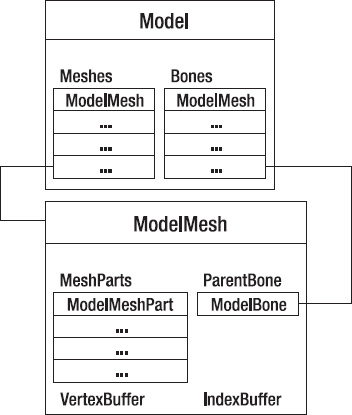
A Model object is made up of many vertices
and materials organized into a set of meshes. In the XNA Framework, a
model is represented by the Model class. A model contains one or more meshes, each of which is represented by a ModelMesh class. Each mesh is associated with one bone represented by the ModelBone class. Notice the familiar VertextBuffer and IndexBuffer that makes up the ModelMesh, which is essentially a collection of triangles under the covers.
The bone structure is set up to be hierarchical to
make controlling each mesh (and therefore the entire model) easier. At
the top of the hierarchy, the model has a Root bone to specify the overall position and orientation of the model. Each ModelMesh object contains a ParentBone and one or more ModelBone. You can transform the entire model using the parent bone as well as transform each individual mesh with its bone.
To animate one or more bones, update the bone transforms during the render loop by calling Model.CopyAbsoluteBoneTransformsTo
Method, which iterates the individual bone transforms to make them
relative to the parent bone. To draw an entire model, loop through a
mesh drawing each sub mesh. It is through transforming bones over time
that a Model can appear to walk, rotate, fly, etc. in a 3D game. With the above background out of the way, Listing 4 describes how to work with a Model in code when rendering.
Example 4. The GameObject3D class
using Microsoft.Xna.Framework.Graphics;
using Microsoft.Xna.Framework;

namespace XNA3DModels.Models
{
  class GameObject3D
  {
Matrix[] boneTransforms;

    public GameObject3D(Model m)
    {
      SpaceshipModel = m;
      boneTransforms = new Matrix[SpaceshipModel.Bones.Count];
    }

    public Matrix World
    {
      get { return Matrix.Identity; }
    }
    public Model SpaceshipModel { get; protected set; }

    public void Update()
    {

    }

    public void Draw(Camera camera)
    {
      SpaceshipModel.CopyAbsoluteBoneTransformsTo(boneTransforms);

      foreach (ModelMesh mesh in SpaceshipModel.Meshes)
      {
        foreach (BasicEffect be in mesh.Effects)
        {
          be.World = World * mesh.ParentBone.Transform;
          be.Projection = camera.Projection;
          be.View = camera.View;
          be.TextureEnabled = true;
          be.EnableDefaultLighting();
          be.PreferPerPixelLighting = true;
        }
        mesh.Draw();
      }
    }
  }
}
|
Notice that we pass the Camera object into the Draw method to ensure that the Model is rendered within the coordinates of the Camera. Just like when we rendered primitives in the XNA3DPrimitives project, an Effect class is used to apply textures and provide lighting. In the next section we cover the SceneManager class that manages GameObject3D objects.
4.2.2. SceneManager Class
The SceneManager class inherits from the DrawableGameComponent class. It maintains a collection of GameObject3D objects in a Generic List collection. As a minimum it loops through each object and calls the Update and Draw methods for all managed objects as shown in Listing 5.
Example 5. TheSceneManager class
using System.Collections.Generic;
using Microsoft.Xna.Framework;
using Microsoft.Xna.Framework.Graphics;

namespace XNA3DModels.Models
{
  public class SceneManager : DrawableGameComponent
  {
    List<GameObject3D> gameObjects3D = new List<GameObject3D>();

    public SceneManager(Game game)
      : base(game)
    {
    }

    public override void Initialize()
    {
      base.Initialize();
    }

    protected override void LoadContent()
    {
      gameObjects3D.Add(new GameObject3D(Game.Content.Load<Model>("Models/spaceship")));
      base.LoadContent();
    }

    public override void Update(GameTime gameTime)
    {
      for (int i = 0; i < gameObjects3D.Count; ++i)
      {
        gameObjects3D[i].Update();
      }

      base.Update(gameTime);
    }

    public override void Draw(GameTime gameTime)
    {
      for (int i = 0; i < gameObjects3D.Count; i++)
      {
        gameObjects3D[i].Draw(((Game1)Game).Camera);
      }
      base.Draw(gameTime);
    }
  }
}
|
The SceneManager class provides support for managing numerous GameObject3D classes and can be the basis for creating a more complex application in combination with the GameObject3D and Camera class we have covered so far. We now pull all of the previous pieces together to compete the XNA3DModels project sample in the next section.
4.3. XNA3DModels Game Class
The Game class Game1.cs is updated to have three additional private members at the top:
SceneManager sceneManager ;
Texture2D backgroundTexture;
GestureSample gestureSample ;
A SceneManager instance is added as well as a Texture2D to display a background image. The GestureSample field is used to obtain a touch screen gesture by the user. If a Tap gesture is detected, the Camera.ResetPosition method is called to reposition the Camera in front of the rendered 3D model.
The Camera object is declared as a public property to the Game1 class so that it can be passed into the Draw method of GameObject3D instances. Here is the Camera and SceneManager initialization code in the Game1 class:
protected override void Initialize()
{
  // Initialize Camera
  Camera = new Camera(this, new Vector3(0, 1000, 15000),
      Vector3.Zero, Vector3.Up);
  Components.Add(Camera);

  //Initialize SceneManager
  sceneManager = new SceneManager(this);
  Components.Add(sceneManager);

  TouchPanel.EnabledGestures = GestureType.Tap;

  base.Initialize();
}
The code also enables the Tap Gesture so that the user can reset the Camera position. The Update method is modified to call the HandleInput method shown here:
private void HandleInput()
{
  if (TouchPanel.IsGestureAvailable)
  {
    gestureSample = TouchPanel.ReadGesture();
    if (gestureSample.GestureType == GestureType.Tap)
      Camera.ResetPosition();
  }
}
The only other code modified in the Game1 class is to load the backgroundTexture and draw the backgroundTexture using a SpriteBatch object as before. Note that you can inter-mingle 2D code to render textures and screen text with 3D code. Figure 10 shows the rendered spaceship model against a space background.
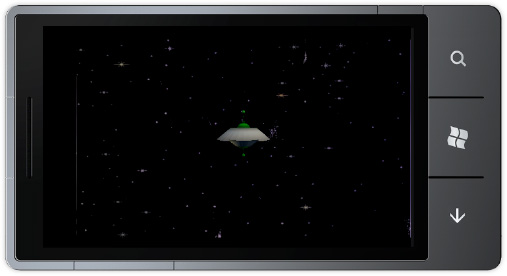
You should run the sample on a phone to test out the Accelerometer
input. While the sample isn't super exciting, it demonstrates how to
render basic 3D models in the XNA Framework including a few classes to
help you get started with 3D game development.
