We have seen how validation can be performed against the HtmlPlaceholderControl
using client-side scripts. Client-side validation essentially reduces
round-trips to the server just to find out if they have left out any
fields. However, client-side validation does have its limitations. For
instance, we can’t exactly be 100% sure that the validation did take
place on the client. The user could have made a copy of the page, fired
up his or her favorite HTML editing tool and modified the page to remove
any form of validation. If that happens, invalid content may still find
its way into the system.
In addition, not all types of validation can be
done on the client. For example, you may need to match the contents of a
placeholder control against an existing store of information in an
online database. Or perhaps requirements dictate performing routines
that can only be executed on the server.
In this example, we will extend our simple check
for an empty placeholder control. Instead of the JavaScript validation
on the client, we will do it server-side.
To be absolutely sure that validation is being
performed on the server, let’s throw in an extra check. We will check to
see if the user has entered a minimum of 50 characters of text—a common
requirement for articles that require say, a summary of at least a
certain length. You can of course, extend the code to perform more
complex validation routines.
The trouble with server-side validation is that
the default placeholder controls are not designed to deal with it
without some customization. Here is what we have to do to get it to
work. We will need to:
Build the RequiredHtmlPHValidator described earlier.
Modify the HtmlPlaceholderControl to cancel the save in the event the server-side validation fails. We do this by creating our own custom placeholder control.
Replace all HtmlPlaceholderControls that require server-side validation with the custom placeholder control.
And
finally, modify all save action controls to cancel the entire save
operation when one or more placeholders contain invalid content.
The HtmlPlaceholderControl with Validation
We’ve already built the RequiredHtmlPHValidator control so let’s dive straight in and build a custom HtmlPlaceholderControl that understands validation. Add a class file to the MCMSValidators project and name it HtmlPHWithValidation.cs. Add the required namespaces above the namespace declaration as shown below:
using System;
using System.Web.UI;
						using Microsoft.ContentManagement.WebControls;
						using Microsoft.ContentManagement.Publishing;
namespace MCMSValidators
{
}
As our custom control will have all the features of HtmlPlaceholderControl, let’s inherit directly from it.
public class HtmlPHWithValidation : HtmlPlaceholderControl
{
}
Next, we will add the ValidationProperty attribute, which instantly makes the HtmlPlaceholderControl compatible with the ASP.NET validation architecture:
When setting the ControlToValidate property of matching validation controls, the HtmlPlaceholderControl’s ID will appear in the dropdown (recall that previously, we had to type in the ID manually).
You will be able to use the control with all ASP.NET validation controls. If you were to add, say, the RequiredFieldValidator and set its ControlToValidate property to that of our custom placeholder control, validation will now take place without any errors.
Add the ValidationProperty attribute above the class declaration and specify Html as the property to be validated.
[ValidationProperty("Html")]
public class HtmlPHWithValidation : HtmlPlaceholderControl
{
}
If adding the
ValidationProperty attribute makes the control compatible with all
ASP.NET validation controls, why didn’t we use this approach to validate
placeholder content?
Technically, we could have simply added the ValidationProperty attribute to all placeholder controls and used this approach to address the problems raised in the earlier section.
However, there are several reasons why we did
not do so. Firstly, HTML isn’t exactly plain text. You would still need
to find ways to run the regular expressions to check to see if the
placeholder control was really empty.
In addition, if you used this approach to
validate MCMS placeholder controls, you would find that validation
occured in all publishing modes. This means that when the placeholder
control contains invalid content, the error message appears even in
published mode! To hide the error message, you would have to customize
the validation control to perform validation only in the AuthoringNew and AuthoringReedit modes as we did in the example above.
Adding the ValidationProperty attribute isn’t a magic bullet; a fair amount of customization is still required.
When validation of the page fails, we need to
cancel the save event. To do so, we will modify the behavior of the
placeholder control’s OnSavingContent() event handler. The OnSaving()
event handler is called just before the contents are written to the
content repository, so it gives us a chance to cancel the event should
the content not be valid.
First, we will trigger validation by calling the Page.Validate() method. The code that gets triggered is the EvaluateIsValid() function of the RequiredHtmlPHValidator
we built earlier. We did not really require the results of this method
then as we depended on client-side JavaScript to perform the validation.
However, during server-side validation, the result returned by this
function is crucial. It decides whether or not the content is valid and
if the page should be saved.
We check the results of the Page.Validate() method by looking at the Page.IsValid flag. If validation is successful, we save the page. Otherwise, the save is canceled by setting e.Cancel
to be true. It is probably worthwhile to note that when canceling the
save, the contents of the placeholder control are not erased or
modified. The control still holds the invalid data. It is therefore
important to give meaningful error messages that are displayed on the
screen so that the author knows that the save has failed.
Add the overridden OnSavingContent() method directly below the HtmlPHWithValidation() constructor.
protected override void OnSavingContent(PlaceholderControlSavingEventArgs e)
{
  Page.Validate();
  if (!Page.IsValid)
  {
    e.Cancel = true;
  }
  else
  {
    base.OnSavingContent(e);
  }
}
And the control is complete!
The RequiredHTMLPHValidator with Server-Side Validation
Earlier, when building the RequiredHtmlPHValidator
control, we took a quick look at how server-side validation could be
accomplished, but didn’t actually write the code that does the work.
Let’s revisit the control and finish up the code by repeating the logic
for checking to see if the control contains content on the server-side.
First, we will modify the EvaluateIsValid() method to perform validation only when in update mode. We look for the HtmlPlaceholderControl to validate and use the Boolean IsEmpty() method (defined next), which returns true when the placeholder is empty and false otherwise.
protected override bool EvaluateIsValid()
{
  bool valid = true;
  // perform validation only in update mode
						if (CmsHttpContext.Current.Mode == PublishingMode.Update)
						{
						HtmlPlaceholderControl ctrl;
						ctrl = FindControl(ControlToValidate) as HtmlPlaceholderControl;
						if (IsEmpty(ctrl.Html))
						{
						valid = false;
						}
						}
  return valid;
}
Next, we add the IsEmpty() method directly below the EvaluateIsValid() method. It’s the server-side version of the JavaScript routine that we coded earlier.
private bool IsEmpty(string content)
{
// Add more tags to ignore in this list if you need to.
// Here, we ignore <hr> and <img> tags
// additional tags need to be added and separated
// with a '|' character.
string tagsToKeep = "img|hr";
// This regular expression matches all <img> and <hr> tags
string regExpTagsToKeep = "<\\s*(" + tagsToKeep + ")\\b[^>]*>";
Regex reTagsToKeep = new Regex(regExpTagsToKeep,
RegexOptions.IgnoreCase | RegexOptions.Compiled);
// Check if one of the tags to keep is included and exit.
if (reTagsToKeep.IsMatch(content))
{
// Placeholder is not empty.
return false;
}
// This regular expression gets all tags in the content
string regExpForAllTags = "<[^>]*>";
Regex reAllTags = new Regex(regExpForAllTags,
RegexOptions.IgnoreCase | RegexOptions.Compiled);
// Remove all Tags by replacing with an empty string
content = reAllTags.Replace(content, "");
// Remove all spaces and non-breaking spaces ( )
content = content.Replace(" ","");
content = content.Replace(" ","");
if (content == "")
{
// All tags removed, we are left with an empty string
// Placeholder is empty.
return true;
}
else
{
// After removing all tags, we still have content.
// Placeholder is not empty.
return false;
}
}
You may be wondering why we performed the same
type of validation twice. After all, if the client-side routine checks
to see if the placeholder is empty, why repeat the same inspection on
the server? This is just an added precaution to be double-sure that
validation does occur. Most of the time, the client-side validation
routine executes without a hitch. However, it’s always a good idea to
repeat the validation on the server as well to address what-if scenarios
where the client-side routine fails. For instance, there could be a bug
that prevented the client script from running, or perhaps authors could
have disabled client-scripts on their browsers. Without checking the
content again on the server, there is a possibility, no matter how
small, of saving invalid content.
Checking the Length of Text Entered
We mentioned earlier that we plan to do more
than check for empty placeholders. In this example, we will add an extra
check to see if the author has entered at least 50 characters of text.
Let’s go back to the EvaluateIsValid() method of the RequiredHTMLPHValidator.cs class. We will add a call to IsLessThanMin() to decide whether or not the content has met the minimum length requirement.
The limit is stored in the MinLength
property value. Developers can set its value using get and set
accessors. The default value of 0 implies that there is no limit to the
amount of text entered. So in our case, the developer will have to set
the MinLength property to 50.
As we are only interested in actual text, not tags, we will filter out all tags from the content using the RemoveAllTags()
method. The method uses a regular expression to match all tags in the
content and replace them with empty strings. All non-breaking spaces are
removed as well. At the end of the routine, only text is left. For
example, if the placeholder contained the following HTML content:
<table><tr><td> <p> I love tropical plants! </p></td></tr></table>
After running RemoveAllTags(), we are left with just the text:
The IsLessThanMin() method accepts the
text-only string as an input. We check the length of the string, and
anything less than the number specified in the MinLength property is considered invalid.
Add the highlighted code to the RequiredHTMLPHValidator.cs class.
protected override bool EvaluateIsValid()
{
bool valid = true;
// perform validation only in update mode
if (CmsHttpContext.Current.Mode == PublishingMode.Update)
{
HtmlPlaceholderControl ctrl;
ctrl = FindControl(ControlToValidate) as HtmlPlaceholderControl;
if (IsEmpty(ctrl.Html) || IsLessThanMin(RemoveAllTags(ctrl.Html)))
{
valid = false;
}
}
return valid;
}
// Property for storing the maximum length of the content
private int minLength = 0;
public int MinLength
{
get
{
return minLength;
}
set
{
minLength = value;
}
}
// Remove all tags
private string RemoveAllTags(string content)
{
// This regular expression gets all tags in the content
string regExpForAllTags = "<[^>]*>";
Regex reAllTags = new Regex(regExpForAllTags,
RegexOptions.IgnoreCase | RegexOptions.Compiled);
content = reAllTags.Replace(content, "");
// Remove non-breaking spaces ( )
content = content.Replace(" ","");
return content;
}
// Determine if the content is below the specified minimum length
private bool IsLessThanMin(string content)
{
bool lessThanMin = false;
if (minLength > 0)
{
if (content.Length < minLength)
{
lessThanMin = true;
}
}
return lessThanMin;
}
Save and build the solution. To use the custom control, follow the steps outlined in the earlier section Adding the Custom Validator to the Template File. In a nutshell, you will need to:
Add a reference to MCMSValidators in the MCMS web project.
Add the control to the Toolbox.
Replace any HtmlPlaceholderControl that requires validation with this control and bind it to an HtmlPlaceholderDefinition.
Add the RequiredHTMLPHValidator control and set its ControlToValidate property to the HtmlPHWithValidation control you wish to validate. Give it an appropriate error message (such as Please enter more than 50 characters). In addition, set the MinLength property to 50.
On the next save, notice that the placeholder
content can’t be saved unless you have entered more than 50 characters
of text (not inclusive of tags and non-breaking spaces).
Canceling the Save Operation
In the example above, we validated an HtmlPlaceholderControl
and saved its contents only if it contained more than 50 characters of
text. However, did you notice that content from regular placeholder
controls continued to be saved? We have only prevented the HtmlPHWithValidation’s content from being saved. The rest of the page went on to be saved back to the repository.
What if you had chosen the Save and Exit option? Instead of canceling the save of the entire page, the page toggles back to the AuthoringUnpublished
mode without informing the author that placeholder content has not been
saved. Clearly, authors won’t be too pleased to find out that all their
hard work has disappeared simply because they left one placeholder
blank.
To get around these issues, we will modify all buttons that perform saves in the Web Author Console to:
Check to see if there are validation controls on the page. If there are, call for the page to be validated.
Raise an error should the page contain invalid content, canceling the entire save operation.
Display an error message on screen, informing authors that the save operation has failed.
Let’s start by modifying the Save and Exit button. We will alter the original behavior of the button by overriding the PerformActionBehavior()
method to check to see if the page contains invalid content. If it
does, we will cancel the save and display an error message in the Error
Console. Otherwise, we proceed with the save.
In the ValidatedReeditSaveAndExitAction.cs class file, add the following overridden PerformActionBehavior() method directly below the ActionJavascript property:
protected override void PerformActionBehavior()
{
  // Get the current CmsHttpContext
  CmsHttpContext cmsContext = CmsHttpContext.Current;
  // Get the current Web Author Context
  WebAuthorContext wac = WebAuthorContext.Current;
  // Check to see if there are validation controls on the page
  if (Page.Validators.Count > 0)
  {
    // Validation Controls exist. Validate the page.
    Page.Validate();
    // Check to see if the page is valid.
    if (Page.IsValid)
    {
      // Yes, the page is valid. Continue with the save.
      base.PerformActionBehavior();
    }
  }
  else
  {
    base.PerformActionBehavior();
  }
}
Save and build the MCMSValidators project.
In edit mode, enter less than 50 characters to the HtmlPHWithValidation
placeholder control to see what happens when validation fails, and
attempt to save the page. This time, an error message appears on the
Error console as shown below:
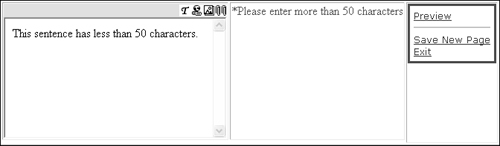
Nothing on the page was saved! All placeholder
controls retain their original content. To complete the solution, repeat
the steps above and add the overridden PerformActionBehavior() method to the following action controls:
