The installation of the Exchange 2007 Hub
Transport server role is a straightforward task. This section covers
the installation and configuration of a basic system to illustrate the
concepts.
The installation of the Hub
Transport role assumes that Exchange 2007 is already installed on the
target server.
Memory and CPU maximum recommendations for the Hub Transport server role are shown in Table 1.
Table 1. Hub Transport Server Role Server Maximums
| Role | Maximum Processor | Maximum Memory |
|---|
| Hub Transport server | 2 Dual Core | 8GB |
Beyond these capacities, there will be diminishing returns. These are based on the Exchange product group testing.
Note
The Hub Transport role cannot be installed on an Exchange server that is a node in a cluster.
The
first step is to install the Hub Transport server role. The following
procedure assumes that the Exchange 2007 server has already been
installed. The steps to add the Hub Transport server role are as
follows:
1. | In Control Panel, double click on Add or Remove Programs.
|
2. | Select Microsoft Exchange Server 2007.
|
3. | Click Change to enter Exchange Maintenance mode. |
4. | Click Next.
|
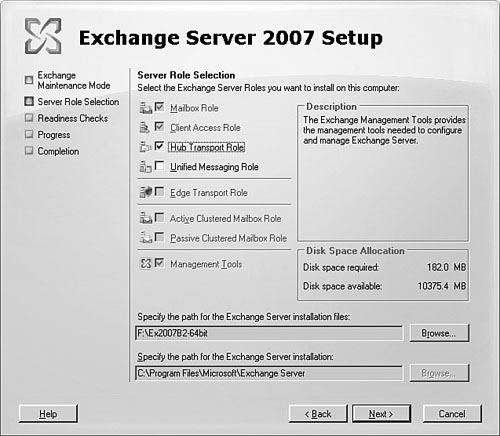
5. | Select the Hub Transport Role check box (shown in Figure 1), and click Next.
|
6. | The installer will conduct readiness checks.
|
7. | Click Install to install the Hub Transport server role.
|
8. | After the installation has successfully completed, click Finish.
|
Configure SMTP Send Connectors
When
a Hub Transport server is installed, there is no SMTP Send Connector
installed. Without an SMTP Send Connector, the Hub Transport server can
receive mail but not send mail.
The SMTP Send Connector can be configured as follows:
Internal— For routing to other Hub Transport servers and Edge Transport servers
Legacy— For routing to Exchange 2003 and previous versions
Custom— For routing to non-Exchange servers
The steps to configure the SMTP Send Connector are as follows:
1. | Launch the Exchange Management Console.
|
2. | Expand the Organization Configuration branch, and select the Hub Transport folder.
|
3. | In the actions pane, select New Send Connector.
|
4. | Enter in a name for the connector.
|
5. | Enter in the intended use of the connector, such as Custom.
|
6. | Add the address space for which the SMTP connector will send mail to, typically “*”.
|
7. | Click Next.
|
8. | Click Next to route using the domain name system (DNS).
|
9. | Click Next to use the current server as the source server.
|
10. | Click New to create the SMTP Send Connector.
|
11. | Click Finish to close the wizard. |
