Making Audio Calls
Initiating an audio call is as simple as
right-clicking a contact, choosing Call, and specifying that it should
be a Lync call. Then, the contact receives a pop-up and an audio
notification and has the option to answer, decline, or redirect. Answer
and decline should be fairly obvious as to what they do. Redirect gives
the option to reply through IM or to set one’s status to Do Not
Disturb. Accepting the call updates both users’ status to In a Call.
Users can easily escalate an existing IM
conversation to audio by clicking the phone icon at the bottom of the
conversation window. This pops the conversation out into its own
window, similar to what happens when a brand-new call is placed.
When the call connects, a new window displays
that looks similar to the IM window. In fact, it is the same window,
but now has the audio portion joined.
The call window enables the user to easily
mute the device by clicking the phone icon once more, which shows a
microphone during an active call. Muting the microphone alters the icon
on the client that muted his microphone. A connection signal strength
and call timer are displayed in the upper-left corner of the
conversation.
Users can access additional call-management
options by hovering over the phone icon. After that, the following
options are displayed:
• Dial Pad—Used to
enter DTMF tones when in a call. Users can also start pressing digits
on the keyboard without first using the mouse to expose this menu.
• Mute—Mutes the
user’s local microphone. The phone icon changes to indicate that the
user is muted and cannot be heard by the other party.
• Hold—Places the call on hold. A notification bar appears with a Resume button to pick up the call again.
• Devices—Allows the user to fine-tune the speaker volume, or switch to another audio device while in a call.
• Transfer—Enables
the user to transfer the call to a mobile device, or to someone else.
The call can also be parked through this option if the Call Park
feature is enabled.
The call can be ended with a click of the red
phone icon in the upper-right corner of the conversation window. This
ends only the audio portion of the call, and keeps the conversation
active if IM or sharing is being used. Clicking the standard Windows
close icon would end the entire conversation.
If Conversation History is enabled,
the call is logged in the user’s Outlook folder. The call itself is
neither recorded nor stored, but the list of participants and the
duration of the call are captured.
Network Connectivity Icon
One of the other icons visible in
the window is a Network Connectivity status, which is displayed in the
upper-left corner of the call. This indicates the quality of the
network connection and is useful in troubleshooting issues with voice
quality on a call.
Making Video Calls
Initiating a video call is as simple as
right-clicking a contact and choosing Start a Video Call. Much as with
the audio call, the recipient has the option to accept, decline, or
redirect. Redirect gives the option to reply with an IM or to mark the
recipient as Do Not Disturb.
When the call is accepted, the usual client
window opens and is located on the Video tab. The recipient initially
sees the caller, but the caller doesn’t see the recipient until after
he clicks Start My Video in the window.
While in an active conversation, users can
leverage the new Video Preview feature to check what their video will
look like before initiating the call. Hover over the video icon to see
a preview, and then click Start My Video to initiate the call.
By default, participants in a two-way call
see themselves in a picture-in-picture window inside the main video
window. You can hide this preview by hovering over the video and
clicking the downward-facing arrow. Click the upward-facing arrow to
restore the video preview.
The same audio controls for mute, hold, and
devices discussed previously are still available within a video call.
Clicking the video icon again stops the user from sending video, and
another click resumes it once again.
Users can also detach the video content from
the conversation window by hovering over the main video and clicking
the arrow in the upper-right corner. This can be useful for users with
multiple monitors, enabling them to maximize the video on one screen
while continuing to use the other monitor for another purpose.
Tip
If you expect widespread adoption of video
conferencing and calls in your environment, don’t skimp on the video
cameras. Modern webcams have rather nice lenses, and modern processors
can easily keep up with the load of high-definition video conferencing.
Sharing Content
Using Lync to collaborate is a favorite
feature of end users because of how simple it is to quickly share a
desktop or an application. While in an active conversation, move the
mouse over the presenter icon, which looks like a monitor, as shown in Figure 2. From here a user can share the following types of content:
• All Monitors—Shares
all the screens currently connected. Depending on the resolution of
each user, the other end might need to zoom and pan to be able to read
the content.
• Specific Monitor—Shares
only a specific screen if multiple monitors are attached. As the user
hovers over the monitor options, a yellow border is displayed on the
monitor about to be shared. This way a user knows exactly what content
will be shown to the other user.
• Program—Shares only
a specific application. This is usually the best experience for users
because it is more efficient and uses less bandwidth. It can also be
useful for keeping private information hidden from the opposite party.
• PowerPoint—Escalates
the conversation to a Lync meeting and begins sharing a PowerPoint
deck. The user is prompted to select a PowerPoint file to present.
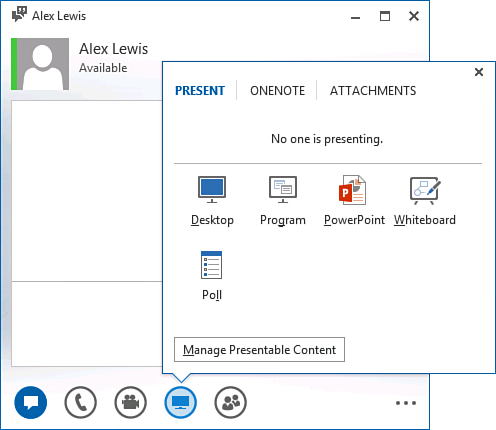
Figure 2. Lync content sharing.
• Whiteboard—Escalates the conversation to a Lync meeting and begins sharing a new whiteboard.
• Poll—Escalates the
conversation to a Lync meeting and presents a poll for the other person
to select. The poll can be given a name, a question, and up to seven
possible choices.
Sending and Receiving Files
The IM interface enables one person to send a
file to the other participant of the IM conversation. The easiest way
to send a file is to just drag it from the desktop onto the current
conversation window.
Alternatively, at the bottom of the
conversation window is an icon with a monitor in it for sharing. Hover
the mouse over that icon and then click Attachments at the top.
Clicking Add Attachment launches a window that enables the user to
select a file to transfer.
The person set to receive the file
receives a notification and has the option to Accept, Save As, or
Decline the file. Accepting the file triggers a warning window to warn
the user that the file might contain harmful malware and that she
should accept files from only someone she knows. After it is accepted,
it downloads and a link displays to access the file. The sender of the
file receives a notification that the transfer was successful.
