1. Adding Lync Online User Accounts
There are several methods that can
be used to add user accounts to Lync Online/Office 365. User accounts
can be added manually using either the online portal, or Windows
PowerShell. It is also possible to create user accounts in bulk using
an import process. User accounts can also be automatically created
using directory synchronization.
2. Adding User Accounts Using the Online Portal
Use the following procedure for creating a new user account using the Online Portal:
1. Log on to the Office 365 Portal.
2. On the left side of the main page, click Users and Groups.
3. At the Users and Groups page, click on the plus symbol just above the user list.
4. At the Details page, mandatory fields for the new account are displayed, as shown in Figure 1.
Enter the first name, last name, and username for the new user account.
The display name is automatically derived from the First name and Last
name fields but can also be edited manually if necessary.
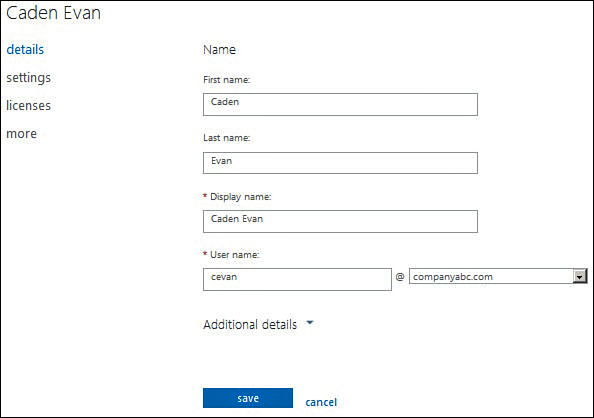
Figure 1. Creating a new user account using the Office 365 Portal.
5. Use the drop-down
menu at the end of the User name field to select from among the
available domains for this user account. This list is automatically
populated with domains that have already been verified for this Lync
Online/Office 365 account.
6. Click on Additional
details to display a number of optional fields that can be filled out,
including job title, department, phone numbers, and addressing
information. Fill out any fields that are desired, and then click Next.
7.
At the Settings screen, if the user will be assigned administrative
permissions to the Lync Online/Office 365 tenant, click Yes under the
Assign role section, and use the drop-down menu to select the
administrative role for the user. Also, enter the alternate email
address of the user, which will be used to allow reset of the user’s
password if it becomes lost or forgotten.
8. Under the Set User Location section, use the drop-down menu to select the user’s location, and then click Next.
Tip
Although it might not seem evident, the user
location setting is actually quite important, because certain Lync
Online/Office 365 services are not available in some locations. After
the user location is configured, the following page will allow
licensing to be applied only for services that are available in that
location.
9. At the Assign
licenses screen, select the check box for the Lync Online plan that the
user will be licensed for, along with any other Office 365 services and
plans that the organization has a subscription for.
10. At the Send
results in email page, keep the default selection of Send email if the
username and temporary password for the new account should be sent to
an administrator via email, and then enter up to five recipient email
addresses separated by semicolons. When finished, click Create.
11. At the
Results page, verify that the user account has been successfully
created, and make note of the temporary password automatically
generated. Click Finish to complete the procedure and return to the
Users and Groups page, or click the link for Create another user to add
another user account.
3. Adding User Accounts Using PowerShell
User accounts can be added to Lync
Online/Office 365 using Windows PowerShell in conjunction with the
Microsoft Online Services Module.
After the Microsoft Online Services Module is installed on a system
with PowerShell, use the following steps to create a new user account
using PowerShell:
1. Log on to the system where Windows PowerShell and the Microsoft Online Services Module are installed.
2. Open Windows PowerShell and import the Microsoft Online Services Module using the command Import-Module MSOnline.
3. Execute the command $cred=Get-Credential, and then at the prompt enter the credentials of an Office 365 administrative account.
4. Execute the command Connect-MsolService -Credential $cred, which creates a connection to Office 365, as required to run the remaining cmdlets.
5. Execute the New-MsolUser
cmdlet to create the new user account. For example, the following
command would be used to create a new account named Lois Victoria in
the companyabc.onmicrosoft.com organization:
New-MsolUser -UserPrincipalName
"LoisV.companyabc.onmicrosoft.com" -DisplayName "Lois Victoria"
-FirstName "Lois" -LastName "Victoria"
6. If the command
completes successfully, the new user account properties will display,
including the temporary password assigned to the account.
Tip
The New-MsolUser
command creates the user account; however, it does not apply licensing
to the user. The licenses can be assigned after the user account is
created using the online portal.
