For an organization that previously had Exchange
Server 5.5 in their environment, or possibly still has Exchange 5.5
servers in the environment, before the migration to Exchange 2007 can
begin, the organization must remove all Exchange 5.5 servers. In
addition, the organization must decommission all remnants of Exchange
5.5, such as site connectors and Active Directory Connectors (ADCs),
and switch the Exchange organization into Native mode before proceeding
with the migration to Exchange 2007.
This
section covers the steps that need to be accomplished before the
conversion to Native mode can be completed. This section also covers
some of the postmigration cleanup processes that need to be run in the
existing Exchange 2000 or Exchange 2003 organization structure prior to
migrating to Exchange 2007. Not all of the cleanup processes need to be
run in all environments; this depends on the method the organization
used to populate Active Directory.
Note
When
referring to Native mode in Exchange, sometimes people confuse it with
Native mode in Windows, but they are two completely different things.
Native mode in Exchange, addresses the removal of Exchange 5.5 in the Exchange organization so
that the Exchange environment is natively Exchange 2000 and Exchange
2003 servers. This is completely different than Windows Native mode,
which means that no Windows NT 4.0 domain controllers can exist in a
Windows Active Directory environment. Windows Mixed mode allows Windows
NT 4.0 Backup Domain Controllers (BDCs) to exist in a Windows 2000 or
Windows 2003 Active Directory.
Converting to Native Mode
Converting
to Native mode changed the way that Exchange 2000 and Exchange 2003
operated that was slightly different from the way Exchange 5.5 worked.
The functions in Native mode Exchange are similar to the way Exchange
2007 operates, so rather than having backward support to Exchange 5.5
functionality that is not supported in Exchange 2007, Microsoft
requires Native mode as a prerequisite before the organization can
migrate to Exchange 2007. The functions in Exchange Native mode are as
follows:
Multiple routing groups are supported.
Routing groups can contain servers from different administrative groups.
Servers can move between routing groups.
Mailboxes can be moved between administrative groups.
Simple Mail Transfer Protocol (SMTP) becomes the default routing protocol.
To shift the organization to Native mode, the following conditions must be met:
No more Exchange 5.5 servers exist in the organization.
No
plans exist to add Exchange Server 5.5 servers to the organization in
the future—the likelihood for a merger or acquisition is low.
No need exists for connectors or gateways that run only on Exchange 5.5.
To convert to Native mode Exchange, the following steps must be accomplished in the following order:
1. | Remove all directory replication connectors.
|
2. | Remove all Exchange 5.5 servers from each remaining site.
|
3. | Remove the recipient connection agreements and all other connection agreements for each Exchange 5.5 site.
|
4. | Remove the Site Replication Service (SRS) from all Exchange Server 2003 systems.
|
5. | Switch to Native mode using the Change Mode button on the organization’s properties.
|
Deleting All Directory Replication Connectors
For
any remaining Exchange 5.5 site that will not be migrated to Exchange
Server 2003, the directory replication connectors must be deleted.
Use
the Exchange System Manager to delete all directory replication
connectors. To delete the directory replication connectors, click to
expand the Tools view to display the Site Replication Service objects
in the Exchange organization. Click the View menu and select Directory
Replication Connector View. Click each directory replication connector
and press Delete.
Next force replication
to propagate the deletion of the directory replication connectors in
the Active Directory Connector Manager by using the Replicate Now
option on the connection agreements for the site. Verify the deletion
of the directory replication connectors by opening the Exchange System
Manager on another Exchange Server 2003 system and viewing the Site
Replication Service with the Directory Replication Connector view. When
the directory replication connector no longer appears, the deletion has
been replicated.
Removing All Exchange Server 5.5 Servers from the Organization
When
all the Exchange 5.5 servers are no longer needed, they should be
uninstalled through the Exchange 5.5 setup program. The last server to
be uninstalled should be the server that was the first server in the site or that contains the first server in the site components.
After
all the servers have been uninstalled, the last server must be deleted
manually from the Exchange hierarchy. To delete the server from the
hierarchy, use the Exchange 5.5 Administrator program to connect to the
Exchange Server 2003 system running the Site Replication Service and
locate the list of servers in the site. Click the server to be removed
and then click Edit, Delete. A warning appears if the server still
contains mailboxes or connectors. Click Yes to continue the deletion.
Another warning appears if there are still public folder replicas on
the server. Click Yes to continue the deletion.
The
next step is to force replication through the ADC for all connection
agreements for the site by using the Replicate Now option. Verify that
the server has been removed from Active Directory through the ADC
before deleting the connection agreements and uninstalling the ADC. The
server should no longer appear in the Exchange System Manager.
Removing Active Director Connectors
Open
the Active Directory Connector Manager and delete all connection
agreements. If the connection agreements are not deleted, the
membership of distribution groups could be lost.
If
the Active Directory Connector is no longer needed and all connection
agreements have been removed, uninstall the Active Directory Connector
through Control Panel, Add/Remove Programs. Also remember to disable or
delete the service account used for the ADC if it’s not used for any
other services.
Deleting the Site Replication Service
The
Site Replication Service is the last service to be deleted before the
conversion to Native mode can take place. To delete the Site
Replication Service, open the Exchange System Manager, and expand the
Tools icon. Next expand the Site Replication Service icon, and then
right-click each Site Replication Service and click Delete.
Throwing the Native Mode Switch
After
the conversion to Native mode, there is no way to return to Mixed mode.
The organization should be completely confident about the transition.
When all the prerequisite steps have been accomplished, the Change Mode
button on the organization properties in the Exchange System Manager
should be available. Use the following steps to convert to Native mode
Exchange Server 2003:
1. | Open the Exchange System Manager.
|
2. | Right-click the organization and click Properties.
|
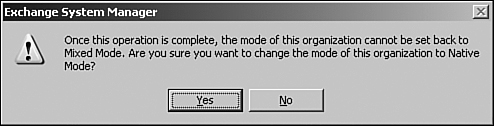
3. | Click
the General tab, and then click Change Mode under Change Operations
Mode. You will be warned that after you make the switch to Native mode,
you cannot go back, as shown in Figure 1. Click Yes to permanently switch the organization’s mode to Native mode.
|
After
the conversion to Exchange Server 2003 Native mode, administrative
groups are always displayed in the organization. Administrators have
the choice of disabling the display of routing groups.
Performing Postmigration Cleanup
Depending
on the method that was used to populate the Active Directory, the
organization might have to use a utility called ADClean that merges
duplicate Active Directory accounts created during the migration
process to Exchange Server 2003. If the Active Directory Connector was
used to populate the Active Directory from the Exchange 5.5 directory
before the Windows NT 4.0 domain accounts were migrated to Active
Directory, two entries will exist for each user. The two user account
entries should be merged through ADClean to complete the migration and
clean up Active Directory.
Duplicate
accounts in Active Directory can also occur if two ADC recipient
connection agreements were created and marked as primary on a
particular container. One account displays as disabled with a red x in
the user icon and with a –1 appended to the display name. The other
account displays normally. ADClean can also be used to merge these
accounts. To merge accounts created because of duplicate connection
agreements, run ADClean and select the container to search. On the next
screen, verify the accounts to merge and then choose the option to
begin the merge or export the merge to a file for import through
ADClean later.
Tip
The Search Based on Exchange Mailboxes Only option allows ADClean to search for only duplicate accounts created by the ADC.
The ADClean utility is installed during setup in the \exchsrvr\bin
directory. ADClean gives administrators the capability to manually
select accounts to be merged or run the wizard to search for and
suggest accounts to be merged. The merge can be executed immediately or
exported to a .csv file to be reviewed by the administrator and then executed later through ADClean.
