Access
Services is designed to allow connectivity between SharePoint and
Access 2010 databases for business applications where out-of-the-box
lists and libraries may not fully meet the business needs. Several site
templates are available that can be used to create sites with specific
purposes: Assets Web Database, Charitable Contributions Web Database,
Contacts Web Database, Issues Web Database, and Projects Web Database.
Skilled Access DBAs can also create tables, forms, queries, and reports
and then publish them to the SharePoint 2010 environment. This section
gives an example of creating a Projects Web Database from a template to
give an idea of the out-of-the-box templates that are available, but
won’t cover a new build in Access.
Access Services is also only
available with SharePoint Server 2010 Enterprise, and if the wizard is
used to configure the farm, and Access Services is left checked, an
Access Services
service application should already be present in the farm. If a new
service application is needed, it can be created from the Manage Service
Applications page on the Central Administration site. The details of
each configuration will vary based on the needs of the organization, and
the settings for the service application are discussed here from a high
level.
Compared to an Excel
Services service application, the Access Service service application is
relatively simple, and only includes one page of settings, as follows:
Lists and Queries—
Maximum Columns per Query (limit 255), Maximum Rows per Query (limit
200,000), Maximum Sources per Query (limit 20), Maximum Calculated
Columns per Query (limit 32), Maximum Order by Clauses per Query (limit
8), Allow Outer Joins (yes/no), Allow Non Remotable Queries (yes/no),
Maximum Records per Table (no limit) Application Objects— Max Application Log Size (no limit) Session Management—
Maximum Request Duration (limit 2073600 seconds [24 days]), Maximum
Sessions per User (no limit), Maximum Sessions per Anonymous User (no
limit), Cache Timeout (limit 2073600 seconds [24 days]), Maximum Session
Memory (maximum 4095MB) Memory Utilization— Maximum Private Bytes (limit of 50 percent of the physical memory on the machine) Templates— Maximum Template Size (no limit)
One prerequisite is
important if the reporting features of these sites are going to be used
(which users will almost certainly request if they are given one of
these sites): The installation of Microsoft SQL Server 2008 R2 Reporting
Services add-in for SharePoint Technologies 2010 (SSRS) is required.
Additional instructions are available from Technet (http://technet.microsoft.com/en-us/library/ee662542.aspx)
and should be reviewed because this can be a nontrivial installation.
It should be noted that there are two modes in running Reporting
Services with SharePoint Server: connected mode and local mode.
Connected mode requires SharePoint Server 2010, the SSRS add-in, and a
SQL Server 2008 R2 Report Server. Local mode only requires SharePoint
Server and the SSRS add-in.
Creating an Access Web Database Site
This section looks at the
process of creating one of the web databases from a template provided
with SharePoint Server 2010 Enterprise. The Projects Web Database will
be used, and then explored to see the different components of this new
kind of site.
To create a web database using the Projects Web Database, follow these steps:
1. | Using
an account with sufficient privileges from a workstation that has
Access 2010 installed, access the Site Actions drop-down menu and click
New Site.
| 2. | Select Projects Web Database from the list. Provide a title for the site (in this example, Projects Database) and a URL name (in this example, ProjectsDatabase) and click Create.
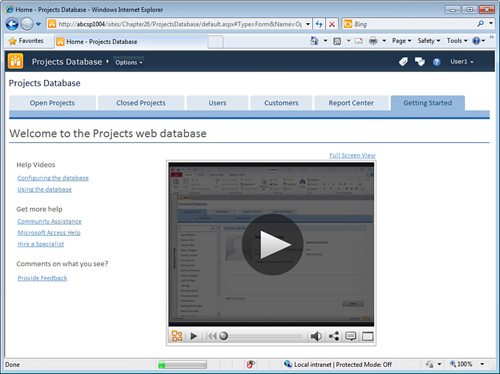
| 3. | The site opens with an interface that looks very different from a typical SharePoint 2010 site, as shown in Figure 1.
The Getting Started tab is open, which provides access to a video that
users can view. Other tabs include Open Projects, Closed Projects,
Users, Customers, and Report Center.

| 4. | Click the Options drop-down menu to reveal additional tools: Open in Access, Site Permissions, Settings, and Navigate Up.
| 5. | Note
that there is no tool available to view all site content. Change the
URL of the current page by deleting the code after the site name (in
this case, .../ProjectsDatabase/) and pasting it in
_layouts/viewlsts.aspx so the full URL looks like the following
(substitute in the appropriate path for your server and site):
http://abcsp1004/sites/Chapter26/ProjectsDatabase/_layouts/viewlsts.aspx
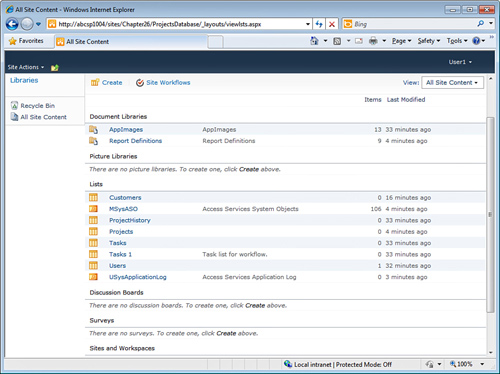
| 6. | Press Enter, and the Viewlsts.aspx page opens, showing the contents of the site, as shown in Figure 2.
This page helps to demystify the site by showing that there are in fact
document libraries and lists that make up the site, even though they
are “hidden” from easy access.

| 7. | Return to the home page of the site by clicking the site name in the breadcrumb.
| 8. | Click the Options drop-down menu and click Settings.
| 9. | The
ModifyApplication.aspx page opens, showing the different tables, forms,
reports, and queries that are available on the site, as shown in Figure 3.

| 10. | Experienced Access developers can make changes to the individual tables, forms, reports, and queries from this interface.
Caution
It is very easy to make a
change that will damage the site and result in a “site is down” error,
so use caution when making edits to components of the site, such as the
tables.
| 11. | Click
the Options drop-down menu, and click Site Permissions to open the
user.aspx page. Notice that the Site Actions drop-down menu is available
from this page. Note that the tools are the same as for other
SharePoint 2010 sites in terms of granting permissions to the Access Web
Database site.
| 12. | Return
to the home page and click the Open Projects tab. Enter information for
a project in the top row. Note when the Category drop-down is open,
there is a link to Edit List Items, so customized categories can be
entered rather than the generic ones.
| 13. | Next, click New Project, and a window will open where more complete information can be entered about a project, as shown in Figure 4.
Complete the form by entering in project information, and creating a
new customer by clicking Edit List Items in the Customer drop-down menu.
In this example, click Save & Close when complete.

| 14. | Next,
click the Tasks link on the toolbar, and select the project just
created. Enter the task information on this screen, as shown in Figure 5,
in the process adding another user by clicking the Edit List Items link
from the Assigned To drop-down menu. Click in the next row down to save
the entry.

|
|