Have you ever squirmed uncomfortably as you watched
someone struggling to make a presentation from his or her computer, and
absolutely everything went wrong? First, the presenter couldn’t get the
secondary display to work, and then, in the middle of the presentation,
the screen saver appeared, or the computer went to sleep. It was a
disaster! Don’t let it happen to you. With Windows Vista and a portable
computer, you can avoid these types of embarrassment by using the
Windows Mobility Center to create your presentation settings and
external monitor connections.
Prepare for the Presentation
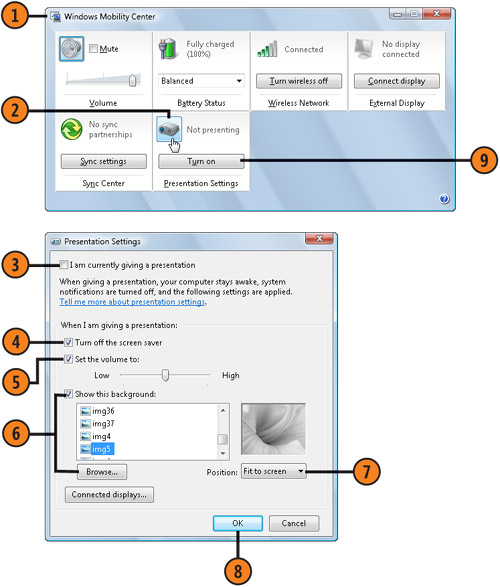
 Click the Start button, type mob in the Search box of the Start menu, and click Windows Mobility Center to display the Windows Mobility Center window. Click the Start button, type mob in the Search box of the Start menu, and click Windows Mobility Center to display the Windows Mobility Center window.
 Click the Presentation Settings button to display the Presentation Settings dialog box. Click the Presentation Settings button to display the Presentation Settings dialog box.
 Clear this check box if it’s selected. Clear this check box if it’s selected.
 Select this check box to make sure the screen saver doesn’t appear during your presentation. Select this check box to make sure the screen saver doesn’t appear during your presentation.
 Select this check box, and use the slider if you want to specify a preset volume level. Select this check box, and use the slider if you want to specify a preset volume level.
 Select this check box, and click an image if you want a special Desktop
background during the presentation. If none of the listed images is
what you want, click Browse, locate the picture file you want to use,
and click Open.
Select this check box, and click an image if you want a special Desktop
background during the presentation. If none of the listed images is
what you want, click Browse, locate the picture file you want to use,
and click Open.
 Specify the way you want the image to fit on the screen. Specify the way you want the image to fit on the screen.
 Click OK. Click OK.
 When you’re ready to give your presentation, click Turn On in the Windows Mobility Center window. When you’re ready to give your presentation, click Turn On in the Windows Mobility Center window.
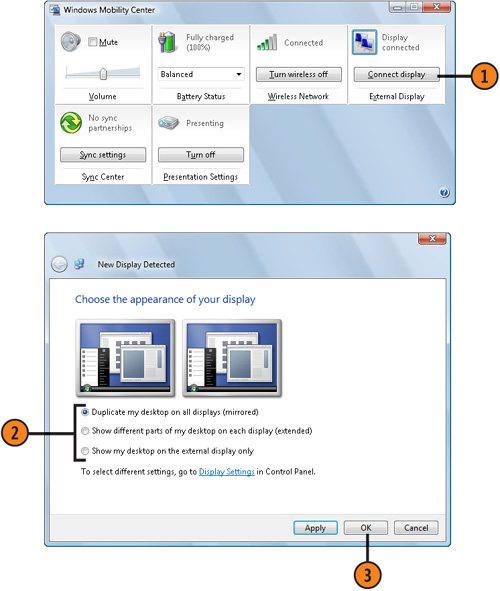
Use an External Display
-
Connect the external monitor. If it isn’t immediately detected, and if
the New Display Detected window doesn’t appear, click Connect Display in
the Windows Mobility Center to display the window.
- In the New Display Detected window, specify how you want both monitors to work together.
- Click OK.
- Make any other changes in the Mobility Center as necessary, close it, and then give your presentation.
Tip After
you’ve made your changes to the presentation settings, Windows Vista
will remember those settings, so you’ll just need to click the Turn On
button to start using the settings. |
Tip The
items shown in the Windows Mobility Center will vary depending on the
computer you use. The items shown here, however, should be available for
most computers. |
|
