1. Printing from a Program
In most programs, you can print a document
on any printer that’s installed on your computer or shared over a
network. By using the Print dialog box, you can specify which printer
to use and can customize the way your document is printed.
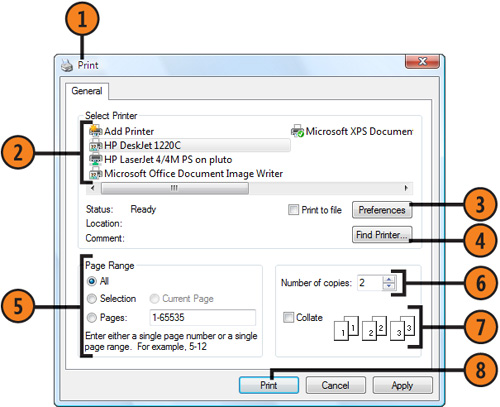
Print a Document
- 1. With the document open in its program, choose Print from the File menu to display the Print dialog box.
- 2. Specify the printer you want to use.
- 3. Click Preferences if you need to change the printer settings—for
example, the size of the paper being used, whether the document is to
be printed in color or in black and white, and so on. (Note, however,
that sometimes the program’s settings will override your own settings.)
- 4. Click Find Printer to find and use a printer on a network that isn’t listed in the Select Printer section.
- 5. Specify the pages you want to print.
- 6. Specify how many copies of each page you want.
- 7. Specify whether you want multiple copies to be printed with the pages
in order (collated) or whether you want each page to be printed
multiple times before the next page is printed. (Collated printing is
usually slower than uncollated printing.)
- 8. Click Print.
Tip
The
Selection option in the Page Range section of the Print dialog box
tells the printer to print the text or the item that’s currently
selected in the document. The Current Page option tells the printer to
print either the page that contains the insertion point or the page
that’s displayed. |
Tip
If
the Print command on the File menu isn’t followed by an ellipsis (...),
the Print dialog box probably won’t be displayed, and the document will
be printed on the default printer using the default settings. |
2. Printing a Document
When
you want to print a document or a group of documents, you can print
directly from Windows Vista without having to start the program in
which the documents were created. That program, however, must be
installed on your computer and will usually be started by Windows. It’s
a great convenience to be able to quickly send several documents to
your printer and then walk away while Windows Vista does all the work.
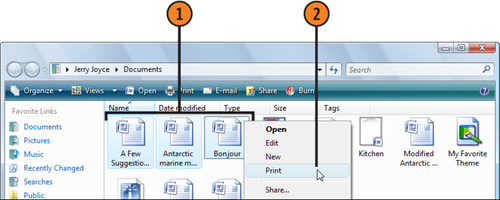
Print a Document Using the Default Printer
- 1. Open the folder that contains the items you want to print, and select
the document or documents to be printed. Multiple documents must be of
the same type (all Word documents or all Notepad documents, for
example).
- 2. Right-click a selected document, and choose Print from the shortcut menu.
Tip
Some
programs require the use of the system default printer. To print
documents that were created in those programs, you have to either use
the default printer or tell Windows to switch the default-printer
designation to the printer you want to use. |
Print a Document Using a Specific Printer
- 1. Click the Start button, type printer in the Search box, and choose the Printers folder.
- 2. Locate and select the document or documents you want to print.
- 3. Drag the selected document or documents onto the Printers folder and onto the printer you want to use.
- 4. If a Printers dialog box appears, click Yes to confirm that you want to print multiple files.
