Logo
programming4us
programming4us
programming4us
programming4us
Home
programming4us
XP
programming4us
Windows Vista
programming4us
Windows 7
programming4us
Windows Azure
programming4us
Windows Server
programming4us
Windows Phone
 
programming4us
Windows 7

Customizing OneNote 2010 : Customizing the Ribbon (part 1)

- Free product key for windows 10
- Free Product Key for Microsoft office 365
- Malwarebytes Premium 3.7.1 Serial Keys (LifeTime) 2019
12/4/2012 6:32:04 PM

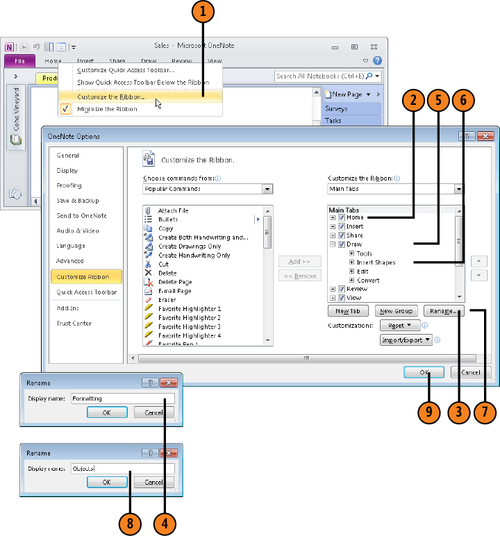
6. Rename a Tab and Group

  1. Right-click any tab name on the ribbon and choose Customize the Ribbon on the shortcut menu.

  2. Under Customize the Ribbon on the right side of the window, select a tab you want to rename.

  3. Click the Rename button.

  4. Enter a name and click OK.

  5. Click the Expand button next to a tab name to expose the names of its groups.

  6. Select the group you want to rename.

  7. Click the Rename button.

  8. Enter a name and click OK.

  9. Click OK to close the OneNote Options dialog box.


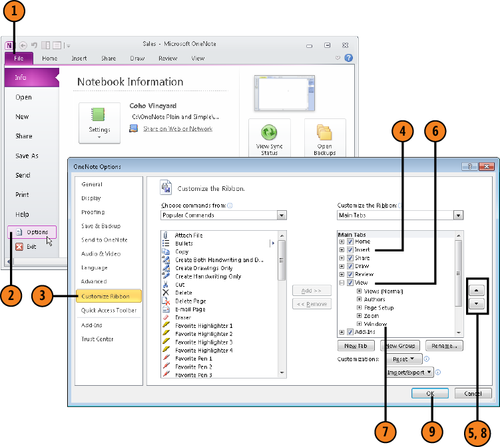
7. Relocate a Tab and Group

  1. Click File.

  2. Choose Options.

  3. Select Customize Ribbon.

  4. Select the tab you want to relocate.

  5. Click Move Up or Move Down.

  6. Click the Expand button next to a tab name to expose the names of its groups.

  7. Select a group you want to relocate on a tab.

  8. Click Move Up or Move Down.

  9. Click OK to close the OneNote Options dialog box.


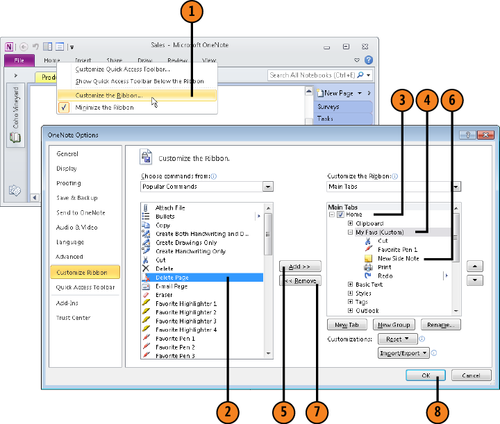
8. Add Commands to and Remove Commands from Custom groups

  1. Right-click any tab name on the ribbon and choose Customize the Ribbon on the shortcut menu.

  2. Under Choose Commands From, select a command (if you have trouble finding a command, open the menu and choose a subset of commands).

  3. Under Customize the Ribbon, click the Expand button next to a tab to see its command groups.

  4. Select the name of a custom group that you created.

  5. Click Add.

  6. Select a command that you want to remove (it must be in a custom group).

  7. Click Remove.

  8. Click OK.


Note:

Try This!

Select a command and click Move Up or Move Down to position it in a group.


9. Reset Your Ribbon Customizations

  1. Click File.

  2. Choose Options.

  3. Select the Customize Ribbon category.

  4. Click the Reset button.

  5. Choose Reset All Customizations.

  6. Click Yes in the Delete dialog box.

  7. Click OK.


Tip:

You can also reset only the customizations you made to a particular tab on the ribbon. Select a tab name on the right side of the Customize the Ribbon window, click the Reset button, and choose Reset Only Selected Ribbon tab (or right-click the tab name and choose Reset Tab).

Other -----------------
- Customizing OneNote 2010 : Customizing the Ribbon (part 1)
- Customizing OneNote 2010 : Customizing the Quick Access Toolbar
- Troubleshooting Hardware and Performance : Dealing with Error Messages, Performing a Clean Boot, Using the System Recovery Options
- Troubleshooting Hardware and Performance : First Aid for Troubleshooting Hardware
- Microsoft Access 2010 : Creating Relationships Between Tables
- Microsoft Access 2010 : Relationships Explained, Enforcing Referential Integrity
- Troubleshooting Stop Messages : Common Stop Messages (part 4)
- Troubleshooting Stop Messages : Common Stop Messages (part 3)
- Troubleshooting Stop Messages : Common Stop Messages (part 2)
- Troubleshooting Stop Messages : Common Stop Messages (part 1)
 
 
Top 10
- Microsoft Visio 2013 : Adding Structure to Your Diagrams - Finding containers and lists in Visio (part 2) - Wireframes,Legends
- Microsoft Visio 2013 : Adding Structure to Your Diagrams - Finding containers and lists in Visio (part 1) - Swimlanes
- Microsoft Visio 2013 : Adding Structure to Your Diagrams - Formatting and sizing lists
- Microsoft Visio 2013 : Adding Structure to Your Diagrams - Adding shapes to lists
- Microsoft Visio 2013 : Adding Structure to Your Diagrams - Sizing containers
- Microsoft Access 2010 : Control Properties and Why to Use Them (part 3) - The Other Properties of a Control
- Microsoft Access 2010 : Control Properties and Why to Use Them (part 2) - The Data Properties of a Control
- Microsoft Access 2010 : Control Properties and Why to Use Them (part 1) - The Format Properties of a Control
- Microsoft Access 2010 : Form Properties and Why Should You Use Them - Working with the Properties Window
- Microsoft Visio 2013 : Using the Organization Chart Wizard with new data
 
programming4us
Windows Vista
programming4us
Windows 7
programming4us
Windows Azure
programming4us
Windows Server