Logo
programming4us
programming4us
programming4us
programming4us
Home
programming4us
XP
programming4us
Windows Vista
programming4us
Windows 7
programming4us
Windows Azure
programming4us
Windows Server
programming4us
Windows Phone
 
programming4us
Windows 7

Customizing Windows 7 : Open the Personalization Window

- Free product key for windows 10
- Free Product Key for Microsoft office 365
- Malwarebytes Premium 3.7.1 Serial Keys (LifeTime) 2019
3/11/2013 6:31:21 PM

To make changes to many of Windows 7's display options, you need to know how to open the Personalization window.

The Personalization window is one of the most powerful and useful features of Windows 7. With the Personalization window you can change the desktop background, select a new color scheme, set up a screen saver, and more. With the Personalization window you can also apply themes to quickly and easily change the overall look of Windows 7.

Open the Personalization Window

1 Click Start.

2 Click Control Panel.

The Control Panel window appears.

3 Click Appearance and Personalization.


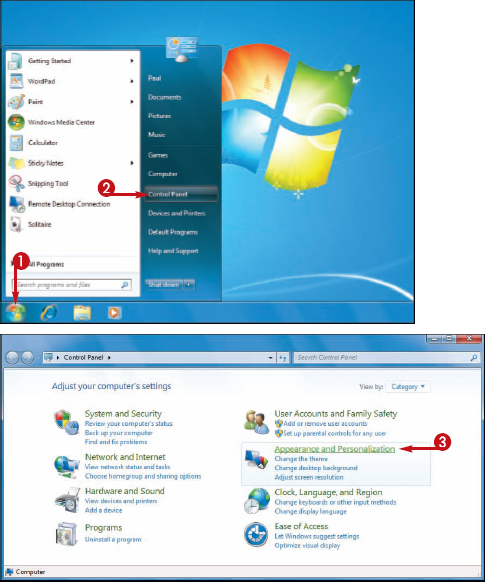
The Appearance and Personalization window appears.

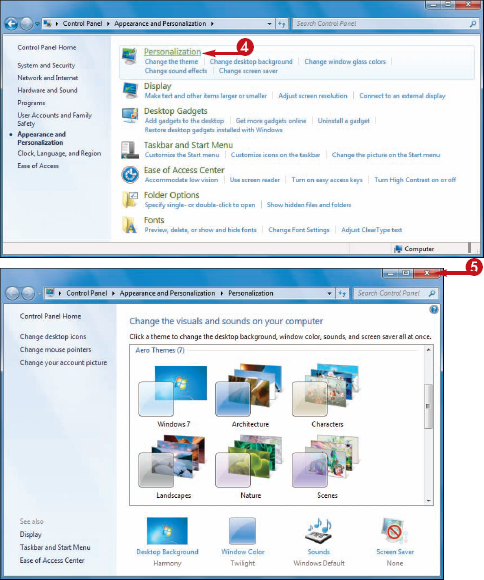
4 Click Personalization.

The Personalization window appears.

NOTE

A quicker way to open the Personalization window is to right-click an empty section of the desktop and then click Personalize.

5 Click the Close button () when you are finished working with this window.


Simplefy It

What is a theme?

The next few sections show you how to tweak the desktop background, screen saver, and color scheme. Instead of performing those tasks individually, you can change all of these at once by applying a theme. Each theme also includes its own set of desktop icons, sound effects, and mouse pointers. In the Personalization window, scroll down to view the available themes, and then click the theme you want to use.

Can I create my own theme?

Yes. After you have customized the desktop background, screen saver, and color scheme, you can save all of these changes as a custom theme. In the Personalization window, click Unsaved Theme and then click Save theme. In the Save Theme As dialog box, use the Theme Name text box to type a name for your theme, and then click Save.
Other -----------------
- Deploying Applications (part 3) - Injecting in a Disk Image, Repackaging Legacy Applications
- Deploying Applications (part 2) - Automating Installation
- Deploying Applications (part 1) - Preparing the Lab, Planning Deployment, Choosing a Deployment Strategy
- Maintaining Windows 7 : Restore Backed-Up Files
- Maintaining Windows 7 : Back Up Files
- Maintaining Windows 7 : Check Your Hard Drive for Errors
- Maintaining Windows 7 : Defragment Your Hard Drive on a Schedule
- Maintaining Windows 7 : Delete Unnecessary Files
- Maintaining Windows 7 : Check Hard Drive Free Space
- Protecting Windows from Viruses and Spyware : Antimalware Strategy: Defense in Depth (part 4) - User Account Control Options
 
 
Top 10
- Microsoft Visio 2013 : Adding Structure to Your Diagrams - Finding containers and lists in Visio (part 2) - Wireframes,Legends
- Microsoft Visio 2013 : Adding Structure to Your Diagrams - Finding containers and lists in Visio (part 1) - Swimlanes
- Microsoft Visio 2013 : Adding Structure to Your Diagrams - Formatting and sizing lists
- Microsoft Visio 2013 : Adding Structure to Your Diagrams - Adding shapes to lists
- Microsoft Visio 2013 : Adding Structure to Your Diagrams - Sizing containers
- Microsoft Access 2010 : Control Properties and Why to Use Them (part 3) - The Other Properties of a Control
- Microsoft Access 2010 : Control Properties and Why to Use Them (part 2) - The Data Properties of a Control
- Microsoft Access 2010 : Control Properties and Why to Use Them (part 1) - The Format Properties of a Control
- Microsoft Access 2010 : Form Properties and Why Should You Use Them - Working with the Properties Window
- Microsoft Visio 2013 : Using the Organization Chart Wizard with new data
 
programming4us
Windows Vista
programming4us
Windows 7
programming4us
Windows Azure
programming4us
Windows Server