Logo
programming4us
programming4us
programming4us
programming4us
Home
programming4us
XP
programming4us
Windows Vista
programming4us
Windows 7
programming4us
Windows Azure
programming4us
Windows Server
programming4us
Windows Phone
 
programming4us
Windows 7

Microsoft Outlook 2010 : Working with Tasks - Adding a Task

- Free product key for windows 10
- Free Product Key for Microsoft office 365
- Malwarebytes Premium 3.7.1 Serial Keys (LifeTime) 2019
12/9/2012 5:09:50 PM
Tasks can be added to your Tasks folder in one of two ways: You can create the task yourself or accept a task that someone else assigns to you. If you create the task yourself, you can create it by using the New Items button on the Home tab for any folder, or you can create it through the Tasks folder.

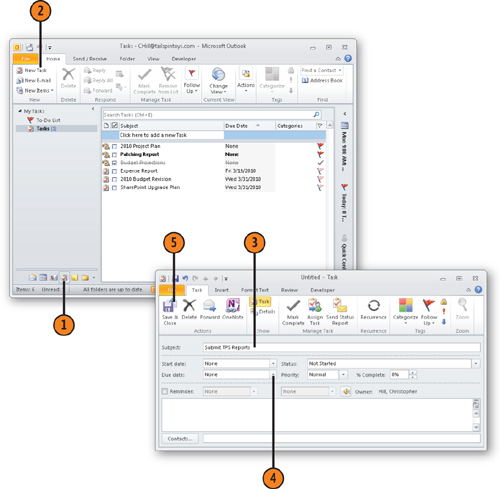
1. Set the Task Name and Due Date

  1. Click the Tasks icon on the Navigation Pane to open the Tasks folder.

  2. Click New Task to start a new task.

  3. Type a subject for the task.

  4. Click the arrow beside the Due Date field and select a date from the date navigator.

  5. Click Save & Close.


Note:

With any folder open, you can use the New Items button on the Home tab to open a new task form and create the task. Click the New Items button and choose Task from the submenu to open the new task form.


2. Set or Change Task Properties

  1. Click the Tasks icon on the Navigation Pane to open the Tasks folder.

  2. Double-click the task whose properties you want to change to open the task form.


    Note:

    Outlook makes a connection between the Status and % Complete properties. If you specify some percentage less than 100% in the % Complete field, Outlook changes the Status field to In Progress. Setting % Complete to 0 changes Status to Not Started. Setting % Complete to 100% causes Outlook to set Status to Completed. Likewise, setting Status to Completed sets % Complete to 100%.


    Note:

    If you delegate an Outlook folder to other users, allowing them to open your folder and view the items in it, they can see all items not marked private. Use the Private button in the Tags group of the ribbon’s Task tab to prevent your delegates from seeing the task in your task list.


  3. Click the Task tab, if you need to.

  4. Modify the start and end dates as you like.

  5. Click the Status drop-down list and choose a status, such as Started, In Progress, or Completed.

  6. Select a priority from the Priority drop-down list.

  7. Specify the percent complete in the % Complete field.

  8. Click the Details button.

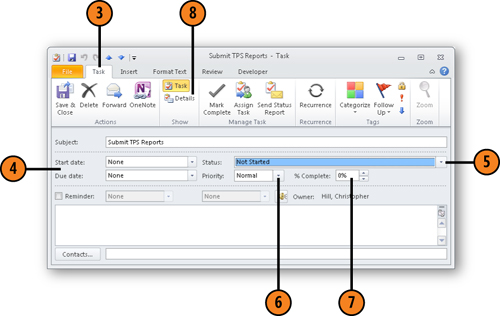
  9. Set additional properties for the task.

  10. Click Save & Close to close the form.


Note:

When you set a reminder for a task, Outlook assigns the default sound for the reminder, and Outlook plays that sound and displays the reminder in the Reminders dialog box when the specified time arrives. You can click the Speaker button next to the Reminder date and time fields to select a different sound file for Outlook to play when it displays the reminder.

Other -----------------
- Microsoft Outlook 2010 : Working with Tasks - Viewing Your Tasks
- Managing Windows 7 : Managing Windows Arrangements, Changing Search Options
- Managing Windows 7 : Changing the Date and Time, Changing the Display
- Customizing OneNote 2010 : Customizing the Ribbon (part 1)
- Customizing OneNote 2010 : Customizing the Quick Access Toolbar
- Troubleshooting Hardware and Performance : Dealing with Error Messages, Performing a Clean Boot, Using the System Recovery Options
- Troubleshooting Hardware and Performance : First Aid for Troubleshooting Hardware
- Microsoft Access 2010 : Creating Relationships Between Tables
- Microsoft Access 2010 : Relationships Explained, Enforcing Referential Integrity
 
 
Top 10
- Microsoft Visio 2013 : Adding Structure to Your Diagrams - Finding containers and lists in Visio (part 2) - Wireframes,Legends
- Microsoft Visio 2013 : Adding Structure to Your Diagrams - Finding containers and lists in Visio (part 1) - Swimlanes
- Microsoft Visio 2013 : Adding Structure to Your Diagrams - Formatting and sizing lists
- Microsoft Visio 2013 : Adding Structure to Your Diagrams - Adding shapes to lists
- Microsoft Visio 2013 : Adding Structure to Your Diagrams - Sizing containers
- Microsoft Access 2010 : Control Properties and Why to Use Them (part 3) - The Other Properties of a Control
- Microsoft Access 2010 : Control Properties and Why to Use Them (part 2) - The Data Properties of a Control
- Microsoft Access 2010 : Control Properties and Why to Use Them (part 1) - The Format Properties of a Control
- Microsoft Access 2010 : Form Properties and Why Should You Use Them - Working with the Properties Window
- Microsoft Visio 2013 : Using the Organization Chart Wizard with new data
 
programming4us
Windows Vista
programming4us
Windows 7
programming4us
Windows Azure
programming4us
Windows Server