There are three cost measures
you can associate with a resource. The Standard Rate is used for work
completed during normal working hours. The Overtime Rate is used for
work completed during overtime hours. Cost Per Use is a special,
one-time cost per assignment that is independent from the number of
hours worked. Each of these cost measures has a default rate that you
can define in the Resource Sheet view or in the Resource Information
dialog box.
You
can create four additional sets of the three rates in the Resource
Information dialog box if you want to charge different rates for
different kinds of work. You can also define time periods when the rates
will change.
Applying the Standard Rate to a Resource
You use the Standard Rate field to show the current default cost of each unit of the resource assigned to a task:
For work resources, the
standard rate is the amount to charge per time unit of normal working
time for the resource. Enter the rate as a number, followed by a forward
slash (/) and one of the following units or its abbreviation: minute
(m), hour (h), day (d), week (w), month (mo), or year (y). Project
assumes an hourly rate if you type just a number without a time unit.
For example, you can type 900/w for $900 per week, 46000/y for $46,000 per year, or just 18.7
for $18.70 per hour. Suppose you were to rent a moving truck for $100
per day. You could create a resource named Moving Truck and enter the
standard rate 100/d.
For
material resources, the standard rate is the amount to charge tasks per
unit of the resource consumed. The unit is defined in the Material
Label field. There is no time unit attached to the dollar amount. Enter
the standard rate as an amount, with no time unit, and it is understood
to be the amount per unit of the resource. For example, if you include
gas as a material resource for the moving truck, its material label
might be gallons (which is already defined in the Material Label field)
and the standard rate might be 3.00, which means $3.00 per gallon.
Cost resources use a flat charge amount assigned to it and do not have either units or standard rate.
Tip
Although
the standard rate is frequently the hourly or salaried rate for a
resource, organizations often define the standard rate as the billed-at
rate. When the standard rate is defined as the billed-at rate, a project
plan serves as a budget estimate for the work to be performed under
contract. Often, a project
plan demonstrates to the client early in the proposal stage that client
requirements are understood and acknowledged and gives the client
important confidence. Expectations are set for the project in the early
stages of planning, as opposed to being unpleasantly discovered during
project execution. Estimates of cost and work are based on defined work
rather than ballpark estimates. |
If the standard rate is entered
with a time unit, the rate is converted to an hourly rate and is applied
to the number of hours of work it takes to complete the task. For
annual rates, the hourly rate is calculated by assuming there are 52
weeks in a year, and the number of hours per week is that which is
defined on the Calendar tab of the Options dialog box. For the standard
workweek of 40 hours, the annual rate is divided by 2,080 (52 weeks × 40
hours) to get an hourly rate. For monthly rates, the hourly rate is
calculated using the Calendar tabs’ definitions for days in a month and
hours in a day (Hourly Rate in a Month = Monthly Rate / (Days in Month ×
Hours in Day).
When you want to charge more
or less than the default rate, you can define four more rates in
addition to the default standard rate that can be used for assignments.
Applying the Overtime Rate to a Resource
Project
uses the entry in the Overtime Rate field when calculating the cost and
actual cost of overtime hours that you schedule for a work resource.
There is no overtime rate for material and cost resources. The default
overtime rate is zero (0.00), so for salaried employees you can leave
the zero value if these resources are not paid extra for their overtime
hours. If the rate for overtime work is the same as the regular rate and
you intend to collect actual overtime work, you must enter that amount
again in the Overtime Rate field, or overtime hours will be charged at
the zero default rate.
Note
Overtime
work can be scheduled using the resource or task usage views by
displaying the overtime work column. Overtime work can only be scheduled
and actual overtime collected at the assignment level. |
Resources that are paid by the
hour often receive a higher wage when working overtime. Be sure to enter
this amount in the Overtime Rate field.
As with the
standard rate, you can define four additional overtime rates for each
resource and use them for special tasks.
Note
You can
set the default values for the standard and overtime rates for all new
resources in the Options dialog box. Choose Tools, Options, and then
click the General tab. Enter an amount per time unit in both the Default
Standard Rate and the Default Overtime Rate fields. All resources added
from that point on initially show these default rates. |
Applying the Cost Per Use to a Resource
The Cost Per Use field is
titled “Cost/Use” in the Resource Sheet view and “Per Use Cost” in the
Resource Information dialog box. This field contains any cost that is to
be charged once for each 100% of a unit of a resource that is assigned
to a task, regardless of the duration of the assignment. In other words,
the amount entered in the Cost Per Use field will be charged every time
the resource is assigned to a task.
Tip
Be
sure to take advantage of the Cost Per Use field when you are laying out
your project plans. One example of this would be a required trip charge
for deploying a resource. Perhaps a plumber charges $50 to examine a
plumbing problem, regardless of the number of hours spent and the
materials necessary to fix the problem. The Cost Per Use field enables
you to assign flat-rate costs to various tasks. |
For example, if you rent a
piece of equipment by the hour but also have to pay a flat charge of
$400 for having it delivered to the work site, you could enter the
delivery charge as a Cost Per Use cost. Keep in mind, however, that if
you assign the equipment to more than one task, the $400 will be charged
for each assignment. Therefore, you should always be careful when using
the Cost Per Use field with work resources, because the amount entered
in that field will be charged once for each 100% of the resource that is
assigned to any task.
Understanding the Cost Rate Tables
The Costs tab of the Resource
Information dialog box contains five Cost Rate tables—Tables A through
E—which show the default cost rates (Table A) plus four other levels of
cost that you can define for different types of assignments. For
example, a Plumber resource’s Table A would contain its default rates,
which might be for new commercial plumbing assignments. Table B might
contain the rates for new residential plumbing assignments, Table C
might show rates for modifying commercial plumbing, and Table D might
contain the rates for modifying residential plumbing. You can select the
rate to apply to an assignment in the Assignment Information dialog
box.
Tip
You
cannot change the labels on the five cost tabs to something more
descriptive than A–E, so you should use the resource Notes field (in the
Resource Information dialog box) to document what each rate is to be
used for. |
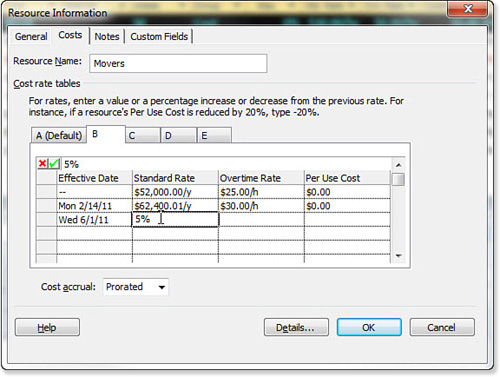
Figure 1 shows Cost Rate Table B for Movers. This table defines the default cost rates to use for the Movers’ assignments.

The entry in the first cell
in the Effective Date column is always two dashes, signifying that there
is no set start date for that level of rates. To enter additional
levels for subsequent dates, enter the change date in the Effective Date
column and then enter the values for the Standard Rate, Overtime Rate,
and Per Use Cost columns. Movers will receive a raise of 20% to both the
standard and overtime rates on 2/14/2011 (see Figure 8.9). You can enter up to 25 dated rate changes in each of the five tabs.
You can also allow for
changes over time in these rates. For example, if you assume that
inflation will cause your costs to increase by 5% per year, you could
show different rates for each of the years during which the project
lasts.
If you want Project to
calculate a percentage increase or decrease in one of the rates, enter
the plus or minus percentage with a percent sign (%), and when you leave
the cell, Project applies that increase to the value in the cell just
above it, displaying the calculated result instead of the percentage you
entered (see Figure 2).
Selecting the Cost Accrual Type
The
Cost Accrual field determines when costs are recognized for standard
and overtime costs. You can choose one of three options: Start, End, or
Prorated.
Tip
The
various cost tables allow for the use of a resource that might be billed
at different rates for various services and functions within the
project. For example, suppose one of your resources is a bilingual
writer who is billed at one rate for writing in English but charges a
different rate for writing in Russian. By factoring in the resource’s
competency in using each language, a different rate can be charged for
utilizing the same resource with various skill sets within the same
project. |
The default accrual method is
Prorated, which means that planned cost is distributed equally across
the duration, and if you mark a task at 15% complete, the actual costs
for all assigned resources would be estimated to be 15% of the scheduled
or estimated cost of those assignments. This method is the most widely
used because it keeps up with the pace of the project, allowing the cost
to coincide with task progress.
If you choose Start as the
accrual method, total planned costs are shown on the task start date;
then, as soon as you indicate that work on a task has started, Project
considers the entire standard and overtime costs of the assignment as
the actual cost. In other words, after a task has begun, the entire cost
is incurred and recognized as if the task were complete.
If you choose
End, Project postpones recognition of the actual cost until you enter a
finish date and the assignment is 100% complete.
Note
Only
the standard and overtime rates are affected by the accrual method you
choose. The Cost Per Use value is always accrued at the start of an
assignment, no matter which accrual method you choose for the resource. |
The
Cost Accrual setting only matters when you are printing interim reports
and when you are working on a task assignment that has started but is
not finished.
