Logo
programming4us
programming4us
programming4us
programming4us
Home
programming4us
XP
programming4us
Windows Vista
programming4us
Windows 7
programming4us
Windows Azure
programming4us
Windows Server
programming4us
Windows Phone
 
programming4us
Windows 7

Sharing Your Computer with Others : Create a User Account, Switch Between Accounts

- Free product key for windows 10
- Free Product Key for Microsoft office 365
- Malwarebytes Premium 3.7.1 Serial Keys (LifeTime) 2019
6/30/2013 5:31:10 PM

1. Create a User Account

If you want to share your computer with another person, you need to create a user account for that individual. To create a new account, you specify a unique name and an optional password. If you supply a password with an account, then only people who know that password can access the account's files, programs, and settings. This is an excellent security precaution, so you should safeguard each account with a password.

Note that you must be logged on to Windows 7 with an administrator account or know an administrator's password to create a user account.

Create a User Account

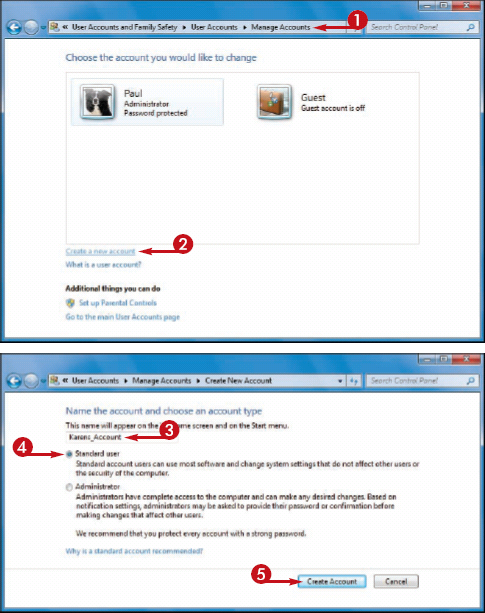
CREATE A USER ACCOUNT

1 Display the Manage Accounts window.

2 Click Create a new account.

The Create New Account window appears.

3 Type the name you want to use for the new account.

4 Click the account type you want ( changes to ).

NOTE

See the tip on the following page to learn the difference between the two account types.

5 Click Create Account.

Windows 7 creates the user account.


2. Switch Between Accounts

After you have created more than one account on your computer, you can switch between accounts. This is useful when one person is already working in Windows 7 and another person needs to use the computer.

One way to do this would be to have the current user log off and then have the other user log on. This works, but it is often inconvenient, particularly if the original user wants to resume working when the other user is finished with the computer.

To avoid this problem, you can switch from one account to another. In this case, Windows 7 leaves the original user's programs and windows running so that after the second person is finished, the original user can log on again and continue working as before.

Switch Between Accounts

1 Click Start.

• The current user's name and picture appear on the Start menu.

2 Click the power button arrow () to display the menu.

3 Click Switch user.

The Welcome screen appears.

4 Click the user account you want to switch to.


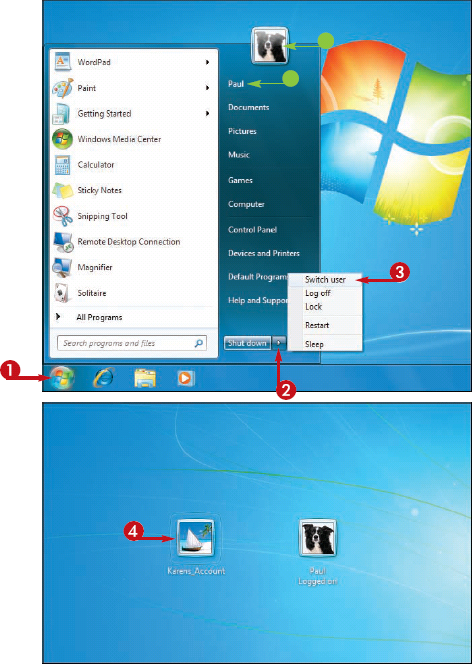
• If the account is protected by a password, the password box appears.


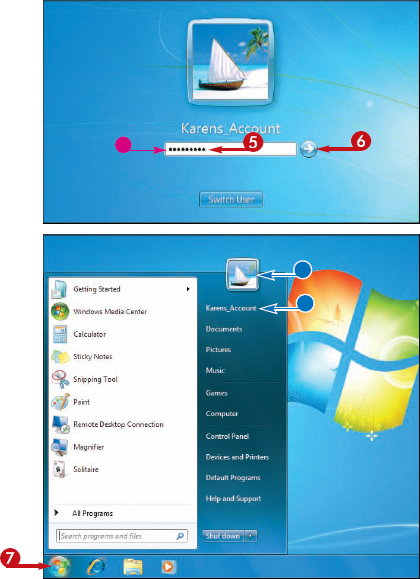
5 Type the password.

6 Click the Go button ().

7 Click Start.

• The user's name and picture now appear in the Start menu.

Simplify It

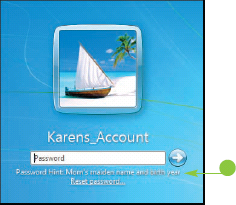
What happens if I forget my password?

When you set up your password as described in the previous section, Windows 7 asks you to supply a hint to help you remember the password. If you cannot remember your password, follow these steps:

1 Type anything into the password box.

2 Click the Go button ().

Windows 7 tells you the password is incorrect.

3 Click OK to return to the Welcome screen.

• Windows 7 displays the password hint.


Other -----------------
- Sharing Your Computer with Others : Display User Accounts
- Plug and Play and Power Management : WMI Request Handler, Synchronization Issues, Security
- Plug and Play and Power Management : Device Enumeration and Startup (part 2) - Device Power-Down and Removal
- Plug and Play and Power Management : Device Enumeration and Startup (part 1)
- Evaluating Applications for Windows 7 Compatibility : Deploying XP Mode
- Configuring Startup and Troubleshooting Startup Issues : The Process of Troubleshooting Startup (part 3) - Troubleshooting Startup Problems After Logon
- Configuring Startup and Troubleshooting Startup Issues : The Process of Troubleshooting Startup (part 2) - Startup Troubleshooting After the Starting Windows Logo Appears
- Configuring Startup and Troubleshooting Startup Issues : The Process of Troubleshooting Startup (part 1) - Startup Troubleshooting Before the Starting Windows Logo Appears
- Configuring Startup and Troubleshooting Startup Issues : Important Startup Files, How to Configure Startup Settings
- Managing Windows 7 : Managing Navigational and Editing Flicks
 
 
Top 10
- Microsoft Visio 2013 : Adding Structure to Your Diagrams - Finding containers and lists in Visio (part 2) - Wireframes,Legends
- Microsoft Visio 2013 : Adding Structure to Your Diagrams - Finding containers and lists in Visio (part 1) - Swimlanes
- Microsoft Visio 2013 : Adding Structure to Your Diagrams - Formatting and sizing lists
- Microsoft Visio 2013 : Adding Structure to Your Diagrams - Adding shapes to lists
- Microsoft Visio 2013 : Adding Structure to Your Diagrams - Sizing containers
- Microsoft Access 2010 : Control Properties and Why to Use Them (part 3) - The Other Properties of a Control
- Microsoft Access 2010 : Control Properties and Why to Use Them (part 2) - The Data Properties of a Control
- Microsoft Access 2010 : Control Properties and Why to Use Them (part 1) - The Format Properties of a Control
- Microsoft Access 2010 : Form Properties and Why Should You Use Them - Working with the Properties Window
- Microsoft Visio 2013 : Using the Organization Chart Wizard with new data
 
programming4us
Windows Vista
programming4us
Windows 7
programming4us
Windows Azure
programming4us
Windows Server