SQL
Azure is heavily automated, and it protects you from the concerns of
the physical infrastructure. This frees you up to focus completely on
managing your database. There are several aspects to managing a
database, and many of them remain the same when the database is in the
cloud.
If you ever have a script that needs to know what version of SQL it’s running in, you can check the Edition and Engine Edition values of the server. When running in SQL Azure, you’ll receive SQL Azure and 5 respectively. This is the query you would execute:
SELECT SERVERPROPERTY ('edition'), SERVERPROPERTY ('engineedition')
Usually, the first task you have after creating a database is moving your data up into the cloud.
1. Moving your data
Just because your database is
in the cloud and you don’t have to manage the disks doesn’t mean you
don’t have to back up your data.
It’s true that SQL Azure
provides a robust and reliable platform for your data. It stores your
data in multiple copies and load balances requests across those copies.
In some cases, this might be enough to meet your disaster recovery
needs.
But remember that, regardless of
the vendor, there isn’t any service in the cloud that protects you from
stupid, there’s no service that makes a bad application work correctly,
and there’s no platform that can fix bad decisions. What it can do is
make them stupider, badder, and break faster, for less money. Don’t be
lulled into complacency by the scale and redundancy the cloud gives you.
You still need to think of the risks to your
system, and to your data, and plan for them. The redundancy protects
you against the common types of catastrophic loss, related to failing
disks and other common issues, but not all loss is catastrophic in
nature. For example, this will not protect you if a dinosaur eats
Chicago or if you hire that guy Bob. Bob might execute a poorly written
update SQL script that renames all of your customers to Terrance. This
means you still need to back up your data, to protect your data from
yourself and your code.
All of this great
redundancy and scale won’t protect against the disaster of the data
center getting hit by a falling satellite, a radioactive monster, or an
oil-eating bacteria. In these cases, having your bits on several servers
in the same data center won’t help you—you’ll need geographic
diversity. Only you, and the business you support, can determine what
level of disaster recovery you need, and how much you’re willing to
afford.
Disaster isn’t your only
risk. What if an upgrade goes awry, and you accidentally delete a
customer’s data in your system? Or if an automated job takes a left turn
and wipes out the order history for the past month? SQL Azure protects
you against faults in the platform, but it doesn’t protect you against
faults in your own code or policies.
Even if you don’t need to back
up your data, you’ll likely need to move data at some point. You’ll run
into this when you’re migrating an existing on-premises database to the
cloud, or when you want to move the data from SQL Azure to another
location.
Right now there are only three
ways to work with SQL Azure data. The first option is to use a
developer’s API to access the data and save it in some format that you
can back up and restore from. There are a lot of options in this case;
you could use ADO.NET, ODBC, or WCF Data Services, but this would be
tedious and breaks our rule of not writing any plumbing code. We don’t
want to have to write our own backup tool.
The second option is to use the
Bulk Copy Program (BCP), which is used quite often to move large amounts
of data into and out of a SQL Server database. It’s one of your best
bets. When using BCP, it’s common for the DBA to disable indexing until
the import is completed, to speed up the transfer process. Once the data
is loaded, the indexes are enabled and updated based on the new data.
To extract the data from your local SQL Server, you’ll need to run BCP from a command prompt. The command is quite simple:
bcp databasename.schema.tablename out filename.dat -S servername -U username -P password -n -q
The bcp command is straightforward. When exporting data with BCP, you need to use the out
keyword. Provide the fully qualified table name, the name of the file
to write the data to, the server name, and your username and password.
The parameters tell BCP to keep the SQL data types native (don’t convert
them), and to use quoted identities in the connection string. Depending
on the size of your table, the copy might take a few minutes. Once it’s
done, you can open the data file and see what it looks like. When
you’re done poking around, you can use BCP in the other direction to
blast the data into your SQL Azure database. You’ll use a similar BCP
command to insert the data into your SQL Azure database.
BCP
operates at a table level, so you’ll need to run it several times, once
for each table. A common trick is to write a script that will export
all of the tables, one at a time, so you don’t have to do it manually.
This also helps with automating the procedure, reducing the risk of
mistakes, and making it easy to reproduce the process at any time.
Your last option for
working with data you have stored, or want to store in SQL Azure, is SQL
Server Integration Services (SSIS). SSIS is SQL Server’s platform for
extracting, transforming, and loading data. It’s a common tool used to
move data in and out of on-premises SQL servers, and it can connect to
almost any data source you need it to. You can also migrate your
existing SQL Server 2008 packages to SQL Azure (Azure can’t run packages
from SQL Server 2005). If you’re going to connect with SQL Server
Management Studio (SSMS), you’ll need to use SSMS 2008 R2 or later; the
earlier versions don’t support SQL Azure. You can trick them into doing
it, but that’s material for a shady blog post, and not for a
high-profile, self-respecting book.
Regardless of the tool you use to connect to your database, your connection will have to make it past the SQL Azure firewall.
2. Controlling access to your data with the firewall
Before an incoming connection
will be routed to the current leader server for your replicas, the
source IP address is checked against a list of allowed sources. If the
source address isn’t in this list, the connection is denied.
The list of approved
sources is a true whitelist, meaning that the IP address must be on the
list to be allowed in. There are no other rules supported, just the list
of allowed addresses. The list is stored in the master database for
your SQL Azure database server.
By using the SQL Azure portal and making the changes through the admin
pages. You can also add entries directly into the master database by
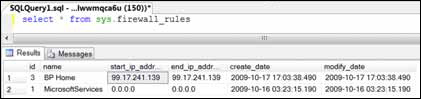
using the stored procedures provided. The rules are stored in a table
called firewall_rules (shown in figure 1),
and you can query it like a normal table. Because the table is in the
master database, the connection to the database performing the query
must be under the system administrator account you set up.
To manage your firewall rules
through code, you can create a connection to the master database with
your administrator account and use the provided stored procedures: sp_set_firewall_rule will create a firewall rule, and sp_delete_firewall_rule will remove a rule. When creating a rule, you’ll need to provide a unique name, and the two IP
addresses that form the range of addresses allowed. These addresses can
be the same if you want to grant access to a single IP address. When
deleting a rule, you only need to provide the name of the rule to be
removed.
Even applications running
in Windows Azure can’t connect to your server until you grant them
permission to connect. Because application servers in Azure use virtual
IP addresses, and the roles could shut down and restart anywhere,
causing their addresses to change, there’s a special rule you can use in
the firewall. If you create a rule with 0.0.0.0 as the starting and
ending addresses, any Azure application will be able to connect to your
server. That connection must still provide a valid username and
password.
A common problem is making a
change to the firewall and then immediately trying to access the server
from that IP address, which then fails. The cache that’s used to speed
up firewall-rule checks refreshes every 5 minutes. If you make a rule
change, it’s worth waiting up to 5 minutes before trying to see if the
change works.
The second line of defense is the use of SQL credentials to verify that people are allowed to connect to your database.
3. Creating user accounts
Managing user accounts in SQL
Azure works much the same way as in on-premises SQL Servers. A few small
differences can be found, mostly with the names of specific roles, but
in general it’s the same.
Your first step in granting
someone access to a database is to create a login for the server
itself. You need to connect to the master database in your server using
an account with the loginmanager
role. This would normally be the administrator account you created when
you created your server, but any other account with that role will
work.
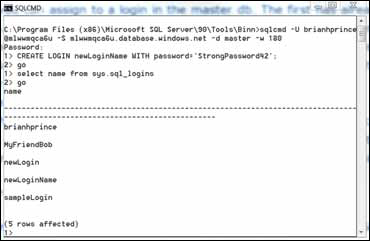
Once connected, you can list the existing logins by executing the sys.sql_logins view. To create a login, use the same command you’re used to, as shown in figure 2:
CREATE LOGIN theloginname WITH password='strongpasswordhere';
There are two roles that you can assign to a login in the master database. The first has already been mentioned, the loginmanager role. This role allows the user to manage user accounts and logins on the server. The second is the dbmanager
role. Granting this role to a user account gives it all the possible
permissions it could have, making it equivalent to the administrative
account you first created.
Once you’ve created a server
login, you can create a user account in a specific database based on
that login. This is the same approach as in on-premises SQL Server
installations. Although you can easily do this in SSMS, many DBAs like
to do this with SQL commands. You would execute the following command
while connected to the database you want to create the user account in:
CREATE USER newusername FROM LOGIN theloginname;
Once the user is created in
the database, you can grant and revoke privileges as you would in a
normal SQL database, either with the admin tools, or with the GRANT and REVOKE commands. SQL Azure only supports SQL users; Windows-based authentication isn’t supported by SQL Azure.
Many people ask us when they
should use SQL Azure and when they should use the Azure Table service.
This is a complex question, and one we’ve dedicated the whole next
section to.
