Probably, everybody knows that new Dynamics AX 2009 supports two-way synchronization with Microsoft Project Server.
Sounds good, but in reality it takes a lot of effort to install and
configure all the required components. This feature is also not
available for older versions of Dynamics AX. But, what if one wants to
simply display Dynamics AX project data as nice chart without installing
and configuring additional features? Of course, you could use the
integrated Gantt chart ActiveX,
but this again cannot be used that smoothly in practice, especially
when it is not possible to save it as a file and share it with other
people.
Another approach, which I successfully implemented in one of my projects, could be to use Microsoft Project
for displaying Dynamics AX project data. In this case, the data is
displayed in a well known format and what is very important is that it
can be stored as a Microsoft Project file for further usage.
In this recipe, we will use Microsoft Project to display Dynamics AX hours forecast data in the Project module. Here we are going to use COM objects to access Microsoft Project in a similar way in which we accessed Excel and Word.
Getting ready
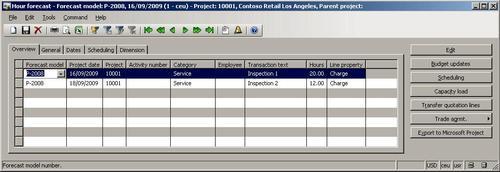
We again need to set up some demonstration data. Open the Project Details form from the Project module. Create a new or select an existing open project. In my case, I selected project No. 10001. Click on the Forecast | Hour button to open the Hours forecast form, and create several forecast lines. I created the following records:
|
Field
|
Value
|
|---|
|
Forecast model
|
P-2008
|
|
Category
|
Service
|
|
Transaction text
|
Inspection 1
|
|
Hours
|
20
|
|
Work center
|
00201
|
|
Field
|
Value
|
|---|
|
Forecast model
|
P-2008
|
|
Category
|
Service
|
|
Transaction text
|
Inspection 2
|
|
Hours
|
12
|
|
Work center
|
00201
|
The data entered in the Overview tab page should look as shown in the following screenshot:
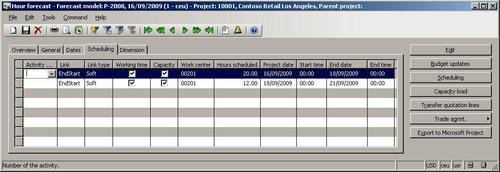
To update scheduling, click Schedule and click OK to accept the default parameters.
Now, the information on the Scheduling tab page should look like the following:
How to do it...
1. In AOT, create a new class called CreateProjectFile with the following code:
class CreateProjectFile

{
}
public client static void main(Args _args)

{
ProjTable projTable;
ProjForecastEmpl forecastEmpl;
ProjForecastEmpl parmForecastEmpl;
COM msproject;
COM projects;
COM project;
COM tasks;
COM task;
int n;
#define.MSProject('MSProject.Application')
;
if (!_args ||
_args.dataset() != tablenum(projForecastEmpl))
{
throw error(Error::missingRecord(funcname()));
}
parmForecastEmpl = _args.record();
projTable = ProjTable::find(parmForecastEmpl.ProjId);
try
{
msproject = new COM(#MSProject);
}
catch (Exception::Internal)
{
if (msproject == null)
{
throw error(
"Microsoft Project is not installed.");
}
}
projects = msproject.Projects();
project = projects.Add();
tasks = project.Tasks();
task = tasks.Add();
task.Name(ProjTable.Name);
task.OutlineLevel(1);
while select forecastEmpl
where forecastEmpl.ProjId == projTable.ProjId
&& forecastEmpl.ModelId == parmForecastEmpl.ModelId
{
task = tasks.Add();
task.OutlineLevel(2);
task.Name(forecastEmpl.Txt);
task.Start(forecastEmpl.SchedFromDate);
task.Duration(forecastEmpl.SchedTimeHours*60);
if (n)
data export, to Microsoft Projectdata export, to Microsoft Projectsteps{
task.LinkPredecessors(tasks.UniqueID(n));
}
n = task.UniqueID();
}
msproject.visible(true);
}
2. In AOT, create a new Action menu item with the following properties:
|
Property
|
Value
|
|---|
|
Name
|
CreateProjectFile
|
|
ObjectType
|
Class
|
|
Object
|
CreateProjectFile
|
|
Label
|
Export to Microsoft Project
|
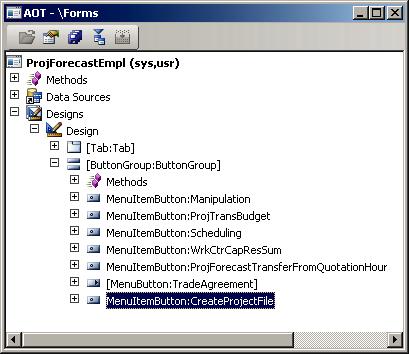
3. Add the created menu item to the bottom of the ProjForecastEmpl form's ButtonGroup group. Set its properties to:
|
Property
|
Value
|
|---|
|
Name
|
CreateProjectFile
|
|
MenuItemType
|
Action
|
|
MenuItemName
|
CreateProjectFile
|
|
DataSource
|
ProjForecastEmpl
|
4. In AOT, the form should look like the following:
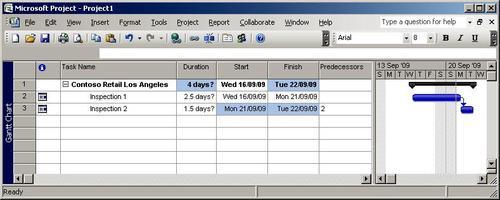
5. To test the export file, open Project | Project Details, select the project mentioned earlier, go to Forecast | Hour, and click the Export to Microsoft Project button to view the forecasted hours as a Microsoft Project plan:
How it works...
For the purpose of this recipe, we created a new class and placed all code in its main() method. The code starts with checking the input record, initializing the projTable record, and starting the Microsoft Project application.
Using the Microsoft Project model hierarchy, we first get a reference to the project collection object projects. Then, we create a new project by calling Add(). Each project contains a task collection, where we could add new tasks by calling its Add().
We do exactly that for the first level in the project plan, i.e. we
create a task whose name is a project name and set its level to 1.
Next, we loop through all Dynamics AX project hour forecast records and start inserting tasks into the Microsoft Project chart into the next level, i.e. 2. Here, we call Add() on the task collection again to create a new task object called task.
We set its properties like name, start date, and duration. We also
define every task to be dependent on the previous one by calling LinkPredecessors() with the number of the previous task as an argument.
Once the code is executed, we make Microsoft Project along with the diagram visible to the user.
Finally, we create a new Action menu item pointing to our class and add this item to the Hours forecast form to make sure the user is able to run it for a selected Dynamics AX project.
Depending
on the requirements, this technique could be used to control other
aspects like resources, custom properties, and other objects provided by
the Microsoft Project COM model.
