1. | Open the ADMT MMC snap-in (Start, All Programs, Administrative Tools, Active Directory Migration Tool).
|
2. | Right-click Active Directory Migration Tool in the left pane and choose Group Account Migration Wizard.
|
3. | Click Next to continue.
|
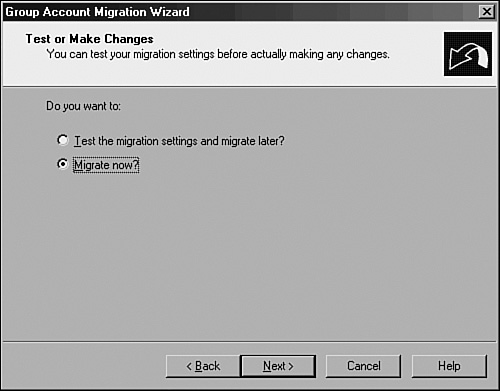
4. | On the next screen, shown in Figure 4,
you can choose to test the migration. As mentioned previously, the
migration process should be thoroughly tested before actually being
placed in production. In this example, however, you want to perform the
migration. Choose Migrate Now and click Next to continue.

|
5. | Select the source and destination domains, and click Next to continue.
|
6. | On
the subsequent screen, you can select the group accounts from the
source domain. Select all the groups required by using the Add button
and selecting the objects manually. After you select the groups, click
Next to continue.
|
7. | Enter
the destination OU for the accounts from the source domain by clicking
Browse and selecting the OU created in the steps outlined previously.
Click Next to continue.
|
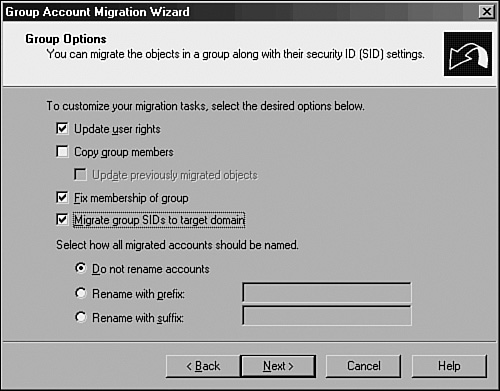
8. | On
the following screen, there are several options to choose from that
determine the nature of the migrated groups. Clicking the Help button
details the nature of each setting. In the sample migration, choose the
settings shown in Figure 5. After choosing the appropriate settings, click Next to continue.

|
9. | If auditing is not enabled on the source domain, you will see the prompt shown in Figure 6. It gives you the option to enable auditing, which is required for migration of SID history. Click Yes to continue.

|
10. | Another
prompt might appear if auditing is not enabled on the target domain.
Auditing is required for migration of SID history and can be disabled
after the migration. Click Yes to enable and continue.
|
11. | A
local group named SOURCEDOMAIN$$$ is required on the source domain for
migration of SID history. A prompt asking to create this group is
displayed at this point, as shown in Figure 7, if it was not created beforehand. Click Yes to continue.

|
12. | Another
prompt might appear asking to create a Registry key named
TcpipClientSupport in the source domain. Once again, this is required
for SID history migration. Click Yes to continue.
|
13. | If
you created the Registry key, an additional prompt then asks whether
the PDC in the source domain will require a reboot. In most cases, it
will, so click Yes to continue.
|
14. | The
next prompt exists solely to stall the process while the reboot of the
Source PDC takes place. Wait until the PDC is back online, and then
click OK to continue.
|
15. | The
subsequent screen allows for the exclusion of specific directory-level
attributes from migration. If you need to exclude any attributes, they
can be set here. In this example, no exclusions are set. Click Next to
continue.
|
16. | Enter
a user account with proper administrative rights on the source domain
on the following screen. Then click Next to continue.
|
17. | Naming
conflicts often arise during domain migrations. In addition, different
naming conventions might apply in the new environment. The next screen
allows for these
contingencies. In this example, any conflicting names will have the
XYZ-prefix attached to the account names. After defining these
settings, click Next to continue. |
18. | The
verification screen is the last wizard screen you see before any
changes are made. Once again, make sure that the procedure has been
tested before running it because ADMT will henceforth write changes to
the Target Windows Server 2003 Active Directory environment. Click
Finish when you’re ready to begin group migration.
|
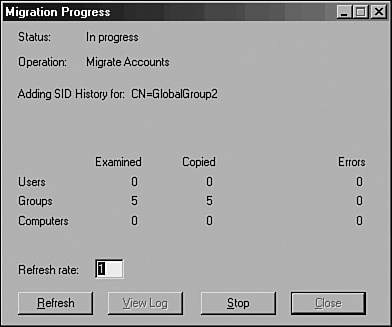
19. | The group migration process then commences. Changing the refresh rate, as shown in Figure 8,
allows for a quicker analysis of the current process. When the
procedure is complete, the log can be viewed by clicking View Log.
After finishing these steps, click the Close button to end the
procedure.

|