1. Configuring Lync-to-Phone
If a hosted voice service has been purchased
from an approved Microsoft partner, you can enable the service for each
user by configuring the Lync-to-phone provider for the user account,
and then adding the user’s phone number to the Office number field.
Use the following steps to enable a user for Lync-to-phone using the online portal:
1. Log on to the Office 365 Portal.
2. On the left side of the main page, click Users and Groups.
3. At the Users and Groups page, click on the name of the user to be enabled for Lync-to-phone to open the account properties.
4. On the left side, click Details, and then click Additional details to display the optional user properties.
5. Enter the phone
number that will be used with the user’s Lync-to-phone service in the
Office phone field, and then click Save to return to the Users and
Groups page.
6. Select the check
box for the user account to be edited; then, under Quick steps on the
right side of the screen, click on Edit Lync properties.
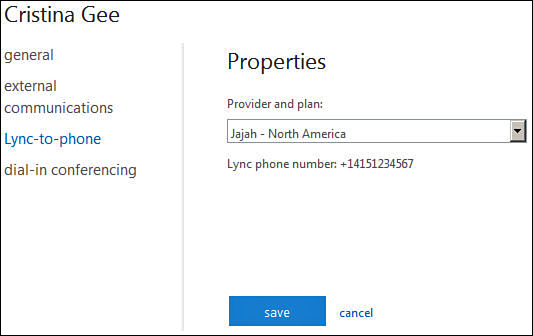
7. On the left side, click Lync-to-phone.
8. Under Properties, use the drop-down menu to select the Lync-to-phone provider, as shown in Figure 1.

Figure 1. Assigning a Lync-to-phone provider to a user account.
9. Click Save to complete the Lync-to-phone configuration.
2. Configuring Exchange UM Integration
If Lync-to-Phone has been purchased
and configured as part of the Lync Online subscription, and Exchange
Online Plan 2 and above has also been purchased, then Exchange UM can
be configured to provide voice mail for Lync clients. The following
sections provide details on the deployment of features that are available with the integration of Exchange UM and Lync Online.
3. Creating a SIP URI Dial Plan
The following procedure is used to configure
a SIP URI dial plan required for integration between Lync Online and
Exchange Online UM:
1. Log on to the Office 365 Portal.
2. On the main page,
click the Admin tab at the top, and then select Exchange from the
drop-down menu to open the Exchange Admin Center.
3. On the left side, click Unified messaging, and then click on UM dial plans at the top.
4. At the UM dial plans page, click on the plus symbol.
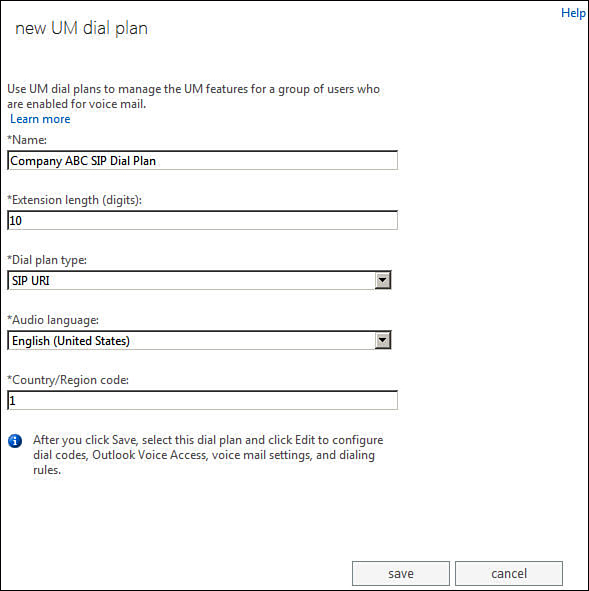
5. The New UM dial plan window appears, as shown in Figure 2. Enter the name of the new dial plan, and the number of digits that will be used.

Figure 2. Creating a new SIP URI dial plan.
Tip
Lync-to-phone supports dialing using full
E.164 phone numbers only; abbreviated dialing using office extensions
is not available with this service. For example, 415-123-4567 is a
valid number to dial, but 4567 is not. This means that the number of
digits specified for the SIP URI dial plan should include the area code
and prefix, which would be 10 digits in this example.
6. Use the drop-down menu to select a Dial plan type of SIP URI, and select the Audio language that will be used for the service.
7. Enter the
Country/Region code for the dial plan to enable domestic and
international dialing; for example, the correct region code for the
United States is 1.
8. When finished, click Save.
If necessary, after the SIP URI dial
plan is created, you can edit additional properties by selecting the
dial plan in the UM dial plans page of the Exchange Admin Center, and
clicking the Edit icon. For example, additional properties of the SIP
URI dial plan that can be configured include minimum PIN length, limits
on personal greetings, Outlook Voice Access settings, and much more.