Using Office 2007 Applications with SharePoint 2010
Microsoft offers a
thorough guide on this topic, with 41 pages dedicated to the various
versions of Office and the level of integration provided with SharePoint
2010:
“SharePoint_2010_and_Office_2010_Business_Productivity_at_its_Best_Whitepaper.docx.”
This guide offers a detailed comparison of the user experience when
Office 2007 products are used with SharePoint 2010 and when Office 2010
products are used with SharePoint 2010.
The following is a partial list from that white paper of the features that users won’t
get if using Office 2007 with SharePoint 2010. IT should find this
useful to help determine whether any of these features would justify or
help justify and upgrade to Office 2010 products.
Features available only with Office 2010 applications and SharePoint 2010 include the following:
Coauthor documents and presentations—
Word 2010 and PowerPoint 2010 offer the coauthoring capability that
allows multiple people to work on one of these documents at the same
time. Note that this is different from the ability in Office web
applications to have multiple users work on the same spreadsheet at the
same time. Simultaneously edit spreadsheets and notebooks— Excel 2010 and OneNote 2010 documents can be edited by multiple people simultaneously.
Excel 2010 takes advantage of Excel Services and Office web apps,
whereas OneNote provides this functionality natively and doesn’t require
Office web apps. Broadcast slide shows in PowerPoint 2010—
Another feature offered by Office web apps, this takes advantage of a
SharePoint 2010 broadcast site, which is automatically created by Office
web apps, which allows users to view a PowerPoint slide show without
having PowerPoint on their desktops or using LiveMeeting, WebEx, or
similar technology. Office Backstage view—
This is available in Office 2010 applications when a user clicks the
File tab and has access to the Backstage tools. This File tab is
functionally the replacement for the Microsoft Office button. Access SharePoint templates—
The New Document Wizard in Office 2010 applications enables users to
select SharePoint templates that have been used previously. Apply PowerPoint templates to SharePoint sites— PowerPoint themes can be applied to SharePoint sites for basic customization and branding.
The following features are partially supported with Office 2007 applications:
Office Backstage view with Excel 2010—
This allows for selective publication of parts of a worksheet, to hide
formulas, and “stage” data to SharePoint 2010. This can be done in Excel
2007, but the process is less intuitive. Integration with Groove and SharePoint Workspace products—
SharePoint Workspace 2010 is the new version of the Groove product and
provides powerful features for mobile workers, but Groove 2007 users
will still have the ability to work offline with SharePoint 2010
document libraries.
The Basics of Saving a Word Document to a SharePoint Document Library
Users and administrators
alike will want to become very familiar with the process of using Word
in conjunction with SharePoint 2010 document libraries.
In this example, the user has
created a new document from a SharePoint 2010 document library and then
accessed the File tab on the Ribbon to access Backstage. This document
library has had several columns added to it that will be reviewed in the
following steps.
Follow these steps to explore the capabilities of Backstage in more detail:
1. | Click
the new document from a document library that has had one or more
choice columns added, and one or more managed metadata columns added.
The assumption is that the document library uses a Word template.
| 2. | When the new document opens, click Enable Editing if needed.
| 3. | Enter some text in the document.
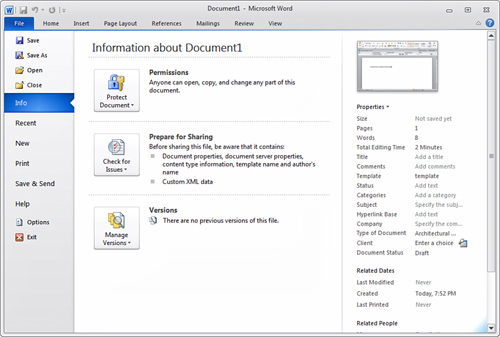
| 4. | Click
the File tab to access Backstage, which will default to the Info tab,
and click the Show All Properties link in the lower-right corner. The
results will look similar to Figure 1. The user has the option to enter metadata from the File tab or from the standard editing view of the document.
| 5. | In
this case, the user prefers to enter metadata from the regular editing
view, so she accesses the drop-down menu titled Properties from the File
tab and clicks Show Document Panel, and the Home tab opens, as shown in
Figure 2.
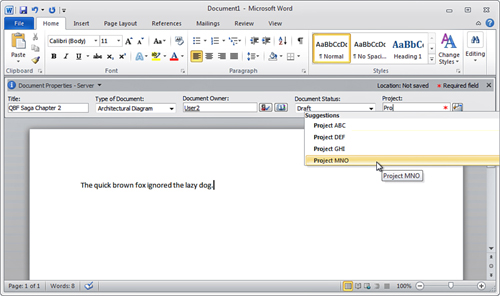
| 6. | The
user now enters data into the various metadata fields. In this example,
those are Title (a default metadata field), Type of Document (a choice
column added to the document
library), Document Owner (a person or group column added to the
library), Document Status (a choice column added to the document
library), and Project (a managed metadata column added to the document
library).
| 7. | In
this example, when the user clicks the Type of Document drop-down menu,
a message appears that informs the user “AutoComplete remembers entries
in Document Information Panel and Web Forms.... Do you want to turn
Autocomplete on?” She clicks Yes. This will make previously entered text
available as suggestions for this and future documents.
| 8. | She
makes choices from the Type of Document drop-down, enters her own
account as Document Owner, sets the Document Status at Draft, and then
in the Project field, she starts typing the word Project and she is given options for the managed metadata values available to choose from, as also shown in Figure 25.2. She chooses Project MNO.
Tip
Depending upon the
configuration of the managed metadata group, as well as the
configuration of the managed metadata column, a user might be able to
add values to the group from within the Office 2010 application. To try
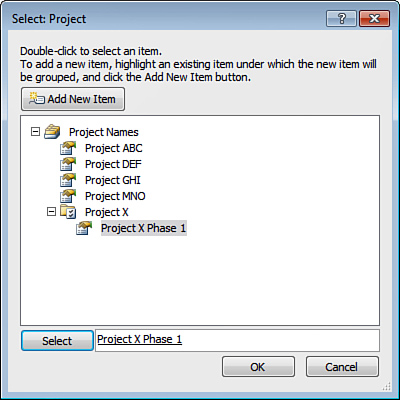
this from Word 2010, access the File tab, and click the icon next to the
Managed Metadata field in the Properties section on the right side of
the page (the property is Project in this example). The Select window
opens, as shown in Figure 3.
Then click Add New Item and enter the new term. For this to be
functional, the term set Submission Policy must be set as Open in the
Managed Metadata service application, and the column in the document
library must have the Allow Fill-in setting set to Yes.
| 9. | She then wants to save her work, so clicks the Save button.
| 10. | The
Save As window opens to the SharePoint document library where the
document was created, and she enters a title and clicks Save.
|
Working with Backstage in Word 2010
Microsoft has repositioned
the Office button and simply made it a part of the Ribbon interface,
where it is now the File tab. The File tab now gives access to the
Backstage page, which provides a number of tools: Save, Save As, Open,
Close, Information, Recent, New, Print, Save & Send, Help, Options,
and Exit. This section briefly summarizes the tools that pertain to
SharePoint connectivity to help administrators and power users get a
sense of how these will affect the user experience.
Note
Developers will be
happy to know that the Backstage view is fully customizable by using XML
to define the structure components and programming code.
A brief walk-through of the Info tab is as follows:
Protect Document drop-down menu offers a variety of tools—
Mark as Final, Encrypt with Password, Restrict Editing, Restrict
Permissions by People, and Add a Digital Signature. Mark as Final,
Encrypt with Password, and Restrict Editing are available without
additional software, but Restrict Permissions by People requires
Microsoft Information Rights Management Server, and Add a Digital
Signature requires Digital Signature Services. The Mark as Final
tool sets the status property to Final, and typing, editing commands,
and proofing marks are turned off. Users will still be able to edit the
document at a future date; they just have to click the Edit Anyway
button that appears under the Ribbon when the document opens. Check for Issues menu offers three tools—
Provides the Inspect Document, Check Accessibility, and Check
Compatibility tools. The Inspect Document tool checks for hidden
properties or hidden information, whereas Check Accessibility looks for
content that might be hard for a person with disabilities to read, and
Check Compatibility checks for features not supported by earlier
versions of Word. Check Compatibility will prove especially useful in
environments that support multiple different versions of Office
products. Manage
Versions offers up to five tools (depending on whether versioning is
configured in the library that houses the document, and whether major
versioning only or major and minor versioning are configured)—
These tools are Refresh Server Versions List, Check Out, Compare with
Major Version, Compare with Last Version, and Recover Unsaved Documents.
The Compare with Major Version and Compare with Last Version are
extremely handy tools to have, and give the user a quick way to see
recent changes in the document.
Additional tools that connect
the Word document to the SharePoint document library can be found on the
Save & Send menu. The Save & Send menu provides the Save to
SharePoint tool and the Workflows section, which lists any workflows
available to the document editor. The user can start a workflow listed
here and then provide additional information required by the workflow.
Accessing SharePoint Templates from Word 2010
Word 2010 offers the new
capability to select a template that lives in a SharePoint document
library to create a document. The user must have already created a new
document in a document library, which will download the template to
their system, and then make the template available in Word 2010. Follow
these steps to test the process:
1. | Visit
a SharePoint document library using an account that has
contributor-level privileges. This assumes that the system has Office
2010 installed, and that the template for the document library is based
on a Word document.
| 2. | Click
New Document from the Documents tab. Click OK to the warning message if
needed, and Word will start using the document library template.
| 3. | Enter some text, click Save from the File tab, and the Save As window opens.
| 4. | Enter a document title and click Save.
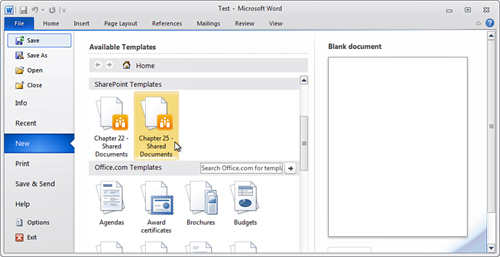
| 5. | Click the File tab, and click the New menu.
| 6. | In
the SharePoint Templates section under Available Templates, the
template from the new document library should appear, as shown in Figure 4.
| 7. | Click the desired template, and then double-click the template icon. The
template will have the metadata fields associated with the document
library available.
|
|
