1. Modifying Files with the Edlin Utility
Edlin is a relic from a
previous time. It actually predates the PC when it comes to the user
interface because it edits files line by line. Someone who worked with a
mainframe in the 1960s would probably feel right at home using Edlin,
but most modern users won't. The important things to remember about
Edlin are
You can find it in every Microsoft operating system and some non-Microsoft operating systems as well.
It uses the same interface everywhere you find it.
The executable is extremely small and portable at 12 KB.
It always works.
Figure 1 shows an example of how Edlin appears with a file loaded.
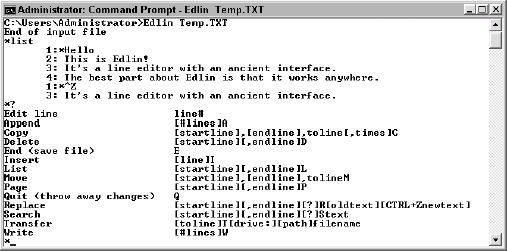
Figure 14.1
actually shows a number of Edlin features. The first line shows how to
start Edlin by providing the name of the file you want to edit. Edlin
can load any file, even binary files, if you provide the /B command line argument.
When you start Edlin, it doesn't display anything (yes, it's that primitive). You must type the List
command and press Enter to show the content of the file, which you then
edit one line at a time. Press Ctrl+Z to stop editing the text.
Typing a ? and pressing Enter displays the list of Edlin commands that comes next in Figure 1.
Here's the one feature that I like about Edlin: it has a very capable
search feature that doesn't assume anything about the file.
Finally, you type Quit
and press Enter to end the editing session.
2. Repairing System Databases with the ESEnTUtl Utility
Windows has a number of
associated databases. Of course, there's the main database, the
registry, which contains all of the system, user, and application
settings. However, Windows also contains a number of other databases
that you don't normally hear about. These databases reside in Solution
Database (SDB) files. Some of these databases record application setup.
You'll find that they normally have a Setup.SDB filename. Other databases record service pack status and have names such as AppHelp.SDB, AppH_SP.SDB, DrvMain.SDB, MSIMain.SDB, and SysMain.SDB. Still other databases keep track of security or other system settings that don't appear in the registry such as SecEdit.SDB.
In short, Windows hides a lot of information in places other than the
registry. You can access all of these other databases using the
Extensible Storage Engine Technology Utility (ESEnTUtl).
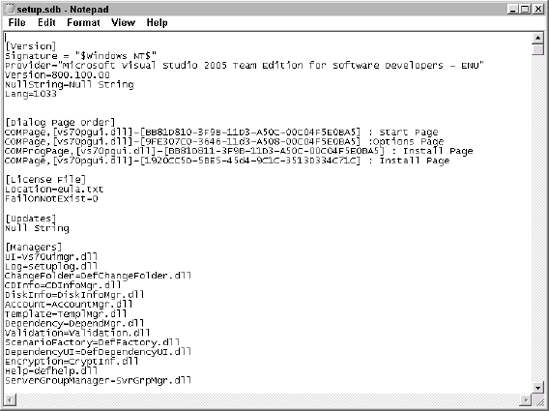
Not every SDB file on your
hard drive is a database. To confuse matters, Microsoft also uses the
SDB extension for some text-based files. For example, the Setup.SDB file for Visual Studio is a text-based file. You can read it using Notepad as shown in Figure 2.
The text entries in this file can tell you a lot about the application,
but the information isn't in a form that ESEnTUtl can manage. A true
SDB file contains binary data.
|
The ESEnTUtl
utility is extremely powerful. Used incorrectly on the wrong file, it
can wipe out security settings or make your system unbootable.
Consequently, make sure you understand this utility completely before
you use it. Always make a copy of any database before you modify it.
Verify as many changes as possible against the Microsoft Knowledge Base
before you make them.
|
|
The ESEnTUtl utility
doesn't provide you with much help. In fact, you'll hardly find this
utility mentioned at all in the Windows help file or many of the other
Microsoft resources. One place you'll find it mentioned is the Microsoft
Knowledge Base. Many Windows problems require you to use ESEnTUtl as a
means of repair.
HOW TO: Use Ntdsutil to Manage Active Directory Files from the Command Line in Windows 2000
http://support.microsoft.com/default.aspx?scid=kb;en-us;315131
You
receive an "Access is denied" error message when you install the
Bluetooth stack and detect a Bluetooth device in Microsoft Windows XP
Service Pack 2
http://support.microsoft.com/?kbid=892891
You cannot add a Windows component in Windows XP
http://support.microsoft.com/?id=884018
Event
ID 2108 and Event ID 1084 occur during inbound replication of Active
Directory in Windows 2000 Server and in Windows Server 2003
http://support.microsoft.com/default.aspx?scid=kb;en-us;837932
The ESEnTUtl operates in several modes. Each mode performs a different task with the SDB file. Here's the syntax for each mode.
Defragmentation
     ESENTUTL /d <database name> [options]
Recovery
     ESENTUTL /r [options]
Integrity
     ESENTUTL /g <database name> [options]
Repair
     ESENTUTL /p <database name> [options]
Checksum
     ESENTUTL /k <database name> [options]
File Dump
     ESENTUTL /m[mode-modifier] <filename>
Copy
     ESENTUTL /y <source file> [options]
The options vary by mode. However, some options are common to all or most modes. Here's a list of the common options.
/8
Defines the
database page size as 8 KB. Normally, ESEnTUtl detects the page size
automatically. Use this option only when told to do so as part of a
Microsoft Knowledge Base article or when you experience problems reading
a database.
/o
Suppresses the Microsoft logo. You can use this option to create output for reports or as input to another database.
/s<Streaming
Filename>Sets the filename for streaming data output. The default setting is NONE.
Use this switch when you want to send data to a destination using
streaming data techniques, rather than a simple dump. This switch
applies to the DEFRAGMENTATION, INTEGRITY, REPAIR, and FILEDUMP modes.
/t<Database
Filename>Sets the temporary database filename. The default setting is TEMPDFRG*.EDB.
Normally, you won't need to change the database filename because
ESEnTUtl already supports multiple temporary databases. This switch
applies to the DEFRAGMENTATION, INTEGRITY, and REPAIR modes.
NOTE
Some of the modes use the same option switch for different purposes. Consequently, don't assume that the /f switch for the DEFRAGMENTATION mode performs the same task as the /f switch for the INTEGRITY mode.
Defragmentation removes
excess space from the database and can improve system performance by
reorganizing the database. The database becomes defragmented after long
use because the system adds and removes entries without placing them in
the optimal position (much as a hard drive becomes defragmented through
use). The defragmentation-specific options include:
/f<
file>Sets the filename for streaming data defragmentation. The default setting is TEMPDFRG*.STM. Normally, you won't need to change this setting.
/i
Prevents ESEnTUtl from defragmenting the streaming file.
/p
Preserves the
temporary database. Generally, ESEnTUtl deletes the temporary database
once all of the changes are incorporated into the main database.
/b<Database
Filename>Creates a backup
copy of the database prior to defragmentation using the specified
filename. It's always a good idea to use this option so that you have
another copy of the database should the defragmentation fail.
Recovery helps
you overcome database errors. ESEnTUtl rebuilds the database using log
entries. This is a typical feature of transactional databases where the
database manager logs every action. The recovery-specific options
include:
/l<
path>Defines the location
of the log files used to recover the data. The default setting is the
current directory. Normally, you don't need to change this setting
because the log files usually appear in the same directory as the
database.
/s<
path>Defines the
location of any system files, such as the checkpoint file, required to
perform the recover. The default location is the current directory.
Normally, you don't need to change this setting because the system files
usually appear in the same directory as the database.
/i
Ignores any
mismatched or missing database attachments. However, by ignoring these
missing elements, you risk database damage. Use this option only when
the database is already damaged and the recovery is a last ditch effort
at reconstruction.
/d
[path]Defines the location
of database files. The default setting is the current directory. The
default setting when you specify this option without a path is the
directory originally logged in the log files, which may be different
from the current directory.
Integrity checking verifies
that the database is in an operational state and doesn't contain any
structural errors. You can perform an integrity check when you suspect
the database may contain errors, but don't want to perform any changes
until you know that it does. The integrity-specific options include:
/f<
name>Defines the prefix to use for name of report files. The default setting uses the name of the database, followed by .integ.raw.
Repair mode actually
changes the database. The most common repair simply removes the damaged
entries. This action can result in various kinds of data loss that
affect system operation. For example, you could lose some of the
security settings for your system. Always make a backup of the database
before you repair it. The repair-specific option includes:
/f<
name>Defines the prefix to use for the name of report files. The default setting uses the name of the database, followed by .integ.raw.
Checksum mode
verifies that the file doesn't contain any bit-level errors. The
checksum acts as a means of verifying the data itself is error free.
Compare this check with an integrity check and you'll notice that the
two provide complementary error checks. You should perform both checks
on a database when you suspect that it contains errors. The CHECKSUM
mode only supports the /8 and /o options.
File DUMP mode lets you
view the content of the database in a nondestructive manner. It's the
same as performing a query on any database. However, given the nature of
these databases, the processing of querying content is slightly
different. Instead of asking for the address of a customer or the number
of widgets sold during the month of June, these queries obtain
specifics about the database itself. The file dump–specific options
include.
/t<
Table Name>Performs a database dump for a specified table only. Use a metadata dump to obtain a list of the tables within the database.
/v
Provide verbose
output for the specified command. Even though ESEnTUtl always accepts
this option, some FILE DUMP mode modifiers can't provide additional
information. For example, performing a file dump of the database header
won't yield any additional results because the initial command always
provides complete information.
In addition to options,
the FILE DUMP mode supports a modifier that determines the kind of data
it provides as output. You combine this modifier with the /m command line switch. For example, to dump the database header, you use the /mh command line switch. The following list describes the FILE DUMP modes:
H
This is the
default modifier. It obtains the database header information. The header
contains a wealth of information about the database, such as the
database type and an indication of whether it uses a streaming file. In
addition, you can discover the last backup date and other essential
maintenance information about the database. You can see a header dump by
typing ESENTUTL /mh SecEdit.SDB in the \WINDOWS\security\Database folder and pressing Enter.
k
A checkpoint file
uses the CHK file extension. This file contains a checkpoint in the
database transactions. The system writes each transaction to memory and
log files first, and then commits them to the database. The reason for
this system is twofold. First, writing the information to memory and a
log file makes it possible to record transaction steps without changing
the database, making it easier to commit and rollback transactions as
needed. Second, using this approach makes it possible to write
information to the database in the most efficient manner possible, which
enhances overall system performance. The checkpoint is a reference to
the transaction stream; it indicates that all of the transactions prior
to the checkpoint appear in the database. Those after the checkpoint
could appear in the database, but more likely appear in memory or in a
log file. You can see a checkpoint by typing ESENTUTL /mk EDB.CHK in the \WINDOWS\system32\CatRoot2 folder and pressing Enter.
l
A log file uses the
LOG file extension and normally appears in the same folder as a CHK or
SDB file. However, sometimes Windows places the log files in an
associated folder, as is the case with the security logs. The log files
contain a record of current transactions—either completed or in process.
You can use the /r command line switch with a log file to roll back or reprocess transactions on the database. You can see a log file by typing ESENTUTL /ml EDB.LOG in the \WINDOWS\system32\CatRoot2 folder and pressing Enter.
m
Metadata tells you about
the content of a database. When you execute this command, you'll see a
listing of the tables and indexes associated with the database, along
with some statistical information about each entry. You can use this
command to obtain a list of tables to use with other ESEnTUtl command
line switches. You can see an example of metadata by typing ESENTUTL /mm SecEdit.SDB in the \WINDOWS\security\Database folder and pressing Enter.
s
This modifier tells
you how much space each of the tables and indexes within the database
are using. You can use this command to determine whether you need to
defragment the database using the /d
command line switch. The best way to determine how much space the
database should use is to defragment the database and use this command
to take a snapshot of the defragmented size. When the database exceeds
some threshold (normally 150 percent of the defragmented size),
defragment the database and take another snapshot. You can see the size
of the security database by typing ESENTUTL /ms SecEdit.SDB in the \WINDOWS\security\Database folder and pressing Enter.
Copying lets you create
another copy of a log file, streaming file, or database in a secondary
location. The default utility settings copy the data from a source
location to the current location, but you can change that behavior by
using the /d command line switch as follows.
/d<Destination
Filename>Copies the file to the specified destination, rather than using the current directory and the same name as the source file.
