Using the Launch and Edit
features of Flash Catalyst, you can modify artwork using the rich
editing capabilities of Adobe Illustrator CS5 and Adobe Photoshop CS5.
Open the artwork in Illustrator or Photoshop, make changes, and then
return to Flash Catalyst.
Take a moment to review the following tips for round-trip editing with Illustrator and Photoshop:
Use Illustrator to round-trip edit bitmaps and vectors.
Use Photoshop to round-trip edit bitmaps.
When
you edit a vector (shape or text) in Illustrator and the vector is not
part of a component, changes apply only to the state in which you select
and edit the vector. If the vector was shared to other states, they are
not affected by the edit.
When
you edit an image or component that is stored in the Flash Catalyst
library, you are editing the object definition in the library. If you’ve
shared the image across states, the changes apply in all states. If the
image is used inside a component, the changes are reflected in the
component.
You cannot round-trip edit vectors or bitmaps that you’ve optimized by choosing Optimize Vector Graphics in the HUD.
You cannot round-trip edit more than one component at a time.
Make
all structural changes to objects in Flash Catalyst. Changing the
structure of objects during round-trip editing can break the intended
behavior of objects or transitions in which they occur.
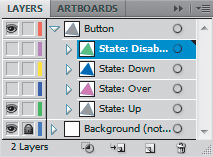
When
you round-trip edit a button (or other components), the component
states are shown as separate layers in Illustrator and Photoshop. If you
round-trip edit a group, its children are shown as separate layers.
When you round-trip
edit an object, the surrounding objects in the artboard are visible (but
dimmed) for reference. These objects appear as locked background layers
in Illustrator and Photoshop and cannot be edited.
Launch and edit in Adobe Illustrator
Using
Illustrator, you can edit drawings, as well as the following
components: Button, Checkbox, Radio Button, Horizontal Scrollbar,
Vertical Scrollbar, Text Input, Toggle Button, Horizontal Slider, or
Vertical Slider. You cannot round-trip edit Custom/Generic components.
To complete this exercise, you must have Adobe Illustrator CS5 installed.
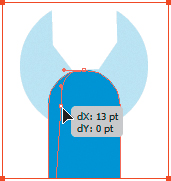
1. | Select LaunchAI in the Pages/States panel.
This page includes a sample drawing of a wrench that was created using
basic shapes. This would look better if the wrench handle tapered inward
a little near the head of the wrench. To do this, you need to edit the
anchor points of the handle shape, which cannot be done in Flash
Catalyst. To make this change, you can launch Adobe Illustrator CS5 and
edit the path using the Adobe Illustrator Pen tool. The shapes that make
up the wrench are grouped.
|
2. | Use the Direct Select tool (light arrow) to select the wrench handle.

|
3. | Choose Modify > Edit in Adobe Illustrator CS5.
Adobe Illustrator CS5 starts, and the shape you selected appears in the
Illustrator artboard. This is similar to Edit-In-Place mode in Flash
Catalyst. Only the selected artwork can be edited. The other artwork
appears in the background for reference only.
A message at the top of the Illustrator window tells you that you are editing from Adobe Flash Catalyst.

|
4. | Use the Illustrator Direct Select tool to select the shape.
|
5. | Click the anchor point at the upper-left side of the shape.
Handles appear. You can modify points on a path in Illustrator.
|
6. | Drag the upper-left anchor point to the right slightly to taper the top portion of the wrench handle.
|
7. | Drag the upper-right anchor point to the left slightly.
The wrench handle now gets narrower near the top of the wrench.
Note
After launching artwork in Illustrator, you can click Cancel to close the application without making changes.
|
8. | Click Done at the top of the application window.
The FXG Options dialog box appears.
|
9. | Click OK to close the FXG Options dialog box and return to Flash Catalyst.
The changes you made in Illustrator appear in Flash Catalyst.

|
Download and install the Adobe FXG extensions for Photoshop
Before you can take
advantage of round-trip editing with Adobe Photoshop, you need to
download and install the FXG extensions. These include the FXG plug-in
and the Simplify Layers For FXG script.
Instructions for downloading and installing the extensions are located at www.adobe.com/go/photoshopfxg.
Launch and edit in Adobe Photoshop
Use Photoshop to edit bitmap images, a selection of multiple images, or a group containing only images.
To complete this exercise, you must have Adobe Photoshop CS5 installed.
1. | Select LaunchPS in the Pages/States panel.
|
2. | Select the bitmap image of the surfer.
|
3. | Choose > Modify > Edit In Adobe Photoshop CS5.
A message reminds you that you need to download and install the FXG extensions for Photoshop.
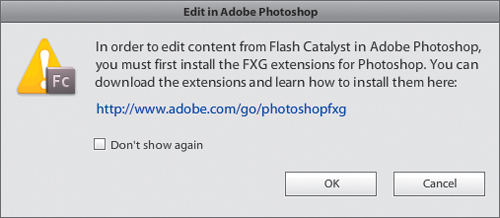 |
4. | Click OK to close the message and launch Photoshop.
Adobe Photoshop CS5 starts, and the bitmap image you selected appears in
the Photoshop canvas for editing. A message at the top of the canvas
reminds you to run the script to simplify layers before returning to
Flash Catalyst.
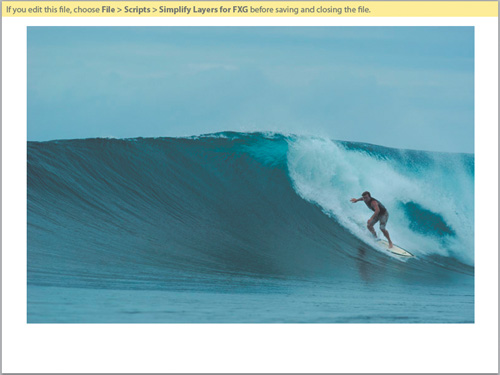
The image appears in its own layer in the Layers panel.

|
5. | Select the layer for the image you’re editing in the Photoshop Layers panel.
|
6. | Choose Filter > Artistic > Dry Brush (or another filter of your choice).
|
7. | Make any adjustments you want to the filter properties and click OK.
Tip
When you’re finished
editing in Photoshop, save the image as a PSD file before running the
Simplify Layers For FXG script. The PSD is your master file, preserving
any layer effects (styles), adjustment layers, layer masks, smart
objects, and so on, that you may have added.
|
8. | Choose File > Scripts > Simplify Layers For FXG.
|
9. | Choose File > Close and click Yes to save changes.
|
10. | Return to Flash Catalyst.
The changes you made in Photoshop appear in the Flash Catalyst project.

|
As
you’ve been working in Flash Catalyst, you’ve probably noticed a
property that’s common to just about everything you select in the
artboard, including components, bitmap images, imported vector drawings,
text, and the shapes you draw. This is the Blend Modes property in the
Appearance section of the Properties panel.
Blend modes are used to
determine how layered objects blend together. It’s helpful to think in
terms of the following colors when visualizing a blend mode effect:
The base color is the original color in the image.
The blend color is the color being applied in a layer above it.
The result color is the color resulting from the blend.
For more information on blend modes in Flash Catalyst, refer to the blend_modes.pdf document in the Lesson11 folder.
