Windows SIM provides a
graphical user interface to create and modify Windows unattended setup
answer files (Unattend.xml). Windows SIM keeps track of the components
that exist in Windows Vista image and verifies your settings against the
available components and their settings. It also allows you to manage
additional packages and drivers to be installed during Windows
installation.
Using Windows SIM, you can:
Quickly create and edit an unattended answer file.
Validate the settings of an existing answer file against a Windows image (.wim) file.
View all of the configurable component settings in an image.
Create
a configuration set that contains a complete set of portable folders
with setup files. You can replicate the configuration set on the
network. Configuration sets contain all of the files necessary to
install and customize Windows Vista. They are essentially portable
versions of the distribution share.
Add third-party drivers, applications, or other packages to an answer file.
Figure 1 shows the Windows SIM user interface. Windows SIM divides the user interface in to several panes:
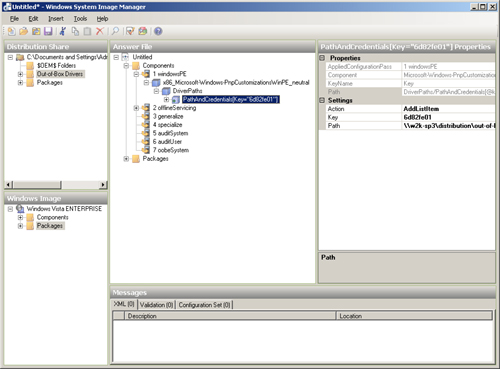
Distribution Share pane
The Distribution Share pane displays the currently open distribution
share in a tree view. You can select, create, explore, and close
distribution share folders by selecting the top node and then
right-clicking in the pane. You can add items in an open distribution
share folder to an answer file by right-clicking the item. The
Distribution Share pane reflects the organization and contents of the
actual folder containing the distribution share. For more information
about the $OEM$ Folders, Out-of-Box Drivers, and Packages subfolders,
see the section “Adding Files and Folders.”
Windows Image pane
The Windows Image pane displays the currently open Windows image in a
tree view. When the tree is expanded, all the components and packages
for the image are visible and available to add to an answer file in the
Answer File pane. The Components item contains settings for core Windows
Vista components, such as Internet Explorer or networking. Most of the
settings that you configure in answer files will be under the Components
item. The Packages item includes settings for Windows Vista optional
features and feature packs. The settings you choose to add to an answer
file greatly depend on your requirements. The Unattended Windows Setup Reference
in the Windows AIK contains a complete listing of all the components
and their settings. It is useful to review this before customizing an
answer file for deployment.
Answer File pane
The Answer File pane displays the Windows Setup configuration passes,
the settings to apply in each pass, and the packages to install. You can
open and edit an existing answer file, validate the settings in an
answer file against a Windows image, or create a new answer file. You
copy settings from the Windows Image pane to one of the configuration
passes in the Answer File pane to add the setting to the answer file.
Messages pane
The Messages pane consists of three tabs. The tabs displayed are XML,
Validation, and Configuration Set. Clicking a tab in the Messages pane
displays the type of message, a description, and the location of the
issue.
Properties pane
The Properties pane displays the properties and settings of a selected
component or package. The Properties pane enables you to edit the
settings, and, in the case of packages, Windows feature selections. At
the bottom of the Properties pane, Windows SIM displays the name of the
setting and the associated .NET type. You cannot change settings that
are gray—you can only edit settings that are bold.
Note
You
can look up information about any setting by clicking the setting in
the Properties pane, and then pressing F1. Pressing F1 on a setting
opens a description of the setting in the Unattended windows Setup Reference. |
Building Distribution Shares
A
distribution share is an optional storage location for third-party
device drivers, applications, and packages issued by Microsoft, such as
security updates. When using Windows SIM, you can open a distribution
share folder and then add the contents to an unattended installation
answer file.
You can use Windows SIM
to manage distribution shares or you can use Windows Explorer to add and
remove files and folders directly. Using Windows SIM helps ensure that
appropriate file structures exist, and that they are properly reflected
in any applicable answer files.
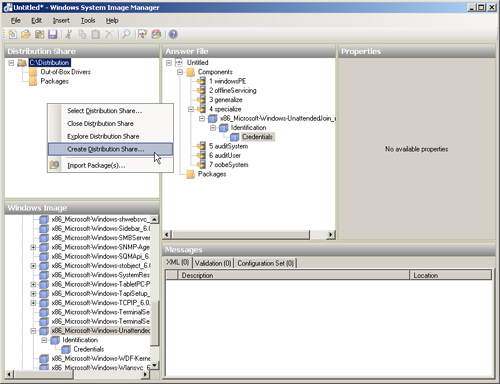
To create a distribution share by using Windows SIM
1. | In
the Distribution Share pane of Windows SIM, right-click Select A
Distribution Share and then click Create Distribution Share (Figure 2).
|
2. | In
the Create A Distribution Share dialog box, click New Folder, and then
type a name for the folder. Click Open to open the new distribution
share folder.
|
Adding Files and Folders
You can add any file or
folder to a distribution share that you want to distribute with Windows
Vista. For example, you can copy applications and scripts to the
distribution share, and then distribute those files with Windows Vista.
To add files to the distribution share
1. | Open a distribution share.
|
2. | Right-click the distribution share and then select Explore Distribution Share.
|
3. | In Windows Explorer, copy files and folders to the following subfolders in the distribution share:
- $OEM$ Folders qCopy
in to this subfolder any files and folders that you want to distribute
to each destination computer. This folder uses the same structure as the
$OEM$ folder for Windows XP. Microsoft encourages you not to use this
folder to distribute files and folders, however, and it’s provide only
for compatibility with already existing $OEM$ folder structures. For
more information, see the “Add Content to $OEM$ Folders” topic in the Windows Automated Installation Kit User’s Guide.
- Out-of-Box Drivers
qCopy in to this subfolder any device drivers that you want to add to
Windows Vista. You can use any folder structure that meets your
requirements. Note that copying device driver files in to this folder is
only the first step. You must also add device drivers to the answer
file, as described in the section “Adding Files to Answer Files.”
- Packages
qThis subfolder contains packages (updates and language packs) that you
want to add to Windows Vista. You must also add them to the answer
file, as described in the section “Adding Files to Answer Files.” You should add packages to the distribution share by importing them, as described in the next section.
|
Importing Packages
Only Microsoft
provides packages. Package types include service packs, security
updates, language packs, and modifications to Windows features. To
import and add a package to an answer file, you must place the package
in a specific folder on a distribution share. You must use Windows SIM
to import packages (Figure 3).
Once you have imported the package and made it available in the
distribution share pane, you can add the package to the answer file. The
section “Adding Files to Answer Files” describes how to add packages to answer files.
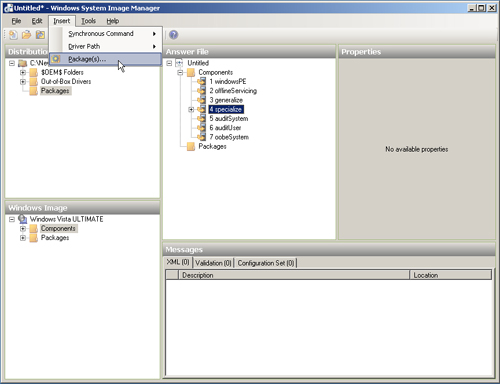
To import a package
1. | In Windows SIM, open a distribution share.
|
2. | On the Tools menu, click Import Package(s).
|
3. | In
the Select Package(s) To Import dialog box, open the file or folder
containing the packages to import and then click Open or click Open
Folder.
Windows SIM adds the selected package to the distribution share
folder. The newly added package is displayed under the Packages node in
the Distribution Share pane. See the “Adding Files to Answer Files” to learn how to add packages to an answer file.
|
Building Configuration Sets
A configuration
set is a subset of a distribution share, which is more easily copied to
removable media or a network share. A configuration set is
self-contained collection of files that contain no references to files
outside of the collection. This makes configuration sets useful for
using removable media to install Windows Vista based on a distribution
share. You can create a configuration set to gather all the resource
files specified in your answer file into one location. In essence, a
configuration set is simply a portable replica of the distribution share
that you can copy to a DVD or a USB Flash Drive.
To create a configuration set
1. | In Windows SIM, click Create Configuration Set on the Tools menu.
|
2. | In the Create Configuration Set window, specify a destination location where you intend to publish the configuration set.
|
3. | Select the location of the $OEM$ folder you created, and then click OK. |
