1. Foiling E-Mail Viruses
E-mail
is your computer’s gateway to the rest of the world, and this gateway
is what makes your e-mail one of the prime vectors for the distribution
of computer viruses and other evils. Fortunately, Windows Mail provides
options that can help you detect and prevent the introduction of viruses
onto your computer.
Protect Yourself and Others
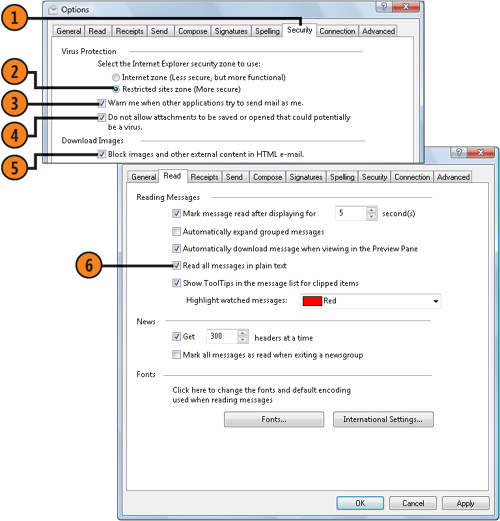
- 1. In Windows Mail, choose Options from the Tools menu, and click the Security tab of the Options dialog box.
- 2. Select the Restricted Sites Zone (More Secure) option if it isn’t already selected.
- 3. Select this check box, if it isn’t already selected, for protection
from programs already on your computer that might use your e-mail to
infect other computers.
- 4. Select this check box, if it isn’t already selected, to enable
inspection of the file type of an attachment and to block any attachment
that could contain a virus.
- 5. Select this check box, if it isn’t already selected, to stop your
message from requesting additional material from an external server.
- 6. On the Read tab, select this check box if you want to prevent any
hidden code in HTML-formatted messages from gaining access to your
computer, provided you don’t mind losing the formatting of HTML
messages. Click OK.
Tip
To
create even more secure e-mail, you can digitally sign and encrypt your
messages, and provide that digital ID to those who’ll be receiving your
secure mail. To obtain a digital ID, click the Get Digital ID button on
the Security tab of the Options dialog box. |
2. Installing Critical Fixes
Microsoft
continues to issue updates to Windows, fixing problems and
vulnerabilities as they’re discovered. To keep your computer running
smoothly and to avoid new types of attacks, it’s important that you
install any critical updates that Microsoft issues as soon as they’re
available. Fortunately, the Windows Update feature does most of the work
for you.
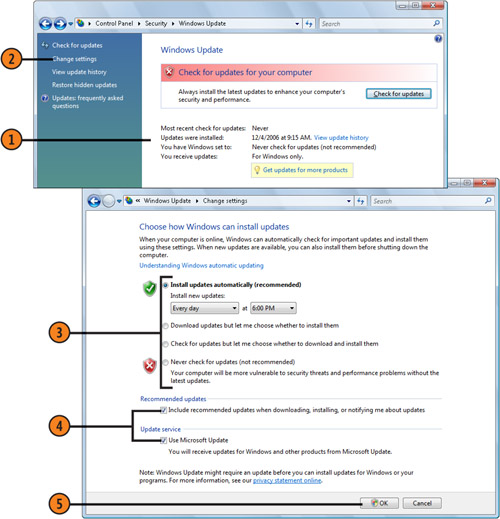
Configure Your Downloading
- 1. Click the Start button, choose Control Panel from the Start menu, click
Check For Updates in the Security section to display the Windows Update
window, and review the status of your updates. If you’re not signed up
to receive updates for all the Microsoft products installed on your
computer, click the Get Updates For More Products button, and sign up.
- 2. If the computer hasn’t checked for updates recently and isn’t set for automatic updating, click Change Settings.
- 3. Specify the way you want to receive updates, if at all.
- 4. Select these check boxes if you want to include recommended updates as
well as critical fixes in the downloads, and if you want to receive
updates for other Microsoft products.
- 5. Click OK when you’ve finished.
- 6. If you chose to be notified when updates have been downloaded or are
available for download, click the message or the download icon in the
notification area of the taskbar to install your updates.