The Advanced tab of the modem’s property sheet has a
text box named Extra Initialization Commands. Any text you enter into
this box is used by Windows XP to initialize the modem. Use this text
box to add AT commands or other initialization settings, as described in
your modem manual. Note that these commands are sent to the modem after Windows XP has sent the modem’s default initialization string.
For
example, you can get most modems to dial faster by changing the value
of the S11 register, which sets the number of milliseconds between
numbers dialed. The default on most modems is about 70, so try lowering
this number gradually until the dialing no longer works. On my modem, I
put ATS11=40 in the Extra Initialization Commands text box.
Modifying Advanced Port Settings
In the Advanced tab, clicking the Advanced Port Settings button displays the Advanced Settings dialog box, shown in Figure 1.
You use this dialog box to control the FIFO buffers used by the serial
port’s UART chip. (This applies only to serial ports that have a
16550-compatible UART. The type of UART you have is one of the things
displayed in the modem diagnostics test I told you about earlier.)
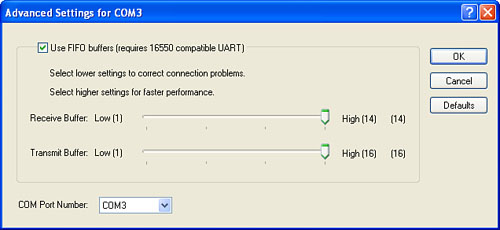
Recall from our
earlier discussion that the purpose of the UART is to convert the CPU’s
outgoing bytes into bits for modem transmission, as well as to convert
the modem’s incoming bits into bytes for the CPU. The FIFO buffers are
storage areas that the UART uses to hold incoming (the receive buffers) and outgoing (the transmit buffers) bytes. When a certain number of these buffers are full, the UART generates an interrupt to let the CPU know what’s going on.
The two sliders determine when these interrupts are sent:
Moving the sliders
to the right means that more buffers must be full before an interrupt
is sent. This means fewer interrupts are generated, so performance
increases.
Moving
the sliders to the left means that fewer buffers must be full before an
interrupt is sent. This gives the CPU more opportunity to deal with the
buffers, so you’re less likely to have transmission problems.
Modifying Default Preferences
In
the Advanced tab, clicking the Change Default Preferences button
displays the modem’s Default Preferences dialog box, The Call Preference
group has two options:
| Disconnect a Call If Idle for More Than x Mins | If
you activate this check box, Windows XP monitors the connection for
activity. If there is no activity within the specified number of
minutes, Windows XP disconnects the call. (Note that this check box will
be disabled if your modem doesn’t support this property.) |
Caution
Forgetting that your modem
is connected to a remote system is easy to do. If you pay money for your
connection time—either a per-minute connect fee or a long distance
charge—be sure to activate the Disconnect a Call If Idle for More Than x Mins check box. For the idle time, enter a value between 1 and 42 minutes.
| Cancel the Call If Not Connected Within x Secs | If
you activate this check box, Windows XP gives the modem the specified
number of seconds to connect to the remote system. If the connection
doesn’t happen within that time, Windows XP cancels the call. If you’re
connecting to a system that takes a while to connect (such as an
international call), adjust the number of seconds accordingly (you can
enter any integer value between 1 and 254). |
The Data Connection
Preferences group has options that enable you to configure the various
modem protocols, including error correction, compression, flow control,
and modulation. Besides setting the default port speed, you can also use
the following lists:
| Data Protocol | Use
this list to select or disable the modem’s built-in error-checking
protocol (such as V.42 or MNP 4). Select Standard EC to enable the modem
to negotiate the error correction method with the remote mode; select
Forced EC to require that the modem use V.42 (if the remote modem
doesn’t support V.42, the connection is canceled); select None to
disable error checking. (Disable error checking only if you are having
trouble connecting to the remote modem.) |
| Compression | Use
this list to enable or disable the modem’s built-in data compression
protocol (such as V.44 or V.42bis). As explained earlier, you can use
compression for text and binary files, but you should disable it for
compressed file transfers. |
| Flow Control | Use this list to select or disable flow control. Select Hardware (RTS/CTS), Xon/Xoff (software), or None. |
In
the Advanced tab, use the Data Bits, Parity, and Stop Bits lists to set
the default values for these connection parameters. For some modems,
you can also use the Modulation list to specify whether the modem uses
its default modulation protocol (the Standard option) or some other
proprietary protocol.
