If you have a notebook computer, you can set up
multiple dialing locations. For example, you could have one location for
dialing from the office that uses extra digits to access an outside
line and uses your corporate calling card. You could then have a second
location for home that doesn’t require anything extra to access an
outside line and disables your call waiting service.
Caution
If you travel with your
notebook and use a modem to connect to the office or the Internet,
watch out for the digital phone systems that are used by many hotels.
Analog modems aren’t compatible with digital systems, so you end up
frying your modem if you attempt to connect over a digital line.
Unfortunately, digital phone jacks look identical to regular analog
jacks, so you need to ask the hotel staff what kind of phone jacks the
hotel uses. Note, however, that almost all hotel phones now come with a
data jack, and it’s perfectly safe to plug your modem into that jack.
Just avoid plugging the modem into any wall jacks.
Creating a New Dialing Location
The location
information you entered while installing Windows XP (if Setup detected
your modem) or while installing your first modem is stored in a location
called My Location. To set up another location, follow these steps:
1. | Double-click Control Panel’s Phone and Modem Options icon. The Phone and Modem Options dialog box appears.
|
2. | Display the Dialing Rules tab.
|
3. | Click New to display the New Location dialog box.
|
4. | Type a name in the Location Name text box.
|
5. | Configure the location as described in the next section.
|
Modifying Dialing Location Properties
Windows XP keeps track
of various dialing properties that you can apply before connecting with
your modem. These properties determine how Windows XP dials the modem.
For example, the Country setting determines the country code used for
long-distance calls (this is 1 in the United States and Canada), and the
Area Code setting lets Windows XP determine whether the outgoing call
is long distance.
You can change these and other dialing parameters by following these steps:
1. | Double-click Control Panel’s Phone and Modem Options icon. The Phone and Modem Options dialog box appears.
|
2. | Display the Dialing Rules tab.
|
3. | In the Locations list, select the location you want to work with.
|
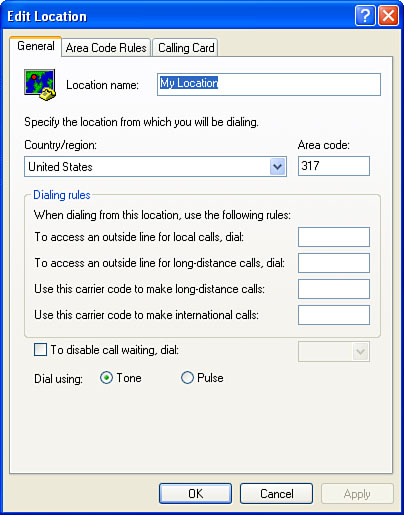
4. | Click Edit to display the Edit Location dialog box, shown in Figure 1.
|
5. | Configure the location using the following controls:
| Country/Region | Use this list to set the country code from which you’ll be dialing. | | Area Code | Use this text box to set the area code from which you’ll be dialing. | | To Access an Outside Line for Local Calls, Dial | Use this text box to enter the code that must be dialed to get an outside line for local calls (such as 9). | | To Access an Outside Line for Long-Distance Calls, Dial | Use this text box to enter the code that must be dialed to get an outside line for long distance calls (such as 8). | | Use this Carrier Code to Make Long-Distance Calls | Use this text box to enter the code required by your long-distance carrier for long-distance calls. | | Use this Carrier Code to Make International Calls | Use this text box to enter the code required by your long-distance carrier for international calls. | | To Disable Call Waiting, Dial | To
deactivate call waiting before making the call, activate this check box
and then either type the appropriate code in the text box or select one
of the existing codes from the list. |
Caution
The extra beeps that
call waiting uses to indicate an incoming call can wreak havoc on modem
communications, so you should always disable call waiting before
initiating a data call. The sequences *70, 70#, and 1170 usually disable
call waiting, but you should check with your local phone company to
make sure.
| Dial Using | Activate either Tone or Pulse, as appropriate for your telephone line. |
|
Specifying an Area Code Rule
Area codes are getting increasingly confusing. There are two situations that are causing the weirdness:
Calling the same area code—
In this situation, you don’t usually have to bother with the area code.
However, some phone systems insist that you include the area code even
if the other number is in the same area code. In some cases, these are
long-distance calls, so you even have to dial a 1 (or some other country
or region code) to start the call.
Calling a different area code—
This situation normally requires that you dial a 1 (or whatever),
followed by the area code, followed by the number. However, in some
larger cities, the phone company has actually run out of numbers in the
main area code, so they’ve created a whole new area code for the city.
These aren’t usually long-distance calls, however, so even though you
have to include the area code, you don’t usually have to dial a 1 to get
started.
Note
that in both cases, the area code might apply to only certain phone
number prefixes. (The prefix is the first three digits of the
seven-digit number.) If you have to make any calls in these situations,
you need to define a new area code rule to handle it. Here’s how it’s
done:
1. | Double-click Control Panel’s Phone and Modem Options icon. The Phone and Modem Options dialog box appears.
|
2. | Display the Dialing Rules tab.
|
3. | In the Locations list, select the location you want to work with.
|
4. | Click Edit to display the Edit Location dialog box.
|
5. | Display the Area Code Rules tab.
|
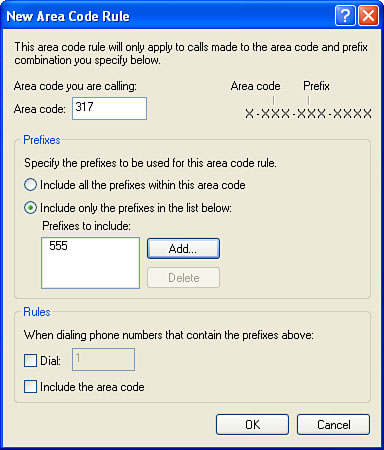
6. | Click New to display the New Area Code Rule dialog box, shown in Figure 2.
|
7. | Use the Area Code text box to type the area code you’ll be calling.
|
8. | If
the rule will apply only to certain phone number prefixes, activate the
Include Only the Prefixes in the List Below option. Then click Add,
type the prefix (or prefixes, separated by spaces or commas), and click
OK.
|
9. | If
you need to dial a country code (such as 1) before the area code,
activate the Dial check box and use the text box to type the number.
|
10. | To force Windows XP to dial this area code, activate the Include the Area Code check box.
|
11. | Click OK.
|
Specifying a Calling Card
When you’re on the
road, you’ll often find yourself having to make calls that cost money.
For example, if you’re in a hotel that charges for calls, you might want
the charge to go through your calling card.
For this type of
situation, Windows XP enables you to specify a calling card to use when
making the call. Here’s the simplest route to take:
1. | Double-click Control Panel’s Phone and Modem Options icon. The Phone and Modem Options dialog box appears.
|
2. | Display the Dialing Rules tab.
|
3. | In the Locations list, select the location you want to work with.
|
4. | Click Edit to display the Edit Location dialog box.
|
5. | Display the Calling Card tab.
|
6. | In the Card Types list, select the type of calling card you have.
|
7. | Type your account number.
|
8. | Type your personal ID number (PIN).
|
9. | Click OK.
|
If your calling card isn’t
in the list, click New to get to the New Calling Card dialog box.
Alternatively, if your card is listed, you might need to adjust its
settings. In that case, select the card and then click Edit to get the
Edit Calling Card dialog box (which is identical to the New Calling Card
dialog box). This dialog box has four tabs, so let’s see what each one
holds.
The General tab is as
good a place as any to start. Here you need to enter three things: the
calling card name (this will appear in the Card Types list), your
account number, and your PIN.
You use the Long Distance
tab to specify the steps that must be followed to make a long distance
call. The first thing to do is specify your card’s access number for
long-distance calls. After that’s done, you define the steps by clicking
the buttons below the Calling Card Dialing Steps box. There are six
buttons for your clicking finger to tickle:
| Access Number | Click this button to add the long-distance access number to the steps. |
| PIN | Click this button to add your PIN to the steps. |
| Wait for Prompt | Click
this button to display a dialog box with various things that the system
must wait for before continuing the dialing. You can have the system
wait for a dial tone, a completed voice message, or a specified number
of seconds. |
| Account Number | Click this button to add your account number to the steps. |
| Destination Number | Click
this button to add the number you’re calling to the steps. You also get
a dialog box in which you can tell Windows XP to also dial the country
code and area code. |
| Specify Digits | Click this button to add one or more digits (as well as * and ) to the steps. |
The idea is that you
click these buttons in the order that they must appear in the card’s
calling sequence. If you make a mistake, use the Move Up and Move Down
buttons to shuffle things around. If your card requires different
sequences for international and local calls, follow the same steps using
the International and Local Calls tabs. When you’re done, click OK to
return to the New Location dialog box. Then click OK to return to the
Phone and Modem Options dialog box.
