The Computer Management snap-in is a great tool for
managing many different aspects of your system, from devices to users to
services and much more. But perhaps the most incredible thing about
Computer Management is that you can also use it to manage some aspects
of a remote network computer, too. Here’s a list of just a few of the
things you can do:
For each shared
folder on any remote computer, find out the users that are connected to
the folder, how long they’ve been connected, and the files they have
open.
Disconnect users from a shared folder or close files that have been opened on a shared folder.
Change
the properties of a remote shared folder, including its share name and
the access rights to the folder. You can even stop sharing a remote
folder.
Set up a new shared folder on any remote machine.
Add, modify, and delete user accounts and security groups on a remote computer.
View (but not modify) a remote computer’s Device Manager.
Start, stop, and configure services.
These are powerful, not-to-be-wielded-lightly techniques. I won’t describe them all here. Instead,
I’ll focus on three techniques that are most useful for network
administration: viewing connected users, working with remote shared
folders, and working with remote open files.
Connecting to a Remote Computer
To get started, you need to open a remote computer in the Computer Management snap-in. Here are the steps to follow:
1. | Open
the Computer Management snap-in by selecting Control Panel,
Administrative Tools, Computer Management. (Alternatively, select Start,
Run, type compmgmt.msc, and click OK.)
|
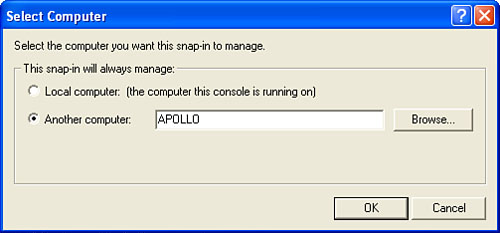
2. | Select Action, Connect to Another Computer. The Select Computer dialog box appears, as shown in Figure 1.
|
3. | Activate the Another Computer option.
|
4. | Use the text box to type the computer name or IP address of the remote computer you want to manage.
|
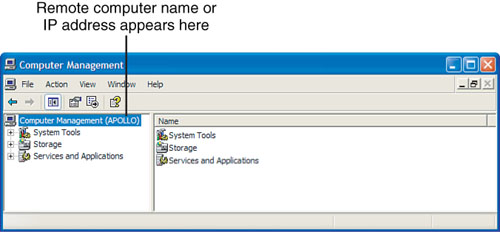
5. | Click
OK. Computer Management connects to the other computer and displays the
computer name or IP address in the console root, as shown in Figure 2.
|
Viewing the Current Connections
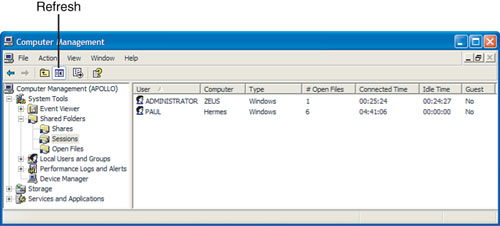
To see a list of the
users connected to any shared folder on the remote computer, select
System Tools, Shared Folders, Sessions. Figure 3 shows an example. For each user, you get the following data:
| User | The name of the user |
| Computer | The name of the user’s computer |
| Type | The type of network connection, such as Windows, NetWare, or Macintosh |
| Open Files | The number of open files in the shared folders |
| Connected Time | The amount of time that the user has been connected to the remote computer |
| Idle Time | The amount of time that the user has not been actively working on the open files |
| Guest | Whether the user logged on using the Guest account |
Note
To ensure that
you’re always viewing the most up-to-date information, regularly select
the Action, Refresh command or click the Refresh toolbar button.
Although in the
interest of network harmony you’ll want to let users connect and
disconnect as they please, at times you might need to boot someone off a
machine. For example, you might see that someone has obtained
unauthorized access to a share. To disconnect that user, right-click his
name in the list and then click Close Session. When Windows XP asks for
confirmation, click Yes.
Working with Shared Folders
Computer
Management also makes it possible for you to view the connections to a
server by its shared folders. To get this display, select System Tools,
Shared Folders, Shares. As you can see in Figure 4, this view provides the following information:
| Shared Folder | The share name. Note that the list includes hidden shares. |
| Shared Path | The drive or folder associated with the share. |
| Type | The type of network connection, such as Windows, NetWare, or Macintosh. |
| # Client Connections | The number of computers connected to the share. |
| Comment | The description of the share. |

Here are the techniques you can use to work with the shared folders:
| To change the properties of a shared folder | Right-click
the folder you want to work with, and then click Properties (or press
Alt+Enter). The property sheet that appears enables you to modify
various share options, including the name, comment, share permissions,
and security. |
| To stop sharing a folder | Right-click the shared folder and then click Stop Sharing. When Windows XP asks whether you’re sure, click Yes. |
| To add a shared folder | Click
the Shares branch and then select Action, New File Share, or click the
Create New File Share toolbar button (pointed out in Figure 22.28). This launches the Create a Shared Folder Wizard, which takes you step-by-step through the process of sharing a folder. |
Working with Open Files
Computer
Management can also display the files that are open on the remote
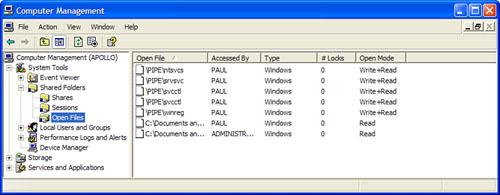
computer’s shares. To switch to this view, select System Tools, Shared
Folders, Open Files. Figure 5 shows the result. Here’s a summary of the columns in this view:
| Open File | The full pathname of the file |
| Accessed By | The name of the computer that’s using the file |
| Type | The type of network connection, such as Windows, NetWare, or Macintosh |
| # Locks | The number of locks on the file |
| Open Mode | The permissions the user has over the file |
Again, you’ll usually
want to let users open and close files themselves so that they don’t
lose information. If you need to close a file, however, you can do so by
right-clicking it and then clicking Close Open File. When Windows XP
asks for confirmation, click Yes.
