You can change your network settings by selecting
Start, All Programs, Accessories, Communications, Network Connections
(or by launching Control Panel’s Network Connections icon). The
configuration of the resulting Network Connections window depends on the
computer’s role in the network. For example, if the computer is the ICS
host, you’ll see a configuration similar to the one shown in Figure 1. There are three items here:
| DSL Internet Connection | This
icon represents the ICS host’s Internet connection—a broadband
connection via a DSL modem, in this case. That is, it’s the connection
that runs from the DSL modem out to the Internet. |
| To Local Area Network | This icon represents the connection to the network. That is, it’s the connection that runs from one NIC to the network hub. |
| To DSL Modem | This icon represents the connection to the modem. That is, it’s the connection that runs from the second NIC to the DSL modem. |

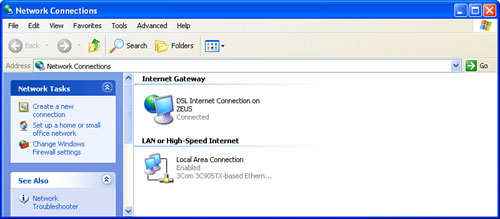
Contrast this with the Network Connections window for a client machine on the same network, shown in Figure 2. In this case, there are only two items:
| DSL Internet Connection on ZEUS | This
icon represents the connection to the ICS host (which Windows XP
considers to be the Internet gateway). In this case, it connects this
computer to the DSL Internet connection on a computer named ZEUS (the
ICS host for this network). |
| Local Area Connection | This
icon represents the connection to the network. That is, it’s the
connection that runs from the computer’s NIC to the network hub. |
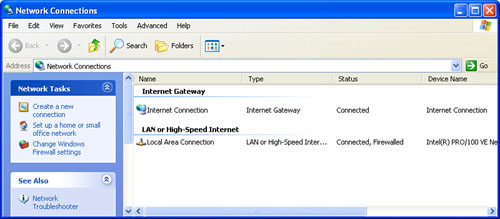
If your network uses a gateway device, the Network Connections window will look similar to the one shown in Figure 3, which has just two icons:
| Internet Connection | This icon represents the connection to the gateway device. |
| Local Area Connection | This
icon represents the connection to the network. That is, it’s the
connection that runs from the computer’s NIC to the network hub. |
From the Network Connections window, you can modify your network settings in the following ways:
Running the Network Setup Wizard—
If you want to make major changes to the network configuration, these
are most easily accomplished by running the Network Setup Wizard again.
In the task pane, click the Set Up a Home or Small Office Network link.
Tip
If you want to
change your computer or workgroup name, you can either run the Network
Setup Wizard or you can change these values directly. To do the latter,
launch Control Panel’s System icon and display the Computer Name tab.
Click Change, type the Computer name and/or workgroup, and then click
OK.
Renaming a connection— Windows XP supplies each connection with a generic name such as Local Area Connection To assign a more descriptive name to a connection, select it, press F2, type the new name, and press Enter.
Installing a networking client, service, or protocol—
You shouldn’t need extra networking components in a small peer-to-peer
network. Just in case you do, you can install them by right-clicking the
network connection, clicking Properties, and then clicking Install.
Disabling a connection—
If you have multiple NICs and want to disable one that you don’t use,
right-click its connection and then click Disable. You can enable this
connection in the future by right-clicking it and then clicking Enable.
