If the default views in Project 2010 don’t meet your
needs, you can make changes to an existing view or create your own by
choosing different display elements, such as a table, a group, or a
screen. You can create or edit a single view (in which one view is
displayed in the Project window) or a combination view (in which two
views are displayed in the Project window at one time).
Follow these steps to create or edit a single view:
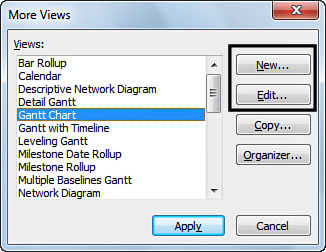
1. | On the View tab, in the Task Views or Resource Views group, click Other Views and then click More Views.
| 2. | If you are editing an existing view, click the name of the view in the list (as shown in Figure 1) and then click Edit. If you are creating a new view, click New.
| 3. | If you are creating a new view, on the Define New View dialog box, click Single view and then click OK. If you are editing an existing view, skip this step.
| 4. | On the View Definition dialog box, edit the following fields:
- Name— Type a name for the view.
- Screen— Choose what type of view you are creating. If you are editing an existing view, this option cannot be changed.
- Table— Choose what table you want to display in the view, if the view type you selected includes a table.
- Group—
Choose how you want to group data in the view, if the view type you
selected includes grouping. If you don’t want to group data, click No Group in the list.
- Filter—
Choose how you want to filter data in the view, if the view type you
selected includes filtering. If you don’t want to filter data, click All Tasks or All Resources in the list.
- Highlight filter— Select this check box to highlight the filtered data, instead of hiding data that doesn’t meet the filter criteria.
- Show in menu— Select this check box to include the view in the corresponding menu on the View tab. For example, if the view type (Screen) is Gantt Chart, the view will appear in the list when you click Gantt Chart on the View tab.
|
Customizations made to
individual views are specific to those views. This includes bar and box
styles, as well as usage view data fields. For example, if you customize
the way Gantt bars appear in one view, when you create a new view or go
to another view that contains Gantt bars, the customizations will not
persist. You’ll need to customize the Gantt bars in that view, as well,
if you want them to appear the same.
|
| 5. | Click OK to save the view.
|
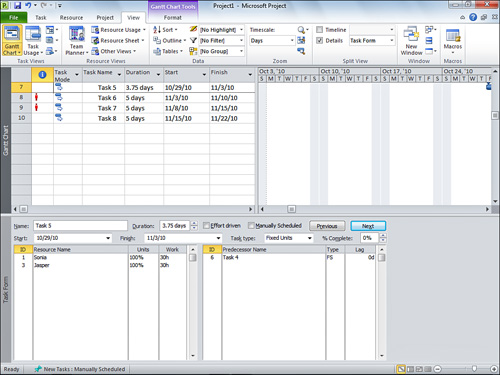
A combination view is a view in which two views are displayed in the Project window at one time. For example, the Task Entry view, shown in Figure 2, is a combination view. It displays the Gantt Chart view on the top portion of the screen, and the Task Form view on the bottom portion.
To create or edit a combination view, follow these steps:
1. | On the View tab, in the Task Views or Resource Views group, click Other Views and then click More Views.
| 2. | If you are editing an existing view, click the name of the view in the list and then click Edit. If you are creating a new view, click New.
| 3. | If you are creating a new view, on the Define New View dialog box, click Combination view and then click OK. If you are editing an existing view, skip this step.
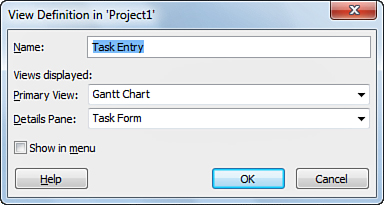
| 4. | On the View Definition dialog box, shown in Figure 3, edit the following fields:
- Name— Type a name for the view.
- Primary View— Choose the view you want to display in the top portion of the Project window.
- Details Pane— Choose the view you want to display in the bottom portion of the Project window.
- Show in menu— Select this check box to include the view in the corresponding menu on the View tab. For example, if the view type for the primary (top) view is Gantt Chart, the view will appear in the list when you click Gantt Chart on the View tab.
| 5. | Click OK to save the view.
|
Another way to save a custom view
is to first set up the Project window using the views and tables you
want. With your views set up, on the View tab, in the Task Views or Resource Views group, click Other Group and then click Save View. Type a name for the new view and then click OK.
|
