Depending on Group Policy settings, end users of
Windows 7 computers in managed environments might be able to find and
install their own printers when needed.
1. Installing Printers Using the Add Printers Wizard
In addition to the new Network Printer Installation Wizard used in Print Management, the end-user Add
Printer Wizard is still available in Windows 7, and it has been
enhanced to allow users to easily add local, network, wireless, and
Bluetooth printers. This wizard is not needed when installing USB
printers, however, because the user can simply attach the printer to a
USB port on the computer and the printer is automatically installed.
Note:
In Windows 7, standard
users can install network printers without administrator credentials
provided the driver is safe (i.e., signed and packaged). If you see an
elevation prompt that says, "Do you trust this printer?" when you try to
install a printer, it is because the printer driver is not trustable.
Only local administrators can install an untrusted driver.
To start the Add Printer Wizard in Windows 7, follow these steps:
Click Start and select Devices And Printers.
Click Add Printer on the toolbar to start the Add Printer Wizard.
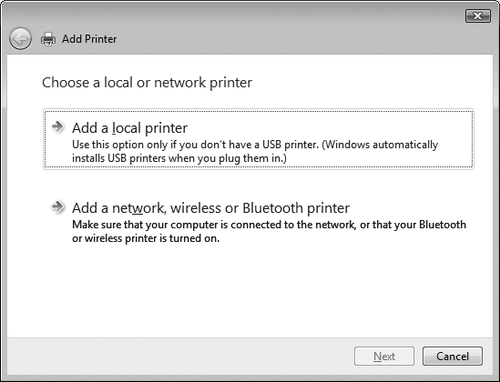
Do one of the following:
To install a local (non-USB) printer, click Add A Local Printer and specify the port, printer driver, and other information required by the wizard. Installing
a local printer manually like this is needed only for non–Plug and Play
printers. USB printers are detected and installed automatically when
they are connected to a USB port on the computer.
To
install a network, wireless, or Bluetooth printer, click Add A Network,
Wireless Or Bluetooth Printer, select the printer you want to install
from the list of found printers, and then click Next to install the
printer.
On a managed network where AD DS is deployed, the Add A Network, Wireless Or Bluetooth Printer option in the Add
Printer Wizard finds network printers published in AD DS as well as
available wireless Bluetooth printers. On an unmanaged network without
AD DS, selecting this option causes the Add Printer Wizard to scan the
local subnet for TCP/IP, WSD, wireless, and Bluetooth printers.
Note:
Network administrators can also
set the number and type of printers to find using Group Policy settings
found under Computer Configuration\Policies\Administrative
Templates\Printers. If you do not want a printer to show up, set the
number of printers of each type to 0 in either Add Printer Wizard –
Network Scan Page (Managed Network) or Add Printer Wizard – Network Scan
Page (Unmanaged Network).
2. Searching for Printers
After a printer is
published in AD DS, users can use the Add Printer Wizard to search for
network printers in AD DS and manually install a printer connection on
their computers so that they can print to the printer. To search for a
published printer to install, the user can follow these steps using
Printers in Control Panel:
Click Add A Printer on the toolbar of the Devices And Printers Control Panel item.
In
the Add Printer Wizard on the Choose A Local Or Network Printer page,
click Add A Network, Wireless Or Bluetooth Printer to display a list of
printers published in AD DS.
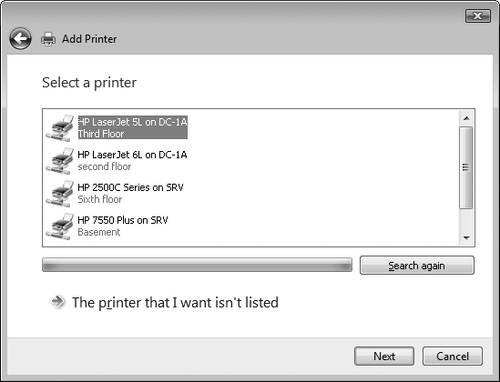
Select
the published printer for which you want to install a connection and
click Next to continue stepping through the wizard and install the
printer connection on the local computer.
If
the printer you want to install is not listed in the directory or if
the number of published printers displayed is very large and the user
wants to search for a specific type of printer in AD DS, click The
Printer That I Want Isn't Listed to open the Find A Printer By Name Or
TCP/IP Address page of the Add Printer Wizard.
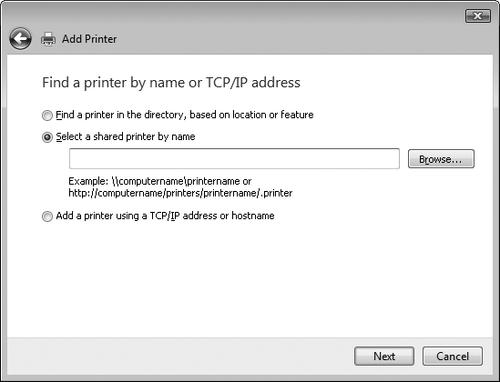
Select one of the following options:
To browse for a shared printer
using Network Explorer, select the Select A Shared Printer By Name
check box and then click Browse. You can also type the Universal Naming
Convention (UNC) path to the shared printer if you know the path.
To
install a printer connection to a stand-alone TCP/IP or WSD network
printer, select the Add A Printer Using A TCP/IP Address Or Hostname
check box and then click Next. Type the IP address or host name of the
printer, select Autodetect to automatically detect whether the printer
is TCP/IP or WSD type, select Query The Printer And Automatically Select
The Driver To Use, and then click Next to install a printer connection
to the network printer.
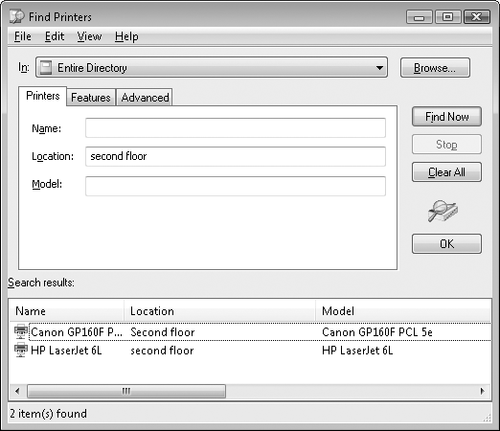
To
search AD DS for a printer that meets specified criteria, select the
Find A Printer In The Directory Based On Location Or Feature check box
and click Next to open the Find Printers dialog box. Specify the
criteria for the type of printer you want to search for and then click
Find Now to query AD DS. Double-click the desired printer to install a
printer connection for it.
You can control the maximum
number of printers of each type that the Add Printer Wizard will
display on a computer on a managed network by using the following Group
Policy setting:
Computer Configuration\Policies\Administrative Templates\Printers\Add Printer wizard - Network Scan Page (Managed Network)
Note:
Advanced users can also search for printers to install by opening a command prompt, typing rundll32 dsquery.dll,OpenQueryWindow, selecting Printers from the Find list box, and continuing as described in the preceding steps.
3. Installing Printers Using Point and Print
End users can also use Point
and Print to install printers over a network. When using Point and
Print, the print server sends the client computer the following
information concerning the printer being installed:
The name of the server on which printer driver files are stored
Printer model information that specifies which printer driver to install
The actual printer driver files needed by the client
End users can install printer
connections using Point and Print by browsing Network Explorer to find a
print server, double-clicking the print server to display its shared
printers, right-clicking a shared printer, and then clicking Connect. If
a driver for the printer is not found in the driver store on the local
computer, the user will need administrator credentials to respond to the
UAC prompt that appears when the driver is being copied from the print
server to the local computer.
4. Using Devices And Printers
Once a printer is installed, you can begin configuring and using it with the Devices
And Printers user interface. Devices And Printers is a new feature in
Windows 7 that provides users with a single, central location where they
can install and manage all of the devices connected to their computer.
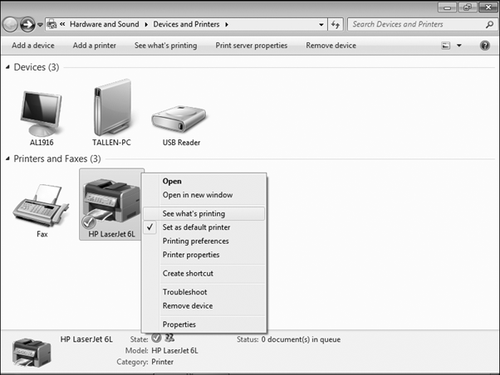
Selecting a printer in
Devices And Printers causes additional toolbar buttons to appear on the
Devices And Printers toolbar (shown in Figure 1). These toolbars, along with the context menu that appears when you right-click the printer, let you perform a number of client-side management tasks for the selected printer, including:
See What's Printing Opens the print queue for the selected printer and displays documents currently being printed and pending print jobs.
Print Server Properties Lets you configure settings on the print server if you have permissions to do so.
Set As Default Printer
Sets the printer as the default printer for the user's computer. (Note
that some client applications can maintain their own default printer
setting that overrides the one set here.)
Printing Preferences Allows the user to select page layout and paper/quality options for the printer.
Printer Properties Lets the user configure different properties of the printer.
Troubleshoot Lets the user start the Printer Troubleshooter to identify and resolve any issues when printing to the printer.
Remove Device Removes the printer from the user's computer.
Additional toolbar buttons
or context menu options might be available depending on the type of
printer installed. In addition, if the computer running Windows 7 is a
laptop computer and connects to more than one network, the user can use
the new Location-Aware Printing feature of Windows 7 to assign a
different default printer to each connected network. For more
information about this new feature, see the next section titled Section 18.5.5. Devices
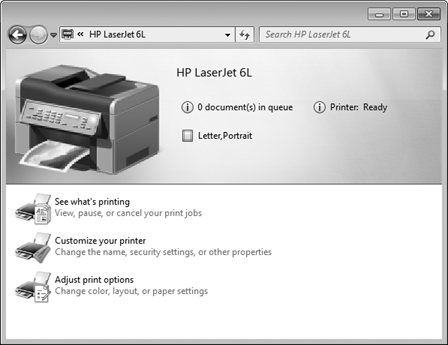
And Printers also integrates with Device Stage, a new feature of
Windows 7 that makes it easier for users to connect, recognize, and use
their devices. When a printer supports Device Stage, you can simply
double-click the printer's icon in Devices And Printers to display the
Device Stage user interface for the printer, which is designed to make
the printer easier to manage and use (see Figure 2).
Note:
Local administrator
credentials for the computer are required to share a printer displayed
in Devices And Printers. These credentials are required so that the end
user can respond to the UAC prompt that appears when this action is
selected. End users who have local administrator credentials on the
computer can also use the Network And Sharing Center to turn on printer
sharing and automatically share installed printers for other network
users to use.
5. Using Location-Aware Printing
Location-Aware Printing is a
new feature of Windows 7 that lets a user assign a different default
printer to each network to which the user's computer connects.
Location-Aware Printing is supported only on mobile computers running
Windows 7 and is different from assigning printers based on location, a
feature that was introduced in Windows Vista to allow administrators to
deploy different printers using Group Policy based on the AD DS site in
which the target computers reside.
Location-Aware Printing is
introduced in Windows 7 because of the increasing importance of mobile
computers to enterprises. A typical scenario in which this feature is
useful might be the following:
Karen
is supplied with a new laptop computer from her company, Contoso Ltd.
While at work, she adds a printer connection to a work printer via the
Add Printer Wizard. The printer is set automatically as the default for
her work network.
Later in the day, she adds a USB printer at home. That printer is set automatically as the default for her home printer.
When she comes back to work the next day, she sees that the printer connection to the work printer is set as the default for her.
When she returns home again, her home printer is once again the default.
The result of implementing
this feature is that whenever Karen is at work, her work printer is her
default printer, and whenever she is at home, her home printer becomes
the default. In other words, Karen doesn't have to switch her default
printer every time she switches networks, as she did in previous
versions of Windows. Instead, she can simply start printing to the most
appropriate printer without needing to set up or configure anything as
she moves from network to network.
When Location-Aware
Printing is available on a computer running Windows 7, an additional
button named Manage Default Printers will be displayed on the toolbar of
Devices And Printers. By clicking this button, the user can configure
default printers for each connected network. There is also a new link on
the final window of the Add Printer Wizard that will take you to Manage
Default Printers.
For more information on how
Location-Aware Printing works, see the following sidebar titled "Direct
from the Source: Location-Aware Printing and Network Location
Awareness."
|
Location-Aware Printing and Network Location Awareness
CSS Global Technical Readiness (GTR) Team
Location-Aware
Printing depends on the Network Location Awareness service and the
Network List Service to determine the network, or networks, to which the
laptop is currently connected.
Using the Network List
Manager APIs, you can enumerate either networks or network connections.
For this feature, networks are enumerated, so if a user is connected to
a managed corporate network, whether via a wired or wireless
connection, the same corporate domain network is detected regardless of
the specific network connection used.
However, if a user is connected to
different wired and wireless networks, the conflict is resolved using
the following order of precedence for choosing one of multiple networks
as an active one:
A wired network connection to a managed network. (Wired networks are always saved by default.) All
WLAN networks that the user has saved or unsaved. (Wireless networks
are not saved by default. Saved networks show up in Control
Panel\Network and Internet\Manage Wireless Networks.) A wired network connection to any unmanaged network.
|
6. Using the Color Management CPL
Windows XP includes support for Image Color Management (ICM) 2.0 to ensure that colors printed from a color printer are accurately reproduced. Beginning with Windows Vista, ICM functions have been enhanced to use WCS,
which provides applications with the ability to perform wide-gamut,
high-dynamic-range color processing of spool file data in a way that
exceeds the possibilities of ICM in previous versions of Windows.
Windows Vista and later
versions also include a Color Management CPL that end users can use to
manage the following aspects of color printing:
Add or remove color profiles and specify a default color profile for each printer and display device used by the local computer
Configure advanced color management settings to ensure accurate display or printing of color information
For more information on using
the Color Management CPL, open Color Management in Control Panel and
click Understanding Color Management Settings on the Devices tab to
access Help And Support information on this topic.
