Data encryption is a way to increase data security.
Encryption is the process of translating data into code that is not
easily accessible to users other than the person who encrypted the data.
Once data has been encrypted, you must have the correct key (SID
number) to decrypt the data. Unencrypted data is known as plain text,
and encrypted data is known as ciphertext.
The Encrypting File System (EFS)
is the Windows 7 technology that is used to store encrypted files on
NTFS partitions. Encrypted files add an extra layer of security to your
file system. A user with the proper key can transparently access
encrypted files. A user without the proper key is denied access. If the
user who encrypted the files is unavailable, you can use the data
recovery agent (DRA) to provide the proper key to decrypt folders or
files. The following EFS features are among those included with Windows
7:
Automatically color-codes encrypted files in green text so you can easily identify files that have been encrypted
Support so that offline folders can also be encrypted
A shell user interface (UI) that is used to support encrypted files for multiple users
Control over who can read the encrypted files
In the following sections,
you will learn how to encrypt and decrypt data, how to create and manage
DRAs, how to recover encrypted files, how to share encrypted files, and
how to use the Cipher utility.
1. Encrypting and Decrypting Folders and Files
To use EFS, a user specifies
that a folder or file on an NTFS partition should be encrypted. The
encryption is transparent to users. However, when other users try to
access the file, they will not be able to unencrypt it—even if those
users have Full Control NTFS permissions. Instead, they will receive an
error message.
NOTE
Windows 7 does not allow
you to have a folder or file compressed and encrypted at the same time. A
feature included with Windows Server 2003 and Windows Server 2008 is
support for concurrent compression and encryption.
In Exercise 1, you will use EFS to encrypt a folder. Before encrypting any data, you will create a new user.
To create a new user, select Start => Control Panel => System And Maintenance => Administrative Tools. Under System Tools, expand Local Users And Groups and right-click the Users folder. Choose New User. Create
a new user named Paige and make her password P@ssw0rd. Deselect the
User Must Change Password At Next Logon option for this user. Click
Create. Close Computer Management. Select Start and type Explorer in the Search box. In
Windows Explorer, find and select a folder on the C: drive. The folder
you select should contain files. Right-click the folder and select
Properties. On the General tab of the folder's Properties dialog box, click the Advanced button. In the Advanced Attributes dialog box, check the Encrypt Contents To Secure Data option. Then click OK. In
the Confirm Attribute Changes dialog box (if this dialog box does not
appear, click the Apply button in the Properties dialog box to display
it), select Apply Changes To This Folder, Subfolders And Files. Then
click OK. Log off as Administrator and log on as Paige. Open
Windows Explorer and attempt to access one of the files in the folder
you encrypted. You should receive an error message stating that the file
is not accessible. Log off as Paige and log on as Administrator.
|
To decrypt folders and files, repeat the steps in Exercise 3.10, but uncheck the Encrypt Contents To Secure Data option in the Advanced Attributes dialog box.
The problem here is that the
user who encrypts the data is the only one who can open the files. But
the owner of the data can share the encrypted files with other users. In
the next section, we will look at how to share your encrypted data with
other users.
2. Managing EFS File Sharing
In Windows 7, it is
possible to share encrypted files with another person or between two
computers. To share encrypted files, you must have a valid EFS
certificate for the user who should have access to the file. By
implementing EFS file sharing, you provide an additional level of
recovery in the event that the person who encrypted the files is
unavailable.
Complete Exercise 2 to implement EFS file sharing.
Encrypt the file if it is not already encrypted (see Exercise 3.10 for the steps involved). Through Windows Explorer, access the encrypted file's properties. At the bottom of the dialog box, click the Advanced button. The
Advanced Attributes dialog box appears. In the Compress Or Encrypt
Attributes section of the Advanced Attributes dialog box, click the
Details button, which brings up the Encryption Details dialog box. In
the Encryption Details dialog box, click the Add button to add any
additional users who should have access to the encrypted file (provided
they have a valid certificate for EFS in Active Directory or that you
have imported a valid certificate onto the local computer). Close the Properties box for the folder.
|
Someone may have encrypted
files or folders and then left the company. There are a few different
ways to unencrypt the data, as you'll see in the next section.
3. Using the DRA to Recover Encrypted Data
If a user who encrypted
folders or files is unavailable or no longer with the company and you
need to decrypt the folders or files, you can use the data recovery
agent (DRA) to access the encrypted files. DRAs are implemented
differently depending on the version of your operating system and the
configuration of your computer;
For
Windows 7 computers that are a part of a Windows 2008 Active Directory
domain, the domain Administrator user account is automatically assigned
the role of DRA.
For
Windows 7 computers that are installed as stand-alone computers or if
the computer is a part of a workgroup, no default DRA is assigned.
You should use extreme
caution when using EFS on a stand-alone Windows 7 computer. If the key
used to encrypt the files is lost, there is no default recovery process,
and all access to the files will be lost.
3.1. Creating a DRA on a Stand-Alone Windows 7 Computer
If Windows 7 is installed on a
stand-alone computer or on a computer that is part of a workgroup, then
no DRA is created by default. To manually create a DRA, you use the
Cipher command-line utility as follows:
Cipher /R:ifilename
The /R switch is used to generate two files, one with a .pfx filename extension and one with a .cer extension. The PFX file is used for data recovery and the CER file includes a self-signed EFS recovery agent certificate.
The CER file (self-signed
public key certificate) can then be imported into the local security
policy and the PFX file (private key) can be stored in a secure
location. Cipher is explained further in the next section.
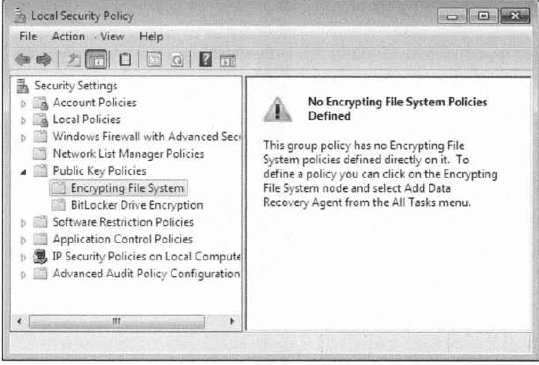
Once you have created the public and private keys to be used with EFS, you can specify the DRA through Local Security Policy, using the steps in Exercise 4.
Through
Local Security Policy, which can be accessed through Administrative
Tools or the Local Computer Policy MMC snap-in, expand Public Key
Policies and then Encrypting File System.
Right-click Encrypting File System and select Add Data Recovery Agent. The Add Recovery Agent Wizard starts. Click the Next button to continue. The Select Recovery Agents screen appears. Click the Browse Folders button to access the CER file you created with the Cipher /R:filename command. Select the certificate and dick Next.
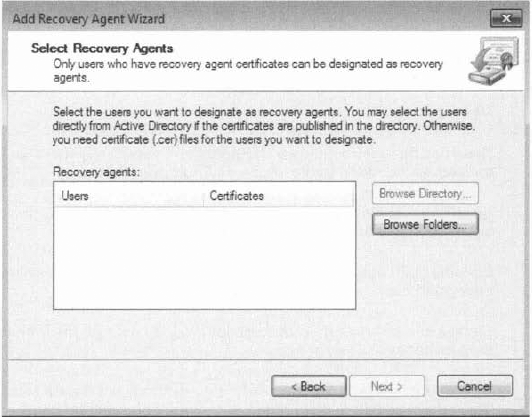
The Completing The Add Recovery Agent Wizard screen appears. Confirm that the settings are correct and click the Finish button.
|
You will see the data recovery
agent listed in the Local Security Settings dialog box, under Encrypting
File System. Let's continue our look at encryption with a discussion of
recovering encrypted files in the next section.
4. Recovering Encrypted Files
If the DRA has the private key to the DRA certificate (that was created through Cipher /R:filename),
the DRA can decrypt files in the same manner as the user who originally
encrypted the file. Once the encrypted files are opened by a DRA, they
are available as unencrypted files and can be stored as either encrypted
or unencrypted files.
4.1.
3.7.4.1.1. Using the Cipher Utility
Cipher is a command-line
utility that can be used to encrypt files on NTFS volumes. The syntax
for the Cipher command is as follows:
Cipher /[command parameter]" [filename]
Table 1 lists common command parameters associated with the Cipher command.
Table 1. Cipher command parameters
| Parameter | Description |
|---|
| /E | Specifies that files or folders should be encrypted. Any files that are subsequently added to the folder will be encrypted. |
| /D | Specifies that files or folders should be decrypted. Any files that are subsequently added to the folder will not be encrypted. |
| /S:dir | Specifies that subfolders of the target folder should also be encrypted or decrypted based on the option specified. |
| /I | Causes any errors that occur to be ignored. By default, the Cipher utility stops whenever an error occurs. |
| /H | By
default, files with hidden or system attributes are omitted from
display. This option specifies that hidden and system files should be
displayed. |
| /K | Creates a new certificate file and certificate key. |
| /R | Used to generate a recovery agent key and certificate for use with EFS. |
| /X | Used to back up the EFS certificate and key into the specified file name. |
Exercise 5
will show you how to use the Cipher utility to encrypt files. Make sure
that you have encrypted a folder on the C: drive before completing
these steps.
Select Start => All Programs => Accessories => Command Prompt. In the Command Prompt dialog box, type C: and press Enter to access the C: drive. From the C:\> prompt, type cipher. You will see a list of folders and files and the state of encryption. The folder you encrypted should be indicated by an E. Type MD TEST and press Enter to create a new folder named Test. Type cipher /e test and press Enter. You will see a message verifying that the folder was encrypted.
|
