The Disk Management utility is a Microsoft Management
Console (MMC) snap-in that gives administrators a graphical tool for
managing disks and volumes within Windows 7. In this section, you will
leatn how to access the Disk Management utility and use it to manage
basic tasks, basic storage, and dynamic storage. You will also learn
about troubleshooting disks through disk status codes.
But before we dive into the
Disk Management utility, let's take a look at the Microsoft Management
Console (MMC). It is important to understand the MMC since Disk
Management (like many other tools) is actually a MMC snap-in.
1. Using the Microsoft Management Console
The Microsoft Management Console (MMC)
is the console framework for application management. The MMC provides a
common environment for snap-ins. Snap-ins are administrative tools
developed by Microsoft or third-party vendors. Some of the MMC snap-ins
that you may use are Computer Management, Active Directory Users and
Computers, Active Directory Sites and Services, Active Directory Domains
and Trusts, and DNS Management.
Knowing how to use and
configure the MMC snap-ins will allow you to customize your work
environment. For example, if you are in charge of Active Directory Users
and Computers and DNS, you can add both of these snap-ins into the same
window. This would then allow you to open just one application to
configure all your tasks. The MMC offers many other benefits:
The MMC is highly customizable—you add only the snap-ins you need.
Snap-ins use a standard, intuitive interface, so they are easier to use than previous versions of administrative utilities.
You can save MMC consoles and share them with other administrators.
You
can configure permissions so that the MMC runs in authoring mode, which
an administrator can manage, or in user mode, which limits what users
can access.
You can use most snap-ins for remote computer management.
As shown in Figure 1,
by default the MMC console contains three panes: a console tree on the
left, a details pane in the middle, and an optional Actions pane on the
right. The console tree lists the hierarchical structure of all snap-ins
that have been loaded into the console. The details pane contains a
list of properties or other items that are part of the snap-in that is
highlighted in the console tree. The Actions pane provides a list of
actions that the user can access depending on the item selected in the
details pane.
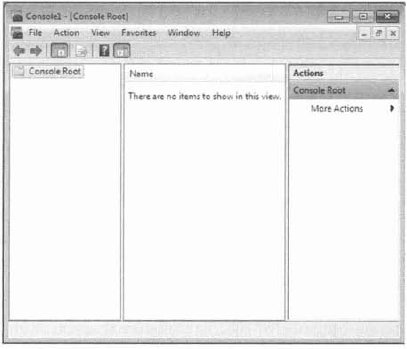
On a Windows 7 computer, to
open the MMC, click the Start button and type MMC in the Search dialog
box. When you first open the MMC, it contains only the Console Root
folder, as shown in Figure 1.
The MMC does not have any default administrative functionality. It is
simply a framework used to organize administrative tools through the
addition of snap-in utilities.
The first thing that you
should decide when using the MMC is the different administrative mode
types. You need to decide which mode type is best suited to use for your
organization.
1.1. Configuring MMC Modes
You can configure the MMC to run
in author mode, for full access to the MMC functions, or in one of
three user modes, which have more limited access to the MMC functions.
To set a console mode, while in the MMC editor, select File => Options to open the Options dialog box. In this dialog box, you can select from the console modes listed in Table 1.
Table 1. MMC console modes
| Console Mode | Description |
|---|
| Author mode | Allows use of all the MMC functions. |
| User mode-full access | Gives users full access to window management commands, but they cannot add or remove snap-ins or change console properties. |
| User mode-limited access, multiple window | Allows
users to create new windows but not close any existing windows. Users
can access only the areas of the console tree that were visible when the
console was last saved. |
| User mode- limited access, single window | Allows
users to access only the area s of t he console tree that were visible
when the console was last saved, and t hey cannot create new windows. |
After you decide which administrative role you are going to run, it's time to start configuring your MMC snap-ins.
3.3.1.2. Adding Snap-Ins
The biggest advantage of
using the MMC is to configure snap-ins the way your organization needs
them. Adding snap-ins is a very simple and quick procedure. To add
snap-ins to the MMC console and save it, complete Exercise 1.
To start the MMC editor, click Start, type MMC into the search box, and press Enter. From the main console window, select File => Add/Remove Snap-In to open the Add/Remove Snap-In dialog box. Highlight the snap-in you want to add, and click the Add button.
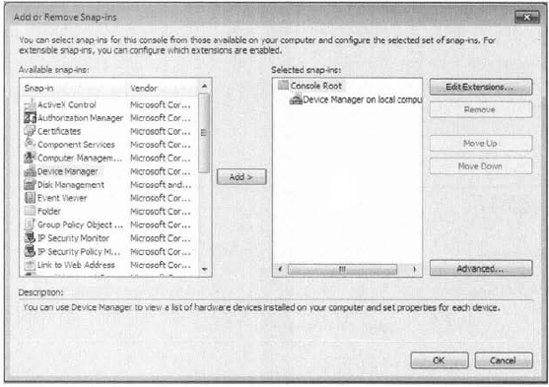
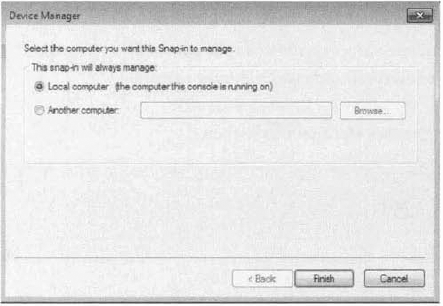
If
prompted, specify whether the snap-in will be used to manage the local
computer or a remote computer. Then click the Finish button.
Repeat steps 2 and 3 to add each snap-in you want to include in your console. When you have finished adding snap-ins, click OK. Click OK to return to the main console screen. After you have added snap-ins to create a console, you can save it by selecting File => Save As and entering a name for your console.
|
You can save the console to
a variety of locations, including a program group or the Desktop. By
default, custom consoles have an .msc filename extension.
Many applications that are MMC
snap-ins, including Disk Management, are already configured for you
under the Administrative Tools section of Windows 7, Next let's take a
look at the Disk Management utility.
